Find you graphic card

How to easily find out what graphics card you have for Windows 10 and MAC

If quarantine is working and you’ve caught yourself going from the kitchen to the room at least 60 times a day just because you don’t have something to do, maybe video games are a slightly more active alternative, at least for the brain. And before you download 90GB Call of Duty Warzone and draw lots if your computer can handle it or not you probably need to see what graphics card you have before, here’s how to do it:

[td_block_ad_box spot_id=”custom_ad_2″]

Check the graphics card you have easily:

At Windows 10

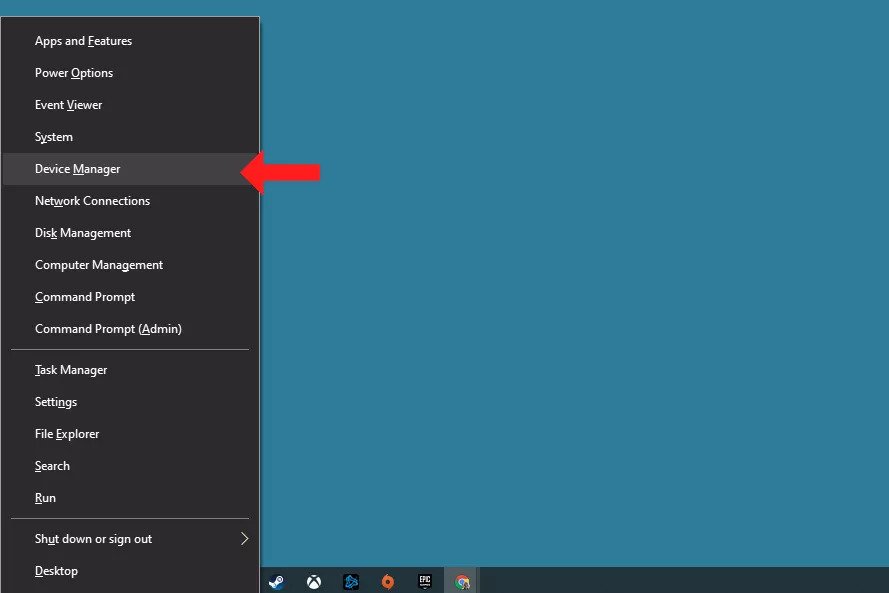
  • Press the “Windows + X” keyboard shortcut and in the list that appears select “Device Manager“.
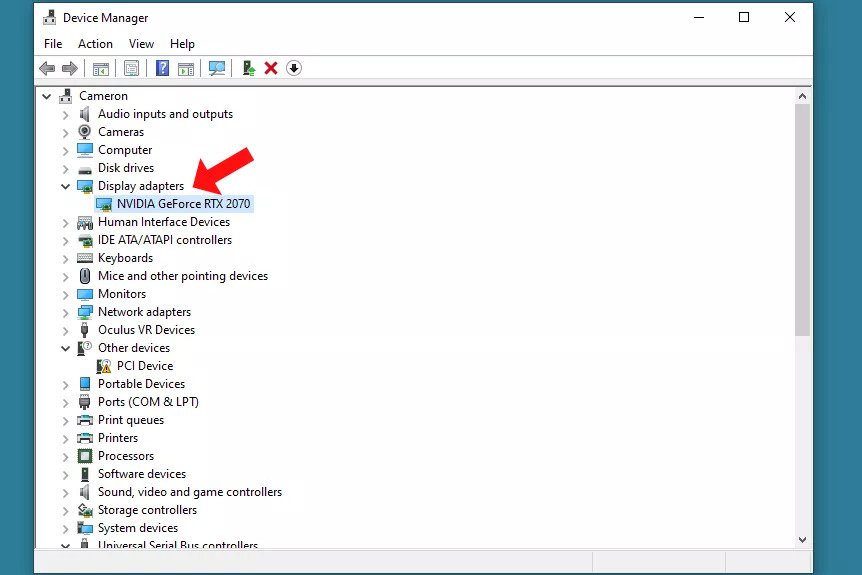
  • Find the “Display adapters” section, and then click 2 times to see what your PC uses for graphics.
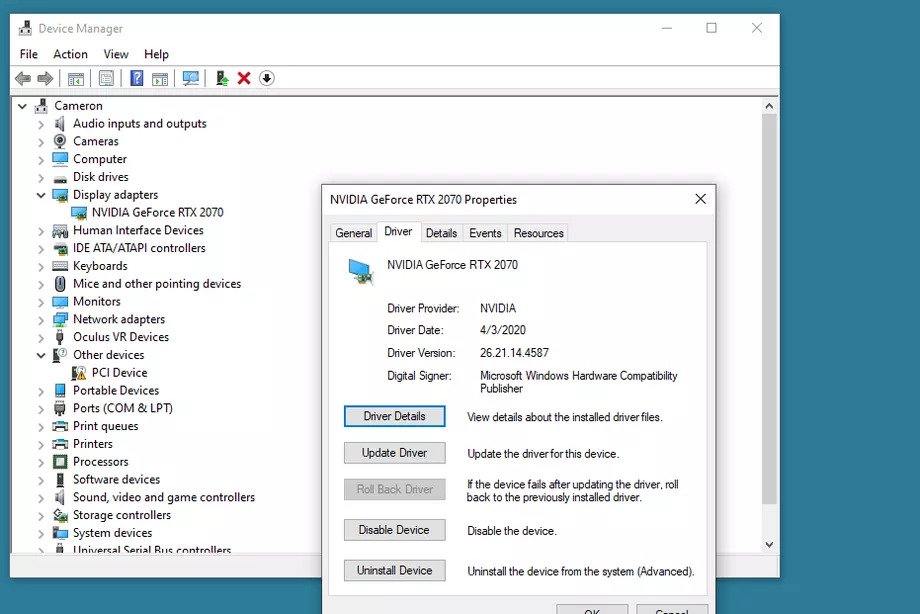
  • If you need more information, double-click on what appears below “Display adapters” to see “drivers” or other info.
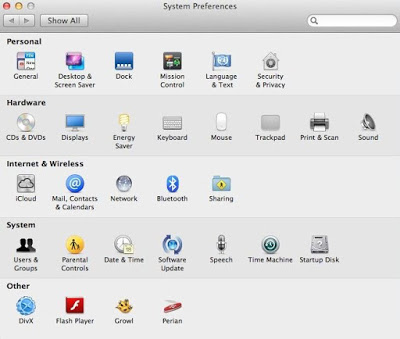
On MAC

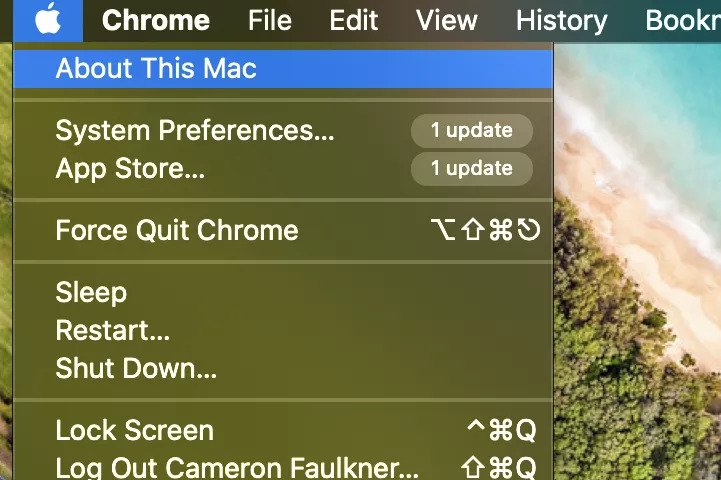
  • Click the “Apple” logo at the top left and select “About This Mac“.
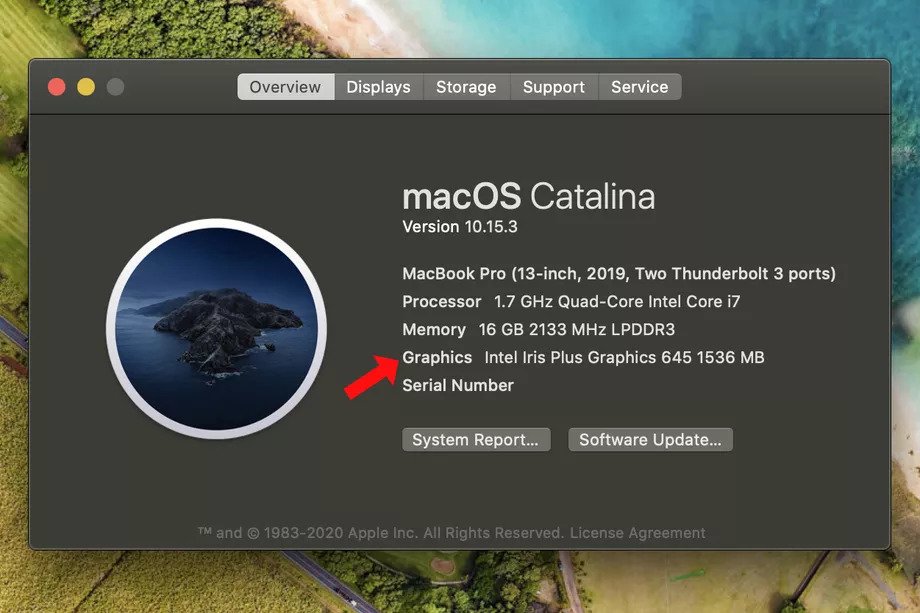
  • The next window gives you the full information. The penultimate line above the “Serial Number” shows what your computer is using for graphics.
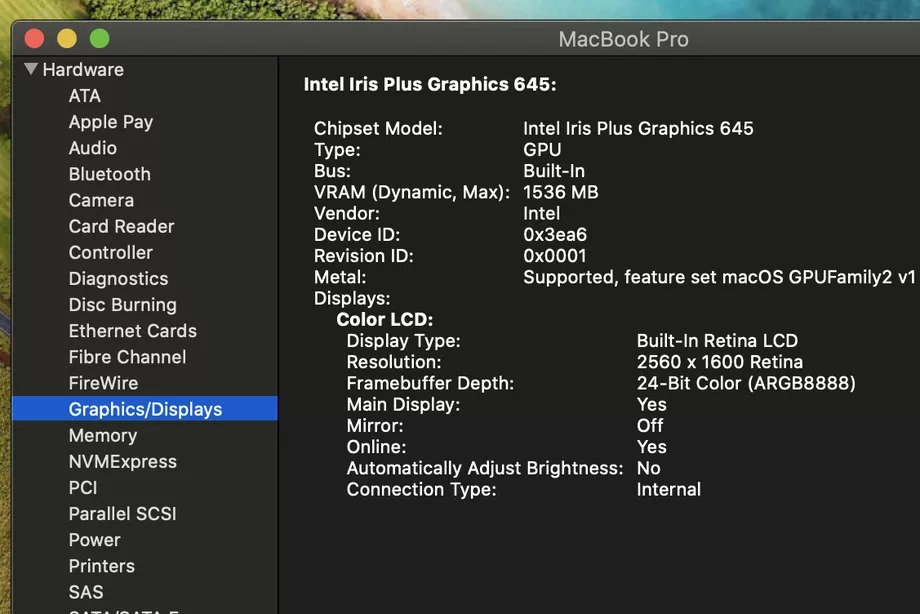
  • For more detailed information, click “System Report” from there select “Graphics/Displays” and you’re done.

> Check Next: Windows 10 Tips & Tricks: Top Best Most Useful Features in Windows 10 

Once you have seen the settings of your computer you will have a clearer idea of ​​what it is capable of doing and possibly save yourself a few hours and MB download. Hope you found this article useful, follow us on twitter and facebook for more news and updates.

neoAdviser

[td_block_11 category_id=”3″ limit=”1″ td_filter_default_txt=”” tdc_css=””][td_block_ad_box spot_id=”custom_ad_3″ tdc_css=””]
Partition A Hard Disk Without Formatting

How To Partition A Hard Disk Without Formatting (Three Methods)

Usually we do a partition of our hard disk drive during the process of formatting the computer while we install a fresh OS. However, for some reason you may need to do this process without going through the installation on a new OS. So, for this, in this post we are going to share a guide to repartition your hard drive, like shrink or extend the space, without formatting. So follow this tricks on how to partition your Hard Disk Without Formatting easily.

[td_block_ad_box spot_id=”custom_ad_2″]

> Check Out: How To Find Serial Key of Any Software (2020 Google Hack)

Steps to Partition Your Hard Disk Without Formatting 

We all want different partitions of our Disk drive to store different files in each of then. So, we go through the process of fascinating from one drive and we crate a new partition with the shrunk space. For ex. if we have a drive of 200GB and we suppose that 80GB is full and the rest 120GB is free, we can do a shrink of 100GB and create a new partition drive. In this way, now we will have to drivers with 100GB each.

To now more about how to do this, follow the guide below on How To Partition A Hard Disk Without Formatting. We will use the different ways.

Method #1. Partition A Hard Disk: – Windows

Step 1. On windows click Search then type “diskmgmt” (remove quotes) then press enter. A disk management window will appear.

Partition A Hard Disk: - Windows
Partition A Hard Disk: – Windows

Step 2. in this tab can see all your drives that are being currently available. Choose the one of drives which you want to shrink or extend. To shrink, a drive and creating a new one there must be some free space on that particular drive. Then right-click on the drive letter which you want to shrink or take out free space. Select shrink volume, & then a little process will go on.

Partition A Hard Disk: – Windows

Step 3. Here you will be able to see the current size of your drive, free space and size which you want to shrink. Now jut  enter the amount of space that you want to free, just make sure that size to not exceed the free space. Than lick shrink button.

Partition A Hard Disk: – Windows

Step 4. At the disk management window you will see an unallocated space at the right bottom corner. Right-click on it and click New Simple Volume.

Partition A Hard Disk: – Windows

Step 5. Now you will taken to “New Simple Volume Wizard” from here you need to create a partition. Click “Next” to continue.

Partition A Hard Disk: – Windows

Step 6. On the next page, specify the volume size. You just need to add the volume size. Enter the volume and then click on next.

Partition A Hard Disk: – Windows

Step 7. Now assign to the drive a letter. Drop down and just select a letter of your choice.

Partition A Hard Disk: – Windows

Step 8. You will be taken now to “Format Partition” page. Select simply the File system to “NTFS” then Enter the name of your new drive and hit the “Next”.

Partition A Hard Disk: – Windows

Step 9. Finally it will format and you will see the summary window of the newly created drive. Click simply on “Finish” and enjoy.

Partition A Hard Disk: – Windows

So, in this way you can easily .Partition A Hard Drive without formatting. This process is the same for all versions of windows like windows 7, 8, 10.

In the same way, when your driver gets overloaded, you can easily enlarge the size of that particular drive. For that situations, you can shrink one drive an make some space unallocated and then simply use that space for extending that drive.

> Check Out: How To Create WiFi Hotspot In Windows/Mac/Linux OS

Method #2. Partition A Hard Disk Using AOMEI Partition Assistant Professional

Step 1. First, download AOMEI Partition Assistant on your computer. Download and install it.

Step 2. Open the app to see the list of all the hard disk partition there.

Step 3. Than, select the driver that you want to repartition. Click on the drive simply and then select “Resize Partition” from the right-click menu.

Partition A Hard Disk Using AOMEI Partition Assistant Professional

Step 4. Here you need Simply use the drag method to resize the volume of the partition. Then free up some space from the partition to get some unallocated space.

Step 5. Right click on the unallocated space, select “create partition” option to create another partition to the hard drive, click on ‘Apply’ to make the changes.

> Check Out: Top 5+ Best Free Screen Recorder For Windows 10 

Method #3. Partition A Hard Disk Using EaseUS Partition Master

EaseUS Partition Master is available for Windows OS and is a leader in disk partition management. It easily allows the creating of disk partitions and managing the data storage space. So here’s is how to use EaseUS Partition Master to manage disk partitions on your  Windows PC.

  • Step 1. First, download and install EaseUS Partition Master form this link.
  • Step 2. Once done, open the software and you will see a screen like below
EaseUS Partition Master Interface
  • Step 3. To make a new partition, first you need to resize the existing partition. To do so, “right-click” at that partition you want to shrink and choose “Resize/Move” form the drop-down menu.
EaseUS Partition Master Shrink Partition
  • Step 4. Adjust the size as for your requirements then drag the target partition into the unallocated space.
  • Step 5. When done, right-click at the ‘Unallocated Space’ and choose “Create
Create Unallocated Space
EaseUS Partition Master: Create Unallocated Space
  • Step 6. Finally, set the partition size, label, drive letter, file system, etc. and when done just click “OK” to create your partition.

> Read Next: How to Find Your Windows 10 Product Key (Using CMD & Windows Registry)

So that’s all! You have now knowledge on how you can partition a hard disk without formatting. Congrats!

Note: Don create partition more than 5-6 as it may corrupt your windows. Also it is good to have more than 1 partition so when install a new Windows OS you don’t have to lose your data on one particular partition. So, that’s all about How To Partition A Hard Disk Without Formatting. Hope you found this guide useful. Please let us know your thoughts in the comment section below,follow us on twitter and facebook for more news and updates.

neoAdviser 

[td_block_11 category_id=”3″ limit=”1″ td_filter_default_txt=””][td_block_ad_box spot_id=”custom_ad_3″]
Tab Groups Google Chrome-min

Google Chrome’s new Tab Groups: Here’s how to enable and use it!

Google has given Chrome users enough reason to give up the browser including controversial changes, security issues and privacy concerns. But recently Google introduced a new feature enough as a reason to stay. After a 360-degree turn last month, Google recently launched Chrome 81, which brought in Tab Groups and is the biggest change in how Chrome has been running for 11 years since its launch. As the name suggests, Tab Groups are the new way to organize the many tabs you have opened at once in Chrome and it’s easy. Here’s how to group tabs in Google Chrome:

[td_block_ad_box spot_id=”custom_ad_2″ tdc_css=””]

How to group tabs in Google Chrome

Chrome 81 is available for Windows, Mac and Linux from now on. As the name suggests, Tab Groups are the new way to organize the many tabs you have opened at once in Chrome and it’s easy:

  • First, update to the latest version of Chrome. Go to Settings>About Chrome.
  • Next, create a new tab group, right-click a tab and select “Add to new group option. Note: if you don’t see this option, you might not have the feature yet and if you still want to use Tab Groups, enable it at chrome://flags.
  • Some tabs will change colors to indicate their group and a dot will appear as the group header.
  • To add tabs to a group, right-click each tab and select Add to the existing group or drag the tabs and drop them. To remove tabs from groups use this same drag-and-drop method.
  • Change a group name, simply clicking the group. Here, you can change the color of the group.

As you see the new Tab Groups feature has many customization options available. By clicking on the tab title you can select colors, remove tabs from the group, and close all tabs in the group. You can also switch tabs from one group to another.

Tab groups will change the way you use Chrome. You will no longer need to keep multiple windows open for different projects because they can all coexist in a single one.

> Check next: WhatsApp Group Calls: How to Make Group Calls on WhatsApp (Android & iOS)

So what do you think about this? Let us know your thoughts in the comments section below, follow us on twitter and facebook for more news and updates.

neoAdviser

[td_block_11 category_id=”3″ limit=”1″ td_filter_default_txt=”” tdc_css=””][td_block_ad_box spot_id=”custom_ad_3″ tdc_css=””]
How to Find Direct Download Link Of Any Movie (Two Methods)

How to Find Direct Download Link to Any Movie (Two Methods)

If you do love movies, like me, then i’m sure that you found yourself online many times searching for the direct download link of your favorite movie. The popularity of movies fans in these days has grown and many of than are searching to download the latest movies cos not of than have time to go and watch then in cinema. But many times when we search for the direct download link of a movie we have faced a spam or an AD link. Today, in the article below, we will share to you a really simple trick with google search so you can easily find the Direct Download Link Of Any Movie. If you are interested to know more about how to find the Direct Download Link Of Any Moviethan follow the article below. We are going to share two simple methods along with some latest updated tips.

[td_block_ad_box spot_id=”custom_ad_2″]

> Check Out: Top 20+ Best Websites to Watch Free Movies Online

How to Find Direct Download Link to Any Movie (Two Methods)

So, to avoid this, we are going to share an amazing trick from which you will be able to easily find the direct download link of any of your favorite movie. For this we are going to share to great google search tricks that we will help you with just one simple click to find easily the direct download link of your favorite movie.

Steps Find Direct Download Link To Any Movie

This google trick is amazing and pretty simple and with just a single click you will get the exact URL that the movie is stored on the servers.

Method 1. – Find Direct Download Link To Any Movie 

Step 1. Launch the web browser on the device.

Step 2. Next put the name of the movie that you want to download, after the name copy and paste the below code.

Movie Name -inurl:(htm|html|php|pls|txt) intitle:index.of “last modified” (mp4|wma|aac|avi)

Method 1 - Find Direct Download Link To Any Movie 
Method 1 – Find Direct Download Link To Any Movie

Like e.x :- Now You See Me -inurl:(htm|html|php|pls|txt) intitle:index.of “last modified” (mp4|wma|aac|avi)

Step 3. Now browse through google search results on the first or second page to find the direct link download of that movie.

Method 1 – Find Direct Download Link To Any Movie

Method 2. – Find Direct Download Link To Any Movie

Step 1. Go to Google and copy the code below:

intitle:index.of? mkv 

Method 2: Find Direct Download Link To Any Movie

Step 2. After pasting the code above to google.com, jut put the name of the movie you want after the code like Avengers:

intitle:index.of? mkv Avengers 

Method 2: Find Direct Download Link To Any Movie

Step 3. Type enter and a list will be displayed that may or may not contain the one you are searching. Just type Ctrl+F to find the direct link of your movie.Than just click the link and the download will start.

Method 2: Find Direct Download Link To Any Movie

That’s all, Congrats! You can search you movie in other format just by simply replacing the Mkv to your wanted format.

Other Tricks To Find direct download Link of any Movie

There are also more Google tricks over the internet that will help you to find the direct download link of any movie. You will only need to play around with Google Search. Below are some tricks that will help you to do so:

#1. Using Multiple keywords under asterisks

Using this method all you need is to enter multiple keywords related to the movie. Most movies are in .mp4 format So below in the screenshot you can see that we have searched for “.mp4” , but you can do the same in other keywords like:

“Dangal” “Movie” “download” “.mkv”
Using Multiple keywords under asterisks

> Check Out: Top 10+ Best Free Live TV Apps for Android & iOS 

#2. Using the Download Now Keyword

This time Google will show the results of the sites which have the “Download Now” written. Almost all the movies sites lists the download link of the movie under the “Download Now” button.

“Dangal” “Movie” “Download Now” 
Using the Download Now Keyword

#3. Search for Movie names along with an extension on the URL

For this we will need to this keyword combination like: “inurl:mp4+movie name” or “inurl:mkv+movie name” and so on. Using this Google Search Trick on the search results will be listed only the websites that have that Movie Name along with the extension in they URL.

inurl:mp4+Dangal Movie
Search for Movie names along with an extension on the URL

> Read Next: Top 15+ Best Free Sports Streaming Sites: Watch Sports Online for Free On 2020

So that’s all about this great google search tricks that will help you to easily find to Direct Download Link To Any Movie. You can use it also to download music by replacing in the code above mp4 with mp3.  Hope you found this article useful. Please let us know your thoughts in the comment section below, follow us on twitter and facebook for more news and updates.

neoAdviser

[td_block_11 category_id=”3″ limit=”1″ td_filter_default_txt=””][td_block_ad_box spot_id=”custom_ad_3″]
Make Group Calls on WhatsApp

WhatsApp Group Calls: How to Make Group Calls on WhatsApp (Android & iOS)

Note: Finally in the latest update, Whatsapp has announced that the limit of participants in a group call is now extended at 8 people instead of four people. The extension of the limit is announced for both audio and video calls.

Staying in touch while in distance is very important and that’s why using apps to make group calls may come in help. WhatsApp is a very popular app used not only as an alternative to texting but also to make Video or Audio calls. Not only, but you can also do audio or video group call on WhatsApp with up to 8 peoples. The WhatsApp app is available for both iOS and Android devices, so despite the type of device you or your friends use, you can easily use group calls on WhatsApp. You are going to share two methods for making group calls on WhatsApp.The GB WhatsApp Download App is available for both iOS and Android devices, so despite the type of device you or your friends use, you can easily use group calls on WhatsApp.

> Check Out: How to play YouTube in Background (Android & iOS)

How to Make Group Calls on WhatsApp (Android & iOS)

WhatsApp is an very popular video and audio messaging app used worldwide buy over 2 billion peoples. Group call is an really great feature to stay in contact with your friends and family and WhatsApp make it very straightforward to do so

On Android the UI (User Interface) may look a bit different, but the steps to make group calls are still the same. The only drawback of WhatsApp group calls is that you are unable to switch a group call form audio-only and video once you start the call, you will need to hang up and start again the call. So here are the steps on hot to make group calls on WhatsAapp:

At the “Call” section: 

  • Click “Calls” at the bottom of your screen
  • Next tap the icon with a phone and a “+” sign at the top-right of your screen
  • Click “New Group Call
  • It will open a list of your contacts. You can search but typing they name in the search bar and add then by clicking the circle next to the name.
  • After you finished adding then, tap the phone button for starting you video or audio group call.

At the group chat:

  • Tap “Chats” at the bottom of the screen an select a group conversation to open
  • Tap on the button with a phone and a “+” sign at the top-right of your screen
  • All the name of members from the group chat will pop up. Choose who to add by tapping the circles next to the names.
  • Next, type the video button to start a video call or the phone button to start an audio call.

> Check Out: How to create email lists in Gmail to send group emails

Add More Peoples in an One-on-One Call on WhatsApp

From an one-on-one call you can also add more peoples. You will need to place an one-on-one voice or audio call and then add more participants. Here’s how to:

  • Click “Chats” on your bottom-right corner and open a conversation
  • Tap the hone button to start an audio call or the video button to start an video call
  • After you started the conversation and the person picked up, now to add another person in the chat tap the button with a person and an “+” sing your top right corner
  • A list of your contact will show up. tap the name of the person in the search bar at the top and next click on the name you want to add.
  • An pop-up may be displayed asking if you want to add it, tap “Add” so it will join the call
  • Follow these steps to ad more participants at you call. You can add up to four peoples simultaneously

> Check Next: Netflix Party: How to watch movies with your friends at the same time

So here is an step-by-step guide on how to make group call on WhatsApp. The process is the same on both Android and iOS devices. We have also showed a way on how to add more peoples in an one-on-one conversation. Using this WhatsApp Feature you can make group video or audio calls with up to 8 peoples and the best part is that all the participants are not required to have the same type of device (Android or iOS). Hope you found this article useful. Let us know your thoughts in the comments section below, follow us on twitter and facebook for more news and updates.

neoAdviser

YouTube in Background

How to play YouTube in Background (Android & iOS)

And you don’t have to pay for YouTube Premium

There’s a lot of music, stories and news on YouTube, and the fact is that you want to be able to play it in the background on your mobile device while reading, writing text, or doing other things. Unfortunately, if you don’t have YouTube Premium, your ability to listen to a YouTube video in the background is limited…, possible, but limited.

[td_block_ad_box spot_id=”custom_ad_2″]

> Check Out: How to create email lists in Gmail to send group emails

How to play YouTube in Background (Android & iOS)

However, there are some solutions. You can play a single song in the background, both on an Android phone and with an iPhone, but it’s a little weird as an experience. And I wasn’t able to play more than a single song on a playlist in the operating system. When I tried it on a phone running Android 10, the same song kept repeating itself, while on an iPhone that had iOS 13, the music just stopped.

However, if you want to try it, here’s how to play music in the background of your mobile device.

How to play YouTube in Background on your Android device

This method, which we saw for the first time written in Digital Trends, works on Chrome and can work on other mobile browsers as well.

  • While you’re at Chrome, go to the YouTube website. (This should be done using a mobile browser, so make sure you are on the website and not on the YouTube app.)
  • Find the video you want to play
  • Click on the three dots in the upper right corner of the screen and then select “Desktop site” from the menu
  • You will now use the desktop version on YouTube. Start the video again.
  • Click the Home button at the bottom of your screen. Once you see the home screen, the music can be stopped. But wait…
  • Swipe down notifications from top to bottom on the screen. You should see the notification for the current song; just press play to restart it.

How to play YouTube in Background on your iOS device

Playing a free video on YouTube on an iPhone is even more complicated, especially since some methods that have worked before have been blocked by iOS 13. We’ve finally found a method that actually works (most of the time). , anyway) in a video by Daniel About Tech.

  • Find your video in Safari. (You will probably use the mobile version of YouTube.)
  • Click on the “AA” symbol in the upper left corner of the screen
  • In the ‘drop-down‘ menu, click on “Request Desktop Website
  • In the YouTube desktop version, start the video and then delete to close the Safari app
  • The video will surely stop playing. Swipe down from the Control Center at the top right of the screen. You will see the video uploaded there; press the play button and the video should start playing again.

We had no problem playing a single video in the background using this method. If it doesn’t work for you at first, then, according to Daniel, if you go back to Safari and restart the video, it should be played. But while I was able to play a single video in the background, as in Android mode, I was not able to play more than one single song.

> Check next: Netflix Party: How to watch movies with your friends at the same time

That’s all! Hope you found this article useful. Please let us know if it worked for you in the comment section below, follow us on twitter and facebook for more news and updates.

neoAdviser

[td_block_11 category_id=”3″ limit=”1″ td_filter_default_txt=””][td_block_ad_box spot_id=”custom_ad_3″]
Find Serial Key Of Any Software in 2020

How To Find Serial Key of Any Software (2020 Google Hack)

Below is a simple google trick to easily find a serial key of any software in 2020. Most of than are third-party programs. Actually, you can find some websites that will provide to you the key of the software that you want to activate. But searching directly with normal keywords, probably you will not find this sites cos there are not favorited on google search results. So, by following this google search database trick, using this specific searching technique you will find a product key or a serial key of any software for free.

[td_block_ad_box spot_id=”custom_ad_2″]

> Check Out: Netflix Party: How to watch movies with your friends at the same time

Find Serial Key of Any Software (2020 Google Hack)

So follow this simple google search trick to easily get product, activation and serial of your favorite software and use the paid version for free.

Steps To Find Serial Key of Any Software

  • Open Google first
  • Next, type the name of the software and 94FBR“ next to the name (example: ” Nero express 94FBR)

  • Now in the search results you will see the product keys of the software you have searched for.
  • That’s all! So by following this simple Google Search hack you will be able to able do find the serial key of any software.

> Read Next: How to Find Your Windows 10 Product Key (Using CMD & Windows Registry)

So following this method, you can easily get the serial activation key of any software to freely us the paid version and without the struggle of scrolling through may websites. Hope you found this article useful, please let us know in the comment section below, follow us on twitter and facebook for more news and updates.

neoAdviser

[td_block_11 category_id=”3″ limit=”1″ td_filter_default_txt=”” tdc_css=””][td_block_ad_box spot_id=”custom_ad_3″ tdc_css=””]
Create email lists in Gmail

How to create email lists in Gmail to send group emails

If you continually send emails to a group of people, you may be able to reduce wasted time by searching for their contacts and creating email lists in Gmail. All the contacts you view and access in Gmail are managed by a separate application called Google Contacts. To create a contact list that you can use in Gmail you need to visit the Google Contacts web app.

[td_block_ad_box spot_id=”custom_ad_2″]

> Check Out: Netflix Party: How to watch movies with your friends at the same time

Step 1. Create mailing lists using Google Contacts

  • Open the browser and go to the Google Contacts website.
  • Once the page opens, go to the contact you want to add to the email list and click on the box next to it. Repeat this action with every contact you want to list.
  • Make sure all contacts have an email included otherwise it will not appear in the list later.
  • Once you have selected all contacts, click on the Label icon and then the Create Label button.

  • Enter a name for this list to remember more easily and click Save to create a contact list.
  • To add additional contacts to an existing list click the Label icon and select the list you want to place the contact in and then the Apply button.

Step 2. Send emails using a list in Gmail

  • Now that you have a list created and with contacts go to your Gmail inbox to email a group of contacts.
  • Once the page opens, send the cursor over the “+” button and the Compose text.

  • From the New Message window, type the name of the list of contacts you have accumulated and click on the suggestion that will appear.
  • Once you have selected the list, fill in the email you want to send and press the Send button to send it to everyone in the list.

The Gmail account allows you to send up to 500 emails a day. If you exceed this limit within 24 hours you will receive error messages that you have exceeded the limit.

> Check Next: How to delete a Gmail address and Download the Data

That’s! Hope you found this article useful, follow us on twitter and facebook for more news and updates.

neoAdviser

[td_block_11 category_id=”3″ limit=”1″ td_filter_default_txt=”” tdc_css=””][td_block_ad_box spot_id=”custom_ad_3″ tdc_css=””]
Netflix Party

Netflix Party: How to watch movies with your friends at the same time

Google’s new Netflix extension lets you chat with friends while watching shows and movies apart

The extension allows you and your friends to stream serials and movies to your desktop at the same time. It also allows anyone in the guest group to pause, play, advance, and reset movies, so you’re always in the same frame. There’s also a chat sidebar where you and your friends can discuss what’s going on in the movie, as if you were sitting together on a sofa. We could see how many people could join your party at once, but the Netflix Party didn’t respond right away.

[td_block_ad_box spot_id=”custom_ad_2″]

Not only can the Netflix Party help relieve the stress of feeling all day long, but it will also be something you can look forward to throughout the day. Read how to download, install, and use the Netflix Party extension to sync your movie viewing with family and friends.

Everyone in your group must have a Netflix account

In order for this to work, everyone to whom you send an invitation will need access to Netflix. If they don’t have an account, Netflix is ​​offering a free 30-day trial for new members. If they are not a new member, they can reactivate their account for $9 a month and cancel it at any time.

How to download, install and use the Netflix Party extension to sync your movie viewing with family and friends

In order for this to work, everyone to whom you send an invitation will need access to Netflix. Once everyone has subscribed to Netflix or logged into their computers, they will need to download the Netflix Party extension. Here’s how to!

Download the Google extension

  1. Visit www.netflixparty.com on Google.
  2. Click Get Netflix Party for free.
  3. You will be redirected to the Google Chrome Web Store site to download the extension. Click Add to Chrome.
  4. A pop-up box will open. Select Add Extension. You will now see a gray NP icon in your browser toolbar.

Start watching movies with friends

Now that you’ve downloaded this extension, you can start watching serials and movies with your friends and family. Here’s how to get started.

  1. Open a new tab on Google and log on to Netflix.
  2. Find a show or movie you want to watch and click on it.
  3. You will now see that the NP (Netflix Party) icon has changed from gray to red. Click on the icon and select Start the party. You will become the host, so you can either choose to be the only controller to pause and play the show, or you can let someone take control.
  4. Copy the URL from the box that appears and send it to everyone you want to invite to the group.
  5. Chatroom will appear on the right side of the screen. From there, you’ll be able to see when someone enters the party.
  6. You can now laugh, cry and shout with your family and friends and feel less alone.

> Read Next: Top 20+ Best Websites to Watch Free Movies Online (2020)

So what do you think about this? Let us know your thoughts in the comments section below, follow us on twitter and facebook for more news and updates.

neoAdviser

[td_block_11 category_id=”3″ limit=”1″ td_filter_default_txt=”” tdc_css=””][td_block_ad_box spot_id=”custom_ad_3″ tdc_css=””]
Create WiFi Hotspot In Windows/Mac/Linux OS (How To)

How To Create WiFi Hotspot In Windows/Mac/Linux OS

You are able to setup a WiFi hotspot on Windows, Mac and Linux Os by reading the guide shared below. With this you will be able to share your internet with all the devices around you and without using a third party app. So, if you want to know more, please follow the guide shared below.

> Check Out: How to Find Your Windows 10 Product Key (Using CMD & Windows Registry)

[td_block_ad_box spot_id=”custom_ad_2″]

1) Create WiFi Hotspot In Windows – Using CMD

Step 1: Open cmd (command prompt) with the administrator privileges. Press Windows + X key on the keyboard then select Command Prompt (Admin) from the pop-up menu.

Step 2: Put netsh wlan show drivers than press ↵ Enter. The command will display information that will help you confirm that your device can create a hotspot with Command Prompt.

Create WiFi Hotspot In Windows – Using CMD

Step 3: Check for “Yes” next to “Hosted network supported”. If you see “Yes” there, your computer does supports the Hosted Network feature, which will allow you to create a Wi-Fi hotspot.
Note: If you don’t see “Yes” here, then your computer will not be able to create a wireless hotspot with Command Prompt.

Create WiFi Hotspot In Windows – Using CMD

Step 4: next Type this code : netsh wlan set hostednetwork mode=allow ssid=llsinfo key=12345678 And press Enter.
Note : Change “llsinfo” with the name you want.
Change “12345678” with the password you want.

Create WiFi Hotspot In Windows – Using CMD

Step 5: Type netsh wlan start hostednetwork , press  Enter. It will turn your Wi-Fi hotspot on.

Step 6: Now your WiFi connection is ready and you can connect your devices through this.

Step 7: To turn off the hotspot , use the following command: netsh wlan stop hostednetwork then press ↵ Enter

> Check Out: Activate GodMode On Windows 7, 8 and 10 (How To)

2) Create WiFi Hotspot in Mac

Step 1:Go to System Preferences.

Step 2: Click Sharing, in Internet and Wireless Section.

Step 3: Select Internet Connection option.

Create WiFi Hotspot in Mac

Step 4: Select Wifi Option Below.

Create WiFi Hotspot in Mac

Step 5: Next Go to Wifi Options and then Set the Password.

Create WiFi Hotspot in Mac

Step 6: next Tick Internet Sharing Option, on the Left Side.

Create WiFi Hotspot in Mac

Step 7: That’s all. use WiFi.

> Check Out: Convert a PDF File Into an Editable Text Document (How to)

3) Create WiFi Hotspot in Ubuntu

Step 1: Go to Network Icon on top panel -> Edit Connections …, and click  Add button in the pop-up window.

Create WiFi Hotspot in Ubuntu

Step 2: Next Choose Wi-Fi when you’re asked to choose a connection type:

Create WiFi Hotspot in Ubuntu

Step 3: In next window,:

  • Type in a connection name. The name will used later.
  • Type in a SSID
  • Select mode: Infrastructure
  • Device MAC address: select your wireless card from drop-down menu.
Create WiFi Hotspot in Ubuntu

Step 4: Go to Wi-Fi Security tab, select security type WPA & WPA2 Personal and set up a password.

Step 5: Go to IPv4 Settings tab, from Method drop-down box select Shared to other computers. When finished, click save button.

Create WiFi Hotspot in Ubuntu

After these steps, a configuration fileis created under /etc/NetworkManager/system-connections directory. The file name is the connection name you careted in step 3.

Step 6: Next press Ctrl+Alt+T on keyboard to open terminal. When it opens, paste the commands below and hit enter to edit the configuration file: gksu gedit /etc/NetworkManager/system-connections/wifi-hotspot

Note : Change “wifi-hotspt” with the hotspot connection name you created in step 3.

Step 7: When the file opens, find out the line mode=infrastructure and change it to mode=ap. Finally save the file.

Create WiFi Hotspot in Ubuntu

Step 8: Finally, enable WIFI from Network Manager icon in the panel. You can check it WiFi section.

> Read Next: How To Find Passwords of All Connected Wi-Fi Networks using CMD

So, that’s all about How to Create WiFi Hotspot In Windows/Mac/Linux OS. Hope you found this article useful. Please let us know your thoughts in the comment section below,follow us on twitter and facebook for more news and updates.

neoAdviser

[td_block_11 category_id=”3″ limit=”1″ td_filter_default_txt=”” tdc_css=””][td_block_ad_box spot_id=”custom_ad_3″]