How To Unlock Pattern Lock On Android Phone (3 Ways)

How To Unlock Pattern Lock On Android Phone (3 Ways)

We probably reset our phone to remove these pattern lock. But what about if we want to rather Unlock Pattern Lock On Android Without Losing Data? Don’t worry you are at a right place.

[td_block_ad_box spot_id=”custom_ad_2″]

Android smartphones are famous world wide for having various kind of useful applications and games. Since we download apps that we need like we use messengers, photo editors, calling apps, launchers and other security apps.

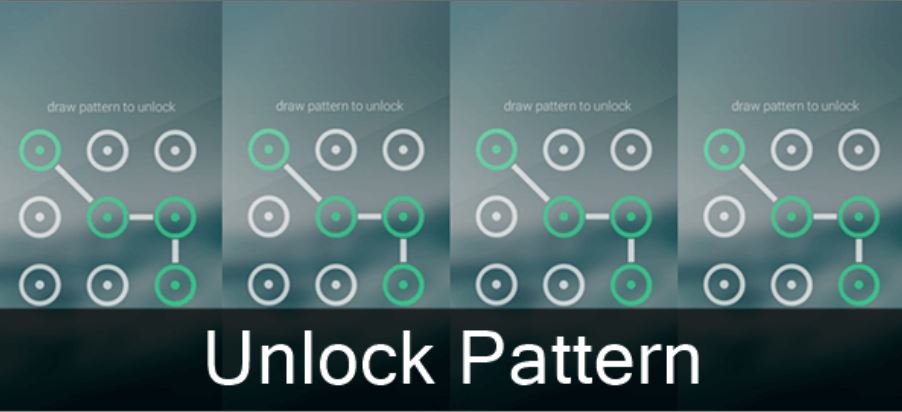
Android is a functional OS but not as secure as it should be. As we can easily download paid android apps for free, Which show that android is probably not secure. Normally we use pattern lock to protect phone for others or we even use some applications. It is a very easy and simple way to secure our personal mobile phone data with pattern lock. We have to just draw a pattern and that’s it. As we don’t have to bother about putting numbers or characters for password. Because we can easily forget numbers and characters as compare to pattern lock, it is a very rare case that you may forget your pattern lock.

As usual we use gmail account in play store it become easy to reset but if you don’t have an email address to reset it. So don’t worry, those who forgot their android pattern lock can easily unlock pattern lock without losing their personal data.As all these patterns can easily bypassed just by doing some effort.

We probably reset our phone to remove these pattern lock. But what about if we want to rather Unlock Pattern Lock On Android Without Losing Data? Don’t worry you are at a right place. Here we found some methods through which you can unlock pattern lock any of your android smartphone. We are going to explain different methods to unlock android smartphone pattern lock without losing data. So choose which you find out easy to do.

How To Unlock Pattern Lock On Android Phone.

Method 1:- Unlock Pattern Lock On Android Without Losing Data.

Required items.

  • Download Aroma File Manager.
  • A memory card for android device.
  • You android device either locked by pattern lock or password lock.

Step 1. After downloading Aroma File Manager, place it in your memory card (SD card). Then, insert the memory card into your locked android device.

Step 2. Open Stock Recovery Mode with reboot your android device and pressing Power Key and Volume up key simultaneously. Different phones may have different methods to open stock recovery mode so if you face any problem Google it.

Step 3. After entering into recovery mode use Volume+ and Volume- buttons to scroll up and down. For select use middle button.

Step 4. From there click on “Install Zip from SD Card” and give path to install “Aroma File Manager” from SD card.

Step 5. After installing, it will open in recovery mode.

Step 6. From the Aroma File Manager navigate to settings >> go to bottom and click on “Automount all devices on start” and then exit.

Step 7. Now again click on “Install Zip from SD Card” and give path to install “Aroma File Manager” from SD card.

Step 8. After this you will get “Aroma File Manager” opened again.

Step 9. Now navigate to Data Folder >> System Folder  and find >> “gesture.key” or “password.key” for pattern lock or password lock respectively.

Step 10. Delete that any one file and then exit aroma file manager and reboot your android device. After rebooting you will notice that password or pattern lock is not removed. But don’t worry draw any pattern and you will open your android device but remember or note that pattern because it will be saved.

Method 2nd:- Unlock Android Pattern Lock With SDK Tools.

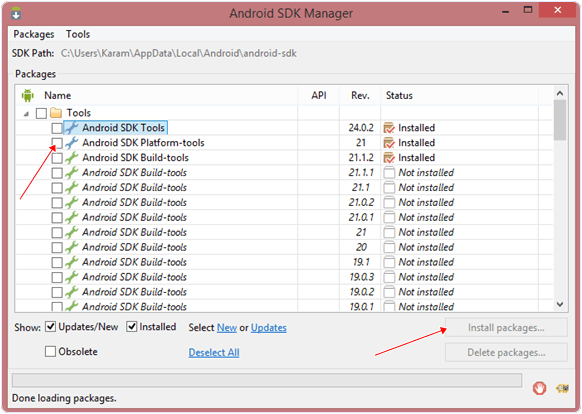
1. First of all Download Android SDK and here we will show you How To download and install Android SDK Tools.

  • Download and install Android SDK Tools for run ADB commands. Open the given page and then select platform according to you download and install it.
  • After installing open it, unchecked the other packages and check Android SDK Platform-tools and then click on install packages according to the image given below.

2. So the other requirement is USB Debugging should be enabled before your android device was locked.
3. The process will probably not be helpful if you don’t have specific and compatible drivers for your phone. So you should be very careful While installing your device compatible drivers.

Steps To Unlock Android Pattern Lock.

Step 1. Connect your locked android phone with PC/Laptop via USB.
Step 2. Then, Open folder where you installed Android SDK Tools Users >> App Data >> Local >> Android >> Android-SDK >> Platform-Tools and then click on blank space hold shift and click right mouse button and select “open command window here”.

Step 3. It will open you command window. Then, you have to put some commands in the command window:-

For checking your device is connected or not put command:-

adb devices

Then, put these commands:-

adb shell
cd /data/data/com.android.providers.settings/databases
sqlite3 settings.db
update system set value=0 where name=’lock_pattern_autolock’;
update system set value=0 where name=’lockscreen.lockedoutpermanently’;
.quit

If above commands not working put:-

adb shell rm /data/system/gesture.key

Step 4. Once you done the above steps, you have to reboot your android device. Now its all done.
After rebooting your device you will see the pattern lock disabled.

So in this method USB Debugging should be enabled before lock because it is a must. If it is not enabled then you cannot proceed further steps.

Method 3rd:- Unlock Pattern With Factory Settings (Data Will Lost).

Since, in the above methods we have used PC/Laptop, we downloaded software and we usedsome commands. But if you do not have a PC/Laptop or your device did not have USB Debugging enable, then you can follow this method.

Note:- In this method your all data will be lost. So if you do not want to lose your data then don’t  follow this method.

Step 1. First of all, Switch off your Locked Android Device.
Step 2. Then, boot your Android device into “Recovery Mode” using specific keys by holding power key and volume up key simultaneously.
Step 3. After opening Recovery Mode

  • Select “Factory Data Reset” option and give “Yes“.
  • Select “Wipe Cache Partition” to wipe cache data.

Step 4. Then, Reboot your device.
Step 5. All Done ! hence, your device will start from the scratch.

> Read Next: How to Hide Data, Applications, Photos, and Documents on Android

In conclusion, we feel that you have learned some interesting facts about how to unlock pattern lock on android. But few people may use this to hack but you should rather use this in a right way to help someone, or yourself. If you have any question leave your comments below,follow us on twitter and facebook for more news and updates.

source/ safetricks.org

neOadviser – HOW TO

[td_block_11 category_id=”3″ limit=”1″ td_filter_default_txt=”” tdc_css=””][td_block_ad_box spot_id=”custom_ad_3″]
How to Schedule an message on Gmail to send it latter?

How to Schedule an message on Gmail to send it latter?

Google announced that Gmail would provide support for scheduling e-mail in April 2019, but the feature is only available today.

[td_block_ad_box spot_id=”custom_ad_2″]

Previously, you had to use third-party appendices to complete this process. Fortunately, the new Gmail function is very easy to use.

But How to Schedule an message on Gmail?

To schedule a message from Gmail on the desktop, follow these steps:

  • Create a new e-mail
  • Click the three-angular button next to the blue “Send” button
  • Choose a schedule you want
  • Click “Schedule send.”

The process is completely similar to Gmail on mobile platforms. But instead of clicking the “Send” button while writing an e-mail, you need to click the three vertical drops in the top right corner of the screen.

A new window will open right where you can set the time you want to send it. Finding scheduled e-mails and canceling them is easy. A new “Scheduled” fold will appear in destop and mobile.

Just click on a message in the relevant folder and click “Cancel send.”

> Read Next: How To Take Scrolling Screenshot Of A Website Using Firefox Quantum?

Hope you found this article useful. Please let us know your thoughts in the comment section below,follow us on twitter and facebook for more news and updates.

neOadviser – How To

[td_block_11 category_id=”3″ limit=”1″ td_filter_default_txt=”” tdc_css=””][td_block_ad_box spot_id=”custom_ad_3″ tdc_css=””]
How to Hide Data, Applications, Photos, and Documents on Android

How to Hide Data, Applications, Photos, and Documents on Android

If you want to have absolute control over everything that appears on your phone, you may need to use Root access, but if you do not want to go so far, this article will help you find valuable alternatives that you do not include the risks of “Root”. Android also has some embedded features to use, if you want to hide all of your intimate secrets.

[td_block_ad_box spot_id=”custom_ad_2″]

How to hide data and apps: Let’s start with the basics

To better provide your sensitive data, you can assign different names to folders that contain everything you want to hide. For example, if you want to hide files, open the manager file application, select the folder with files and images, and change the name. This way the footage of this folder will not be shown in the Gallery that collects all the photos.

> Check Out: How to make your Android smartphone faster (5 Tips)

Certainly this action does not hide the full security of the photographs. Those files will not automatically show up in your gallery, but if it loses the handset then this way it loses its efficiency.

Similarly, you can hide all those pre-installed, boring applications that you can not uninstall without using third-party apps. If you want to remove them, at least from the vision, go to Settings> App and select the app to hide. If you can not uninstall, then disable it. A wonderful, good, and right thing is to learn how to block applications that work in the background, or “working in background”.

How to hide Android data and folders: external help

If the above is not enough for you, you are probably thinking that to protect all your data you need something else. So an aid that exponentially increases the total protection of your privacy. There are some applications that are wonderful in this regard.

> Check Out: Android Vs. Android One Vs. Android Go

If you just want to hide your applications without blocking and encrypting their opening, one of the easiest things you should do is install a new “Launcher“. Like many of the available in the Play Store, we’ve chosen the “Nova Launcher“, currently the best in circulation.

Nova Launcher
Nova Launcher
Developer: Nova Launcher
Price: Free
  • Nova Launcher Screenshot
  • Nova Launcher Screenshot
  • Nova Launcher Screenshot
  • Nova Launcher Screenshot
  • Nova Launcher Screenshot
  • Nova Launcher Screenshot
  • Nova Launcher Screenshot
  • Nova Launcher Screenshot
  • Nova Launcher Screenshot
  • Nova Launcher Screenshot

Although the application hide option is provided in the free version of Nova Launcher, it would be even more fantastic if you buy the Prime version. Scroll to Nova Launcher> Nova Settings> App & Widget drawers and then select Drawer groups> Hide app.

Another popular launcher that will allow you to hide applications without having to spend a penny, is “Apex Launcher“.

Apex Launcher
Apex Launcher
Developer: Android Does Team
Price: Free
  • Apex Launcher Screenshot
  • Apex Launcher Screenshot
  • Apex Launcher Screenshot
  • Apex Launcher Screenshot
  • Apex Launcher Screenshot
  • Apex Launcher Screenshot
  • Apex Launcher Screenshot

Go to Settings> Drawer Settings> Hidden apps to check which applications will be visible and which will be hidden. Indeed a very necessary option for privacy.

How to hide data: Keep your applications in a safe place

If even hiding the applications and folders with the above methods is not enough, then guess the best security is in a code lock. There are some third-party apps that will help you in this effort: try and decide which one best suits your need.

> Check Out: Aptoide: How Was Born, How It Works And Is It Safe?

One of the most popular in the Play Store is “Smart AppLock“.

It is useful for both videos and photos. In addition to closing different types of folders, Smart AppLock allows you to prevent the app being uninstalled without your permission.

Another version of this app that is considered considered is “Applock Fingerprint

Schützen(Smart AppLock)
Developer: SpSoft
Price: Free
  • Schützen(Smart AppLock) Screenshot
  • Schützen(Smart AppLock) Screenshot
  • Schützen(Smart AppLock) Screenshot
  • Schützen(Smart AppLock) Screenshot
  • Schützen(Smart AppLock) Screenshot

This app provides other features such as the ability to capture instant selfies of anyone trying to enter your phone without permission, as well as the ability to lock the phone away. Both versions offer improvements through purchases of premium versions of the app.

As soon as these apps are installed, go to the page that contains the application list and select the ones you want to protect with the key. Every time you open the selected apps, you will be asked to enter the password or to use the fingerprint reader. To get rid of the annoying ads you will have to buy the premium version.

> Check Out: Download Modded Games On Your Android Device (How To)

In the end, we can talk about “App Hider

App Hider uses an icon that looks like an app that manages the handset’s audio so that when the app opens, it looks like it’s adjusting the sound. By holding down the application icon for a long time, you will be able to access the hidden section of the phone where you will find your secrets: files, apps, and everything you want to hide.

How to hide the data: Our Advice

To choose the right app from the ones above, you should first think which data you need to secure. If you just want to hide the folders, you can do it without having to install anything, knowing that you will not have full protection of your sensitive data.

There are many other applications in the Play Store that allow you to hide your data: Do you use one that is not included in this list? Share with us in a comment!

> Read Next: How to Scan a Document Using Your Phone or Tablet – The Best Way

So that’s all about hoe to hide your data on your Android Phone. Hope you found this article useful. Please let us know your thoughts in the comment section below, follow us on twitter and facebook for more news and updates.

neOadviser

[td_block_11 category_id=”3″ limit=”1″ td_filter_default_txt=”” tdc_css=””][td_block_ad_box spot_id=”custom_ad_3″ tdc_css=””]
How to make your Android smartphone faster (5 Tips)

How to make your Android smartphone faster (5 Tips)

In this article we will try to answer a frequently asked question: how to make the fastest smartphone? Note, this article only applies to Android-powered mobile phones! He always hides some surprises under the smartphone interface that is being used. Some features that can turn your smartphone into an even more powerful device.

[td_block_ad_box spot_id=”custom_ad_2″]

How to make your Android smartphone faster (5 Tips)

We’ll talk about the little and almost unrecognizable Android features and options for most users. These very effective tricks that will improve your smartphone in many ways: security, graphics, internet connectivity, and overall performance.

> Check Out: Android Vs. Android One Vs. Android Go

#1. How to make your Android smartphone faster: Improve graphics quality

The technical features of smartphones continue to grow. We have 64-bit multi-core processors, high-end integrated graphics cards, abundant RAM and high resolution displays. Therefore, it is normal to have PlayStore games with graphics that are comparable to those offered by console games (PS4, XBox etc) and, in some cases, titles that are not able to use 100% hardware of our device.

Among the hidden features of Android you will find one named MSAA 4x that will allow you to improve the graphics quality of the games. The MSAA 4x option is nothing but an anti-aliasing filter, a process that improves imaging quality by “smoothing” contours. This option does not work in all Android games, but only in those that use the OpenGL ES 2.0 API.

To enable this option, you must first activate “Developer Options,” by typing “Build Number” repeatedly in Settings. After you enable it, you must go to Settings> Info> Active / Force MSAA 4x located in the Accelerated Hardware Rendering section. Given extra anti-aliasing processing efforts, the impact on performance will be greater: if your device is not powerful enough or the application is not optimally optimized, it’s best to disable this feature.

#2. How to make your Android smartphone faster: Give the android system more fluency

Android is a system full of animations that make it easier to navigate from one application to another, the menu view and navigation in the broadest sense. But the speed of the animations can greatly affect our experience of using the software.

Two smartphones with the same performance may look slower depending on the speed at which animations are performed: Android also thought about this, allowing us to change the speed of animations with a hidden feature included in the options developers.

Once “Developer Options” are enabled, you need to modify the three dedicated animation options: Resize / Scale animation window, setting the scale to 0.5x. In this way, the speed of the animations will be doubled and everything will be more fluid and faster, regardless of the performance of your device. You can also choose to disable the animations completely, but this move would turn the use of the software into something extremely ugly.

> Check Out: Aptoide: How Was Born, How It Works And Is It Safe?

#3. How to make your Android smartphone faster: Keep your personal data and private life safe

Smartphones are the real safe deposit of personal information. Apart from photos, videos, and recordings, they also contain all of our bank accounts or PayPal.

If someone were able to strengthen the security of our smartphone, they would have easy access to the sensitive data we store there. The unlocking code is certainly a first obstacle to overcome, but it is not enough to keep away the bad people.

Solution? Android offers the ability to encrypt all Android memory, so without the “password” of any data stored on the smartphone it will be impossible for hacking even for the most experienced users. To activate the option, go to Settings> Security and follow the procedure that was followed in Device Encryption. Unfortunately, not all devices have this feature. Before you enable this feature, make sure you have the Android smartphone charger on your hand, because you will need to upload it to perform the procedure

#4. How to make your Android smartphone faster: Improve Internet navigation

Google Chrome is almost certainly your trusted browser. Probably because it is ready for use right from the start of use. Fortunately, Chrome is one of the most up-to-date browsers with many features, some of which are hidden very well. Thanks to an option, accessible only by entering Chrome: // flags in the search box, you will be able to speed up your browser and gain a few seconds whenever you search for content on the web. Second, at the end of the day, taking into account the many uses of the internet in the smartphone, it can turn clockwise.

As soon as the Chrome ://flags page is open, you should search the Fast tab/Windows close:Enable article. Restart the browser as needed and continue browsing, you will notice a greater fluency in Internet experience. This feature allows Chrome to close windows that are not linked to Java scripts that run in the background, speeding up the browser.

#5. How to make your Android smartphone faster: Best apps, fastest smartphone

The first thing you need to do to improve the system response to application functionality is to use those that are easier and more suitable for your device’s performance. We know that this is not a hidden feature within your Android and that you install a Nova Launcher launcher, but this move will greatly enhance the speed effect of using the device.

> Read Next: Cellphone Battery – that’s what you need to know (8 Tips)

So, that’s all about how to make your Android smartphone faster. Hope you found this article useful. Please let us know your thoughts in the comment section below, follow us on twitter and facebook for more news and updates.

neOadviser

[td_block_11 category_id=”3″ limit=”1″ td_filter_default_txt=”” tdc_css=””][td_block_ad_box spot_id=”custom_ad_3″ tdc_css=””]
Xbox 360 Emulator

Download Xbox 360 Emulator for PC & Android [2019]

Xbox 360 Emulator for PC for comes as a best gaming emulator on windows computer also android Smartphone. Also in this article you will find all information about how to Download Xbox 360 Emulator on Pc.

Xbox is simple words meaning for dominant players in console gaming also you can play games  like Halo, Gears of Wars that also play great without any problem.

Xbox 360 Emulator Download for PC & Android [Updated Version]

What is the Xbox 360?

However, Xbox 360 comes as a best gaming consoles the Xbox 360 gaming console. Xbox 360 created by Microsoft Corporations. This gaming console is the best competitor to Sony’s PS3.

Xbox 360 is the best gaming console developed by Microsoft also comes from 2005. Xbox 360 comes for Xenon 8 core processor, also graphical processing unit also play most games on locked frames that is best for Xbox 360.

What is the Xbox 360 Emulator?

Xbox 360 Emulator is console android app for the handpicked Xbox games on your Android. Also, Xbox 360 Emulator is free app also graphics and resolution are not good but enjoy playing games for this emulator.

Here, the Xbox 360 emulator is designed to work on the computer also Get Xbox 360 emulator on android.

> Related: Steps to Download PS4 Emulator for PC

Xbox 360 Emulator Download & Install for Android

Step 1: First, you are downloading Xbox emulator Apk.

Step 2: After, go to settings > security > enable to “unknown source”.

Step 3: Open downloaded APK file.

Step 4: Click install.

Step 5: Done.

Now, above steps for Download Xbox 360 Emulator for Android.

How to Download and Install Xbox 360 Emulator on Computer

Here, you need to Download and install Xbox 360 Emulator on a computer so; first, you need windows running Windows XP, 7, 8, 10 and also Microsoft .Net Framework 4.0 this things need you after Try below Steps.

Step 1: Here, Xbox 360 Emulator Download for Computer.

Step 2: After, the emulator is the available zip file.

Step 3: You can extract the zip file in your Folder.

Step 4: Now, you will find an Xbox 360 emulator file and open it.

Step 5: After, Start installation process.

Step 6: Now, install completed Xbox gaming emulator after open it.

Step 7: Wait for some Load File to Running.

Step 8: Done.

> Next: Top 10+ Best Android Emulators | Experience Android On PC (2019)

However, above mentioned Steps for Download Xbox 360 emulator for PC and Android. I hope you have successfully installed the Xbox 360 emulator on a computer and your android phone. Also, you are following Above Steps that is very easy and helpful for you, follow us on twitter and facebook for more news and updates.

neOadviser – HOW TO

[td_block_ad_box spot_id=”custom_ad_3″][td_block_11 category_id=”3″ limit=”1″ td_filter_default_txt=”” tdc_css=””]
Take Scrolling Screenshot Of A Website Using Firefox Quantum?

How To Take Scrolling Screenshot Of A Website Using Firefox Quantum?

Have you try Firefox Quantum a revamped Mozila Firefox version? What if you may know now that Firefox 57 has a arrived with an amazing tool with which you will be able to take scrolling screenshots or a full page screenshot from a website.

[td_block_ad_box spot_id=”custom_ad_2″]

If you use the latest Firefox browser (Firefox 57 and Up), making full page screenshot or scrolling screenshot is just a few click task. The best thing is that it is not needed to take multiple images screenshots.

> Check Out: How To Change Your Outlook.com Account Password (2019)

How to take scrolling screenshot using Firefox Quantum?

The Mozilla Firefox tool is available for all the platforms, like Apple MacOS, Microsoft Windows and Linux.

Follow theses steps to make scrolling screenshot:

  1. Open the website in Firefox browser.
  2. Next in the right-hand side, click the Page Actions (three dots) button.
  3. Click “Take a Screenshot” in the drop-down menu.

    take scrolling screenshot using Firefox Quantum
    take scrolling screenshot using Firefox Quantum

4. Next, for the full page screenshot of the site, click “Save full page option” in the top-right corner.

To capture the part showed and the screen choose “Save visible”. You can also choose also to select any particular area of the page using the mouse. The tool will help you to capture only what’s required.

5. For saving the scrolling screenshots, you can choose to download it on your device clicking on download button, or you can choose to upload it to Mozilla’s cloud storage (It’ll expire in 14 days).

> Read Next: How to make bootable usb flash drive

So, that’s how you can capture long screenshots easily by using Firefox Quantum. The uploaded screenshots can be accessed in My Shots, where you can share, download or delete then.There are some others Firefox add-ons to help you capture full page screenshots like Easy Screenshot, Nimbus Screen Capture, etc. Hope you found this article useful. Please let us know your thoughts in the comment section below,follow us on twitter and facebook for more news and updates.

neOadviser – How To

[td_block_11 category_id=”3″ limit=”1″ td_filter_default_txt=”” tdc_css=””][td_block_ad_box spot_id=”custom_ad_3″]
Add all friends to facebook group By Single Click

Add all friends to Facebook group By Single Click (How To)

Facebook groups are really a great place to discuss your unique topic with your friends and other members of that group. Group differs from Facebook Pages cos members outside the group can not interfere without the Admin permission. There are different types of groups like public, close, or secret. A great thing for Facebook Groups will be to add all members to the group just by a single click and not one by one to save some time. In a recent post, we have already shared tow methods on how to Invite All Friends To Like A Page On FacebookThe process shared there is only to use for Facebook Pages.

[td_block_ad_box spot_id=”custom_ad_2″ separator=””]

> Check out: How To Merge Facebook Pages: All You Need To Know

Steps To Add All Friends To Facebook Group At Once. (Two Methods)

So, today, in the article below we are going to share tow simple tricks on How To Add All Friends To Facebook Group At Once in a single click. So imagine if you have an account Profile with more than 5000 friends, adding than one by one to the group manually will be really time-consuming. But don’t wary! We got this. So make sure to follow the methods shared below to add all friends to Facebook groups with a single click.

Method #1. –  Add all friends to Facebook group Using Browser Script

  • Log to the Facebook account whose friends you want to invite.
  • Open the Facebook Group in which you want to add friends.
  • Next Click F12 button to open debugger, next select console box.
  • Copy the script from the below given button.
  •  Copy the whole provided code and then paste it into console box.
Add all friends to Facebook group Using Browser Script
  • Press enter and a process will start to send invitation.

Method #2. – Add all friends to Facebook group Using Chrome Extension.

In case the script above doesn’t work then another great way is by installing Google Chrome extension.

  • First, go and download the below-given extension on your chrome browser.

  • Once downloading and installing, open your Facebook group where you want to add friends.
  • Simply click on the visible icon on the top right corner of the browser to perform this task.
  • In a few min the process of adding friends will begin.

Note: – The script is totally safe so don’t worry about it. It will not compromise the security or mess with your account. But in case you have many friends, due to Facebook policy, your account may get blocked or you may be blocked of using groups for some time.

> Read Next: How To Accept All Friend Requests On Facebook At Once 

So, that all about How To add all friends to Facebook group By Single Click. Hope you found this article useful. Please let us know your thoughts in the comment section below, follow us on Twitter and Facebook for more news and updates.

neoAdviser

[td_block_11 category_id=”3″ limit=”1″ td_filter_default_txt=”” tdc_css=””][td_block_ad_box spot_id=”custom_ad_3″ separator=””]
Download Modded Games On Your Android Device (How To)

Download Modded Games On Your Android Device (How To)

Now-days hundreds of apps are developed for Android devices and we all want to try then on, but most of then are not free. There are many ways or methods used to Hack apps, like ex. you can hack game’s premium features, money, etc. However, with these methods, you can just directly download modded apk on any device. Today, in the article below, we are going to share some methods to download or grab any modded APK to any of your android devices. You will also get paid apps for free. Go through the article to know more about it.

[td_block_ad_box spot_id=”custom_ad_2″]

> Check out: How to Find Direct Download Link to Any Movie (Two Methods)

Download Modded Games On Your Android Device (How To)

With these methods, you will download or grab modded apk directly on your device so you will not need any other app to hack your apps/games. The other best thing is that you will not need to root your android device. So, follow the article below to download directly modded games on your Android device.

Download Modded Games On Your Android Device – Using TuTuApp

  • Step 1. Firstly, download and install TuTuApp on your Android device.
TuTuApp
TuTuApp
  • Step 2. Open it on your device; you will get a screen like below.

  • Step 3. So here you can now browse through various categories like Google Play Store but with the difference that here all the apps/games are free.

  • Step 4. If you want to download and install modded apk, simply browse in the app to discover various modded apps or you can search even for “MOD” in the search bar.

So that’s all. Simply search, download and install any modded apk without the heed of other apps like Lucky Patcher.

> Check out:  How To Partition A Hard Disk Without Formatting (Two Ways)

Download Modded Games On Your Android Device – Using Blackmart Alpha

Blackmart Alpha is a marketplace where you will find hundreds of Apps and games to download on your Android device. This is the best Google Play Store alternative for you to have on your smartphone.

Blackmart Alpha provides many paid games and Apps for free, which is a really great feature. We can even say that almost every paid app that is available on Google Play Store is available here for free.

The app is not available to download from Google Play Store. To find the apk file of this app just do a google search and find it. Before installing make sure to enable “Unkown source download”, on your device.

> Check next: How to use your Android smartphone as a webcam for your PC

So that’s all about how to download paid apps and games for free. Also, you can directly download modded apk to your Android device. Hope you found this article useful. Please let us know your thoughts in the comment in the section below, follow us on Twitter and Facebook for more news and updates.

neoAdviser

[td_block_11 category_id=”3″ limit=”1″ td_filter_default_txt=””][td_block_ad_box spot_id=”custom_ad_3″]
Root Android without PC

How to Root Android Without Pc (100% Working) (2019)

Google released the Android 8.0 update for all supported Android devices and also launched Google Pixel 2 ships with Android 8.0. The update is available for all to download as fastboot flashable factory images, but there’s no sign of Android Orio OTA updates yet. But if you are a developer, you can install a beta version of any Android OS before the official release. But for that, you have to Root your Android device. Now, what is rooting?

WHAT’S ROOTING?

Rooting means getting superuser permissions to your Android Device. With this superuser privileges, you can access all Android system files and folders. Also, you can install custom ROMs, enhance performance, increase battery life, and the ability to install Root applications. In other words, you will get instant access to the root directory of your android mobile.Root Android Without PC, it is like Jailbreak for Android.

[td_block_ad_box spot_id=”custom_ad_2″ separator=””]

Earlier, a Rooting process required some tools and complex procedure but now you can Root Any Android Phone within a minute, and that is without PC or Laptop.

The rooting procedure which I have given here doesn’t require PC or Laptop. All you need to do is download a simple Android App and follow mentioned steps. But there are some disadvantages of Rooting like warranty may get void.

HOW TO ROOT ANDROID WITHOUT COMPUTER PC?

Rooting voids warranty, but you can unroot your Android phone & restore to factory settings any time if you know what you do. Hope you have some insight into rooting & its background. There are so many Android Apps which are available on Google Play Store including FramaRoot, Universal Android Root, Towel origin, vRoot that allow users to Root Android Phone without P

Pros:

  • Access all files Android Files and Folders
  • Increase performance by over clockocking
  • Increase battery time.
  • Install custom ROMs
  • Access Root Apps
  • Increase RAM

Cons:

  • Your phone might hard brick
  • Data loss
  • Warranty killed,
  • Random reboot
  • No More Privacy

Ok so if you have decided to Root your Android phone then fine. Below are some cool apps that you can use to Root your Phone. But before going to install them, you have to enable Unknown Sources from Settings > Security if it says Installation is blocked.

POING TO REMEMBER:

Before going to use these apps, first follow some basic steps:

  • Always Take a Complete backup of your Android Phone.
  • Battery Should be 60% or Above.
  • Read all the steps first and then perform Rooting.

1. FRAMAROOT

FramaRoot is one of the best and popular App to Root Android device. FramaRoot is available on Google Play Store.

How to use the Framaroot app:

Step 1: Download Framaroot from here.

Step 2: Install it on your android phone > Open Framaroot app.

Step 3: Click install superuser and select any exploit.

Step 4: You will see Success Message.

2. UNIVERSAL ANDROID ROOT

Universal Android Root is one of the simplest app to root android mobile safely. Steps to root the phone using Universal AndRoot:

Step 1: Download Universal Root.

Step 2: Install it > Open it.

Step 3: Click on Root to begin rooting process.

3. IROOT

iRoot is a Chinese app, and it is a simple app to Root your Android phone within a minute.

Step 1: Download iRoot from here.

Step 2: Install it and then Open iRoot app.

Step 3: Click on I Agree and then click on Root button.

Step  4: Wait for sometime, and it’s done.

4. Z4ROOT

Z4Root is the oldest app to root android without a computer. Follow these steps:

Step 1: Download Z4Root apk file from here.

Step 2: Install it and open it from the app drawer

Step 3: Click on Root button.

Step 4: Wait for sometime and its done.

5. TOWEL ROOT

Towel Root is one of the lightweight Android App to Root Android devices easily.

Step 1: Download Towel Root app from here.

Step 2: Once you have downloaded, Install it and Open Towel Root.

Step 3: Click on Make it Rain.

Step 4: Now, Just wait for sometime.

6. BAIDU ROOT

BaiduRoot is available for both PC and mobile to root android phone.

Step 1: Download Baidu Root

Step 2: Install APK > Open Baidu Root app

Step 3: Click on Root button and wait till it reaches to 100%.

Step 4: Restart your android phone.

7. ROOT MASTER

Step 1: Download Root Master app from here.

Step  2: Install APK > Open Root Master app

Step 3: Click on Tap to root.

Step 4: Wait for sometime and its done.

8. KINGROOT

How to root Android Using Kingroot

  • Download kingroot in your phone and open it
  • Now click Green root Button
  • Wait a minute for finish this process
  • After finish, reboot your android and done

HOW TO CHECK IF YOUR PHONE IS ROOTED OR NOT?

There is an app called Root Checker that you can use to check if your Android Phone is rooted or Not.

Using root Checker App

Step 1: Download Root Checker App (link)

Step 2: Open it, & Click on Check Button

tep 3: When asked for permission, click on grant.

Check root Access With Terminal Emulator

Step 1: First Download Terminal Emulator From Here

Step 2: Install > Type su and press enter

Step 3: If there’s a pound sign (#) then your device is rooted.

The most recent version is now able to play most of the apps, including top 3D games. After the download completes, the same computer is currently prepared to share. All these things are vital if you need to continue to keep your PC free of threats from both the web and offline sources.

You may conduct a android backup. All you have to know is you can save full backups of your phone and restore it at any moment. In case you haven’t done so already go on and plug the USB drive into your system. You may be pretty impressed with the operation of your Android phone.

source/ tricksmaze.com

So, which APK rooted your android phone without a computer? We would love to hear about it in comments below. If you’re having any difficulty in any of the above methods, then feel free to comment below.

[td_block_ad_box spot_id=”custom_ad_3″ separator=””][td_block_11 category_id=”3″ limit=”1″ td_filter_default_txt=”” tdc_css=””]
unroot your Android phone

How to unroot your Android phone or tablet [2019]

Rooting your phone and unlocking its true potential is one of the best parts of the Android ecosystem, and just one of the things that sets it apart from Windows 10 Mobile and iOS. Of course, it isn’t for everyone. For one, the process is a bit complicated. Not to mention the fact that you could potentially harm your device, and tinkering with a handset can void the warranty, resulting in an unfortunate situation.

[td_block_ad_box spot_id=”custom_ad_2″ separator=””]

Don’t want to be part of the root club anymore? Being in Google’s protective arms is definitely nice, and it is an inconvenience that root generally gets in the way of updating your software over the air. Additionally, when it comes to selling a phone, many buyers want the “out of box” experience, as if the phone were brand new, which root technically detracts from.

The thing is, there’s plenty of tutorials out there for rooting a smartphone, but not as many show you how to unroot. Let’s fix that!

See also – Benefits of rooting your phone

Unroot by using SuperSU

Many users take advantage of SuperSU, a popular tool for managing rooted devices. Among its many features is the ability to unroot your device.

The process is as simple as they get. Just open the SuperSU app and head over to the Settings tab. Scroll down and select “Full Unroot”. Follow instructions and let the phone do its thing. After it takes care of business, just restart the phone and you will be back to normal.

Unroot by using an app

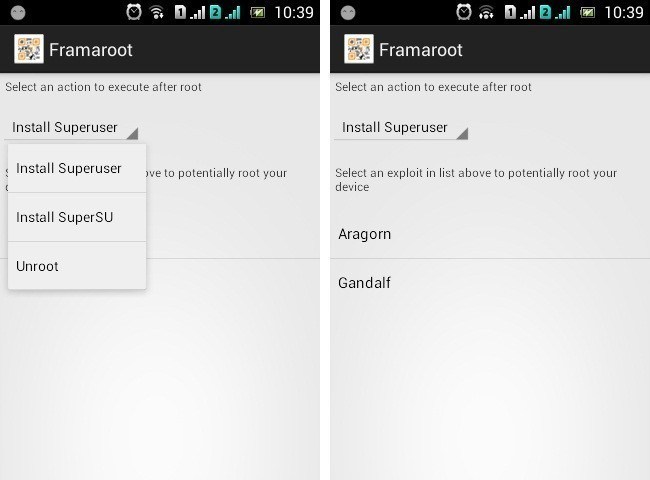
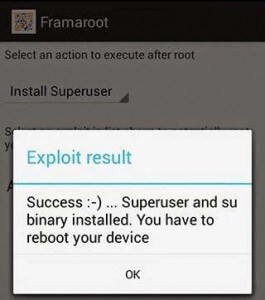
Not using SuperSU? There’s a slight chance you might still be able to unroot your phone by taking advantage of a simple app. The only caveat is that these applications don’t seem to work well with every smartphone out there. It’s kind of a hit or miss.

The most popular option is Universal Unroot, which can easily get rid of root privileges in Android devices. Sadly, there’s plenty of downsides. For starters, a bunch of Samsung devices won’t work, due to a complication with KNOX. LG devices will be unrooted, but they will still show as rooted afterwards, thanks to LG’s eFuse.

I will say this is a bit of a gamble, as it costs $0.99, but that might be worth it if you don’t want to play around with your phone too much

Unroot by using a file manager

Root access might seem like a complicated set-up, but it’s really nothing but a bunch of files on your phone. Get rid of them and root will also go away.

To do this, you will need a file manager with root access. My favorite one happens to be ES File Explorer (just turn on root access in the settings).

  1. Access your device’s main drive and look for “system”. Select it, and then tap on “bin”. From there, delete “busybox” and “su”. By the way, these might not be there. If that is the case, move on to the next step.
  2. Go back to the system folder and select “xbin”. If the files are there, go ahead and delete both “busybox” and “su”.
  3. Go back to the system folder and select “app”.
  4. Delete “superuser,apk”.
  5. Restart the device and it will all be done.

Unroot by installing an OTA update!

Remember we told you root gets in the way of updating? Well, that is only if you want to update the traditional way, you can still push updates manually. We won’t get into those details right now, but the trick here is that software updates tend to break root access. Most users have to root again, but if you don’t want root it’s easy to simply install your next update.

The obvious downside is that you do have to wait for an update to arrive. Oh, and don’t forget to uninstall SuperSu and any other root-related apps. Alos keep in mind that this will only work when using the stock recovery on your device.

Unroot by installing stock firmware

Taking the phone back to its original firmware is usually the best way to unroot a phone. There’s no ifs or buts here, it will work regardless of your device, ROM, kernel or recovery. This is because the firmware has all the necessary software packaged together.

The only sad part is that we can’t quite give you a tutorial. Phones have different ways of accomplishing a firmware install, so you will have to do a bit of research on how to do this to your specific smartphone. Users will need to download their specific firmware files, use USB Debugging and possibly download some PC software.

Wrapping it up

So there you have it, guys. Now you have the necessary tools for getting your phone away from the potentially dangerous world of rooting. Remember smartphone hackery is not exactly for everyone!

> Read Next: Cellphone Battery – that’s what you need to know (8 Tips)

Have any of you guys tried these methods? Hit the comments to let us know your experiences. I have personally only used the last option. I feel like clean starts are always better, but I do have to say it makes me work and research much harder. Any other tips you can think of? Share them down in the comments below.

surce/ androidauthority.com

[td_block_11 category_id=”3″ limit=”1″ td_filter_default_txt=”” tdc_css=””][td_block_ad_box spot_id=”custom_ad_3″ separator=””]