Windows 10 Tips & Tricks: Top Best Most Useful Features in Windows 10 (2020)

Windows 10 Tips & Tricks: Top Best Most Useful Features in Windows 10 (2020)

While Windows 10 may be the most convoluted operating system Microsoft has ever created it does include many handy features that are quite useful. So coming up i’ll show you more than 10+ tips, tricks and features that will help you get the most out of using Windows 10. Because there are many of you interested in this, we are going to include a mix of the newer features and some of the older classics that are still available for use with Windows 10. These top best 2020 Windows 10 tips and tricks will make your life a lot easier. I’m pretty sure you’re going to find something new here ’cause some of these are what I consider hidden features in Windows 10 and I have no clue about them for the longest time, but they made a big difference for me once i found out about them and started using.

> Check Out: How to Find Your Windows 10 Product Key (Using CMD & Windows Registry)

Windows 10 Tips & Tricks: Top Best Most Useful Features in Windows 10 (2020)

So, without going through to much talk, i will save your time and go right to it! So let’s get started with my tips for Windows 10 in 2020.

Tip #1. Clipboard History: Enjoy next level pasting with clipboard history

Windows 10 version 1809 has announced for the first time the new clipboard experience, so in order to use the new Clipboard History feature you will need to have Windows 10 version 1809 or greater. Although it came up with a new interface and some new features, its not really an complicated experience to use.

How to use Clipboard History feature on Windows 10

The new clipboard features uses the old experience that you already use. But instead of using CTRL + C to copy and CTRL + V shortcut to paste, now you will use the same CTRL + C shortcut to copy text multiple time and next you will use now Windows key + V shortcut to bring the new clipboard history. In this new interface you will find the lists of your copied items. So follow the steps below on how to do so:

  • Use CTRL + C shortcut several times to copy different text form your application
  • Open the document you want to paste it and this time click Windows key + V shortcut to open the clipboard history
  • In the new interface you will find the list of the above copied content
  • Select the content you want to paste

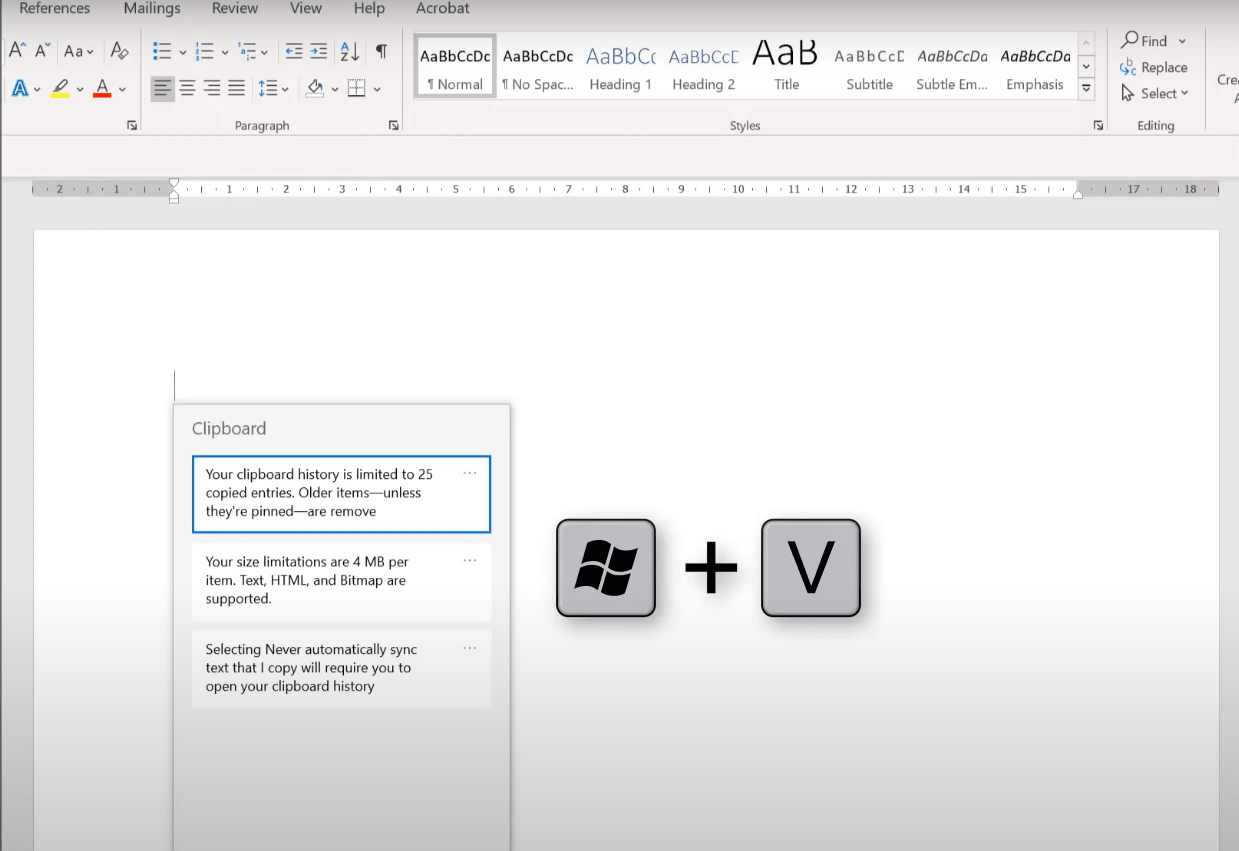
Isn’t that great? No more flipping back and forth between applications to copy and paste each bit separately and no more accidentally losing some copied text because you forgot to paste and copy something new over it. You can copy text, HTML and bitmaps up to four megabytes per item. You may have to activate clipboard history in the settings first, so here’s how to do so!

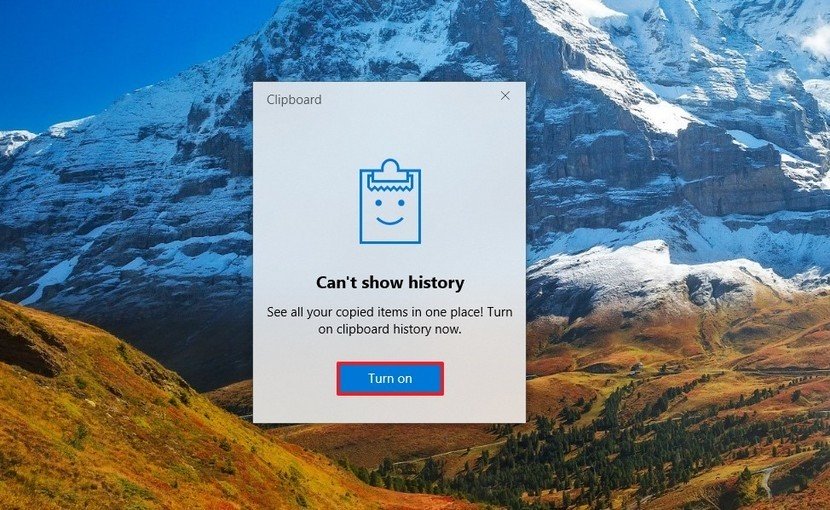
1. Enabling clipboard using a shortcut

The fasted way to activate clipboard history feature is by using a keyboard feature, so follow the steps:

  • Tap Windows key + V on keyboard
  • Click the Turn on button
Activate Clipboard History Feature
Activate Clipboard History Feature using shortcut

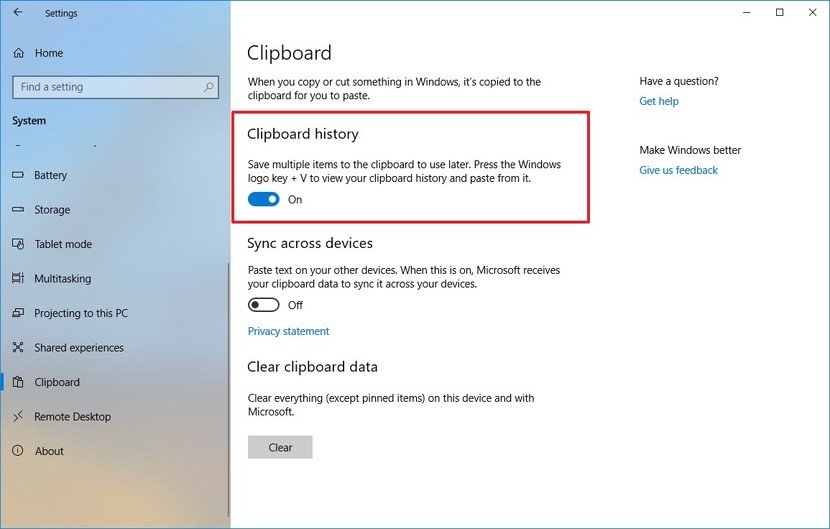
2. Enabling clipboard using Settings

To do so, in the Setting app, use the following steps:

  • Go to Settings.
  • Then click on System.
  • Next click on Clipboard.
  • Turn on the Clipboard history toggle switch.

From here you can tun ON or OFF the Clipboard History feature at any time.

Enable clipboard history using Settings

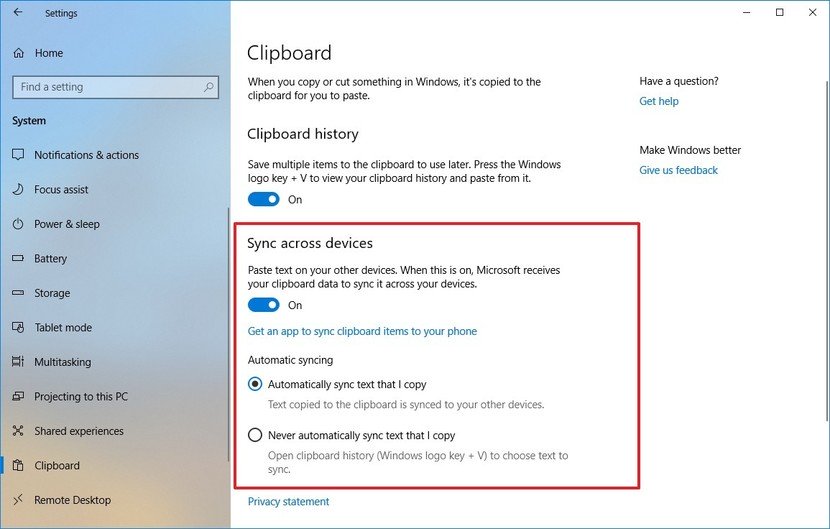
How to sync clipboard history on Windows 10

The other setting here, sync across devices allows you to share copied text across any of your windows devices as long as you’re signed in to the same Microsoft account. Anyway, for privacy reasons, this feature most be enabled and configured manually, here how to’s:

    • Go to Settings.
    • Next click on System.
    • Go to Clipboard.
    • Under “Sync across devices,” turn on the toggle switch.

Finally, select the automatic syncing option that you want:

  • Automatically sync text that I copy: Your clipboard history will sync to the cloud and across your devices.
  • Never automatically sync text that I copy: You must manually open the clipboard history and select the content you want to make available across devices.
Sync Clipboard history Windows 10

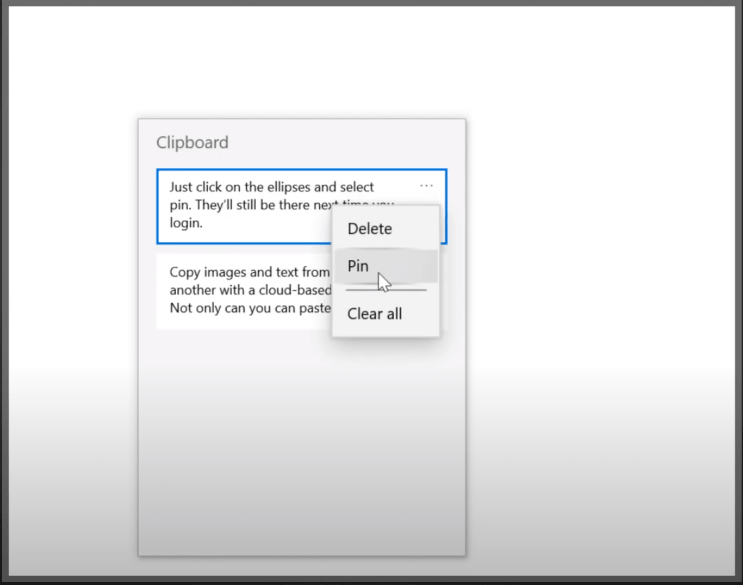
How to pin items in the clipboard history

One more great feature: Let’s say you have some items on your clipboard that you use frequently and you’d like to be able to reuse these even after rebooting your computer. No problem for clipboard history, you can pin these items. Here’s how to:

On the Clipboard History Interface:

  • Click the “ellipsis” next to the item
  • Next select pin.

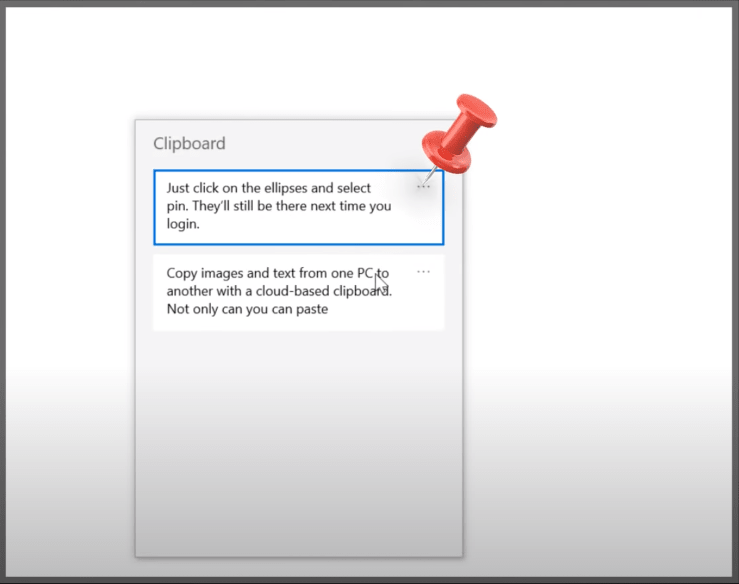
They’ll still be there the next time you log in. The unpinned items on your clipboard history are cleared every time you restart your PC. Only those items you pinned are going to remain on the clipboard.

How to clear clipboard history on Windows 10

Latest, if you no longer need to use the Clipboard History feature, or is something does not work as expected, you can reset the history to see if the problem may be fixed, so here’s is how to:

  1. Click Settings.
  2. Go to System.
  3. next click on Clipboard.
  4. Under “Clear clipboard data,” click “Clear” button.
clear clipboard history

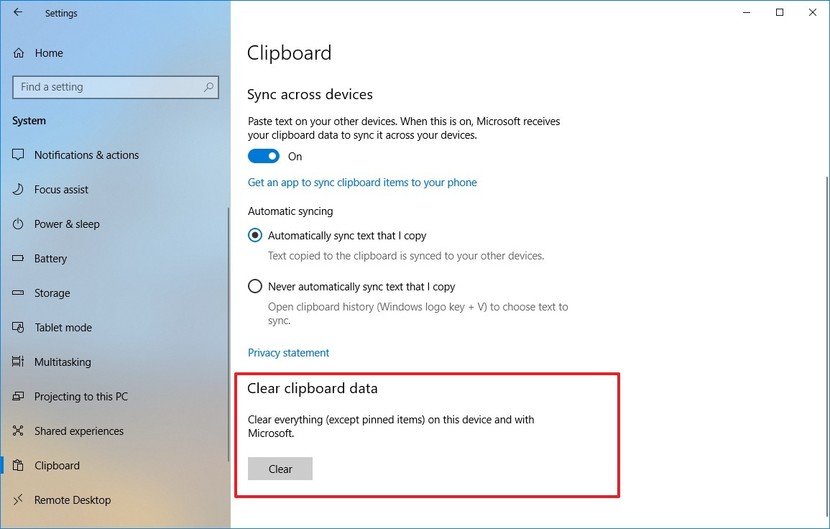
Once done, the clipboard content will be deleted form your device and Microsoft account, but Pinned item will still remain till you remove then manually. If you wish to just delete only one or two items, you can do it so by opening the Windows key + V interface and simply click the button on each of the content you want do delete. You can choose also Clear all button on the history interface to delete the list.

> Check Out: Top 5+ Best Free Screen Recorder For Windows 10

Tip #2. Sandbox: Stay safe by using Windows Sandbox feature

Sandbox is another exciting new feature that was introduced with the Windows 10 May 2019 Update (version 1903). It offers a separate testing environment to try out software or download apps from websites that you’re not so sure about. Sandbox is part of the Pro and Enterprise edition of Windows 10 so unfortunately it’s not available in Windows 10 Home. Also your processor and motherboard need to support virtualization. If the virtualization is supported but not enabled, check your motherboard manufacturer to find it out how to enable it. 

Sandbox is like a virtual PC that’s built right into your Operating System. This way you can run programs or access websites in a safe zone without affecting your system. Although you may be able to create virtual machines to reach the same experience, Windows Sandbox has some key benefits. By using it eliminates the steeps on downloading and creating virtual machines. Every time you run the Sandbox features, it will immediately create a new clean Windows 10 installation. Once the Windows Sandbox gets closed every thing gets wiped out automatically. Also an important thing is that everything happens inside the environment while being isolated from your main installation to offer maximum security.

Windows Sandbox system requirements

Before going through the steps on how to enable Windows Sandbox feature, make sure your device meet these minimum software and hardware requirements:

  • Windows 10 Pro (or Enterprise).
  • Hardware virtualization.
  • AMD64 architecture.
  • 2 processor cores minimum (4 cores with hyperthreading is recommended).
  • 4GB of RAM (8GB is recommended).
  • 1GB of HDD space (SSD is recommended)

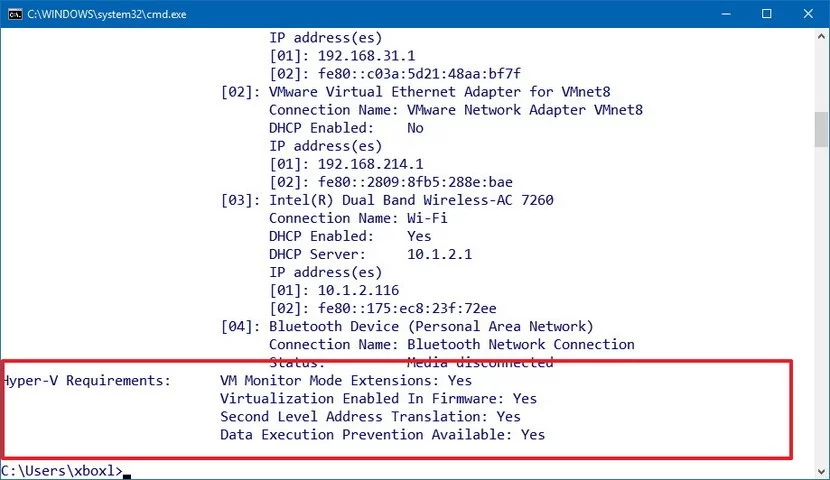
How to check if virtualization is enabled

Hardware virtualization most be enabled in the BIOS of your system. Depending of your motherboard you may need to check if it supports it and how to enable.

To check is its enabled follow the steps below:

  • In the search bar type “CMD” end pres enter
  • Next in the CMD window type the following commandsysteminfo.exe
  • Check under the “Hyper-V Requirements” section, if “Virtualization Enabled In Firmware” reads Yes, then you can use Windows Sandbox.
check if virtualization is enabled

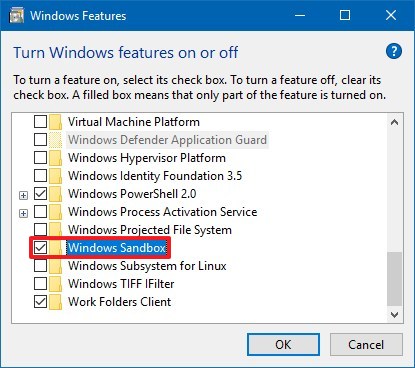
How to enable Windows Sandbox feature on Windows 10

Sandbox isn’t turned on by default, so you have to activate it first. Here’s how to:

  • On the windows search bar type “Turn Windows features on or off” and pres “Enter
  • In the pop-up window search for “Windows Sandbox” option
  • Check the “Windows Sandbox” and then click “OK” button
  • Click the Restart now button
enable Windows Sandbox

After completing above steps, you can start now using the new virtualization layer to install and test untrusted applications temporarily.

How to use Windows Sandbox feature on Windows 10

To start using the Windows Sandbox feature you have just activated is really easy, just follow the steps below:

  • In the windows search bar type “Windows Sandbox
  • In the search results at the top, right-click to “Windows Sandbox” and select “Run as administrator”
  • This will open the Sandbox window
  • Now at you main device, copy the app that you want to test it and than past it inside the Windows Sandbox experience
  • Click on the installer (.exe, .msi, etc) to execute the installation

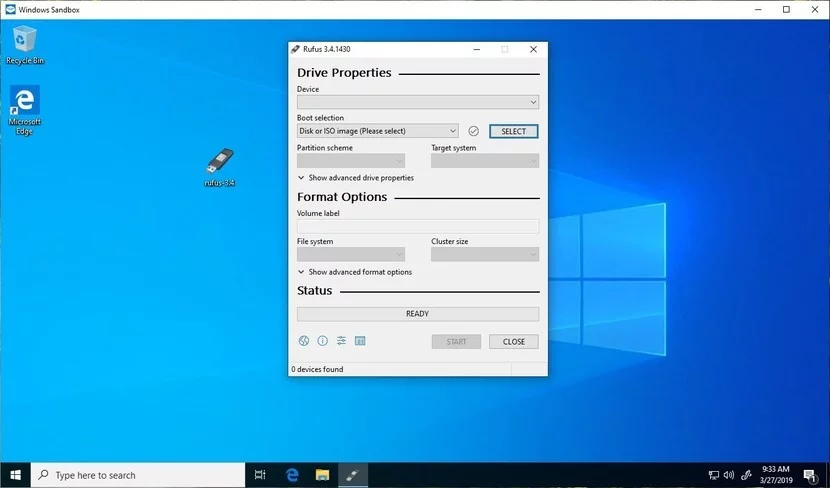
You can safely now open it and check if everything is okay or use edge to check out some dodgy website you’re not sure about, to make sure it’s safe. When you’re done just close Sandbox an the X button and all the content there is going to be wiped out. So even if the Sandbox is compromised next time you start it up again, it’s going to give you a brand new box to play with, but be aware that Sandbox only gives you an Operating System with a browser, none of the other third party applications are going to be available in Sandbox.

So you can’t copy an office attachments that you received into the Sandbox and open it there because you won’t have Office in the Sandbox. You can install apps, but you’re going to have to install them again next time you open up a new Sandbox. Also keep note that you can’t drag and drop files form your Windows main installation to the Windows Sandbox interface.

So keep that in mind!

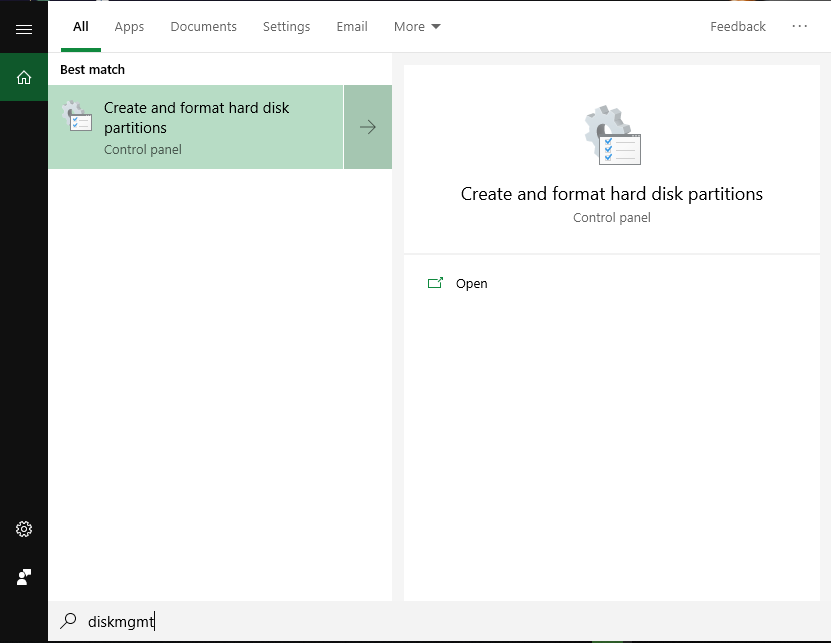
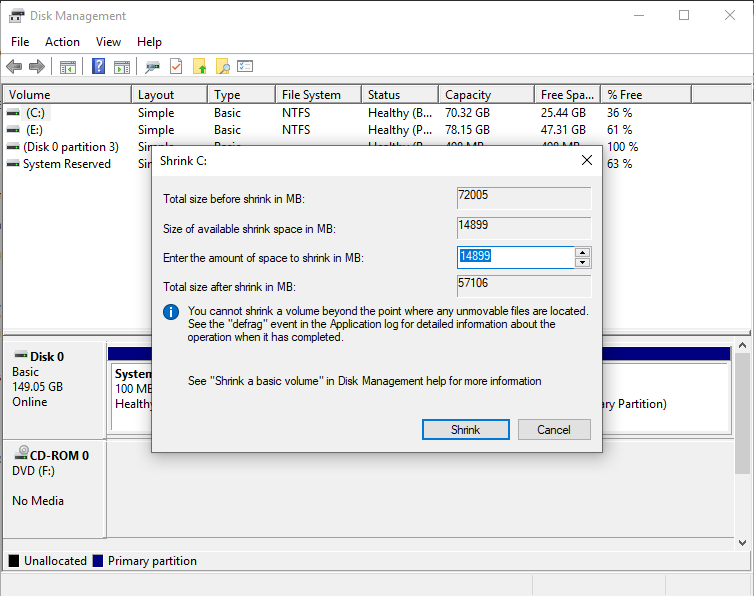
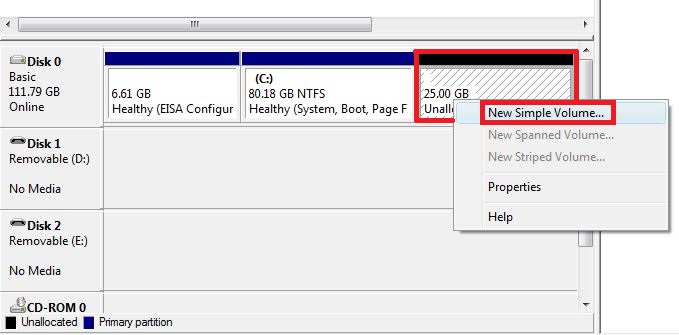
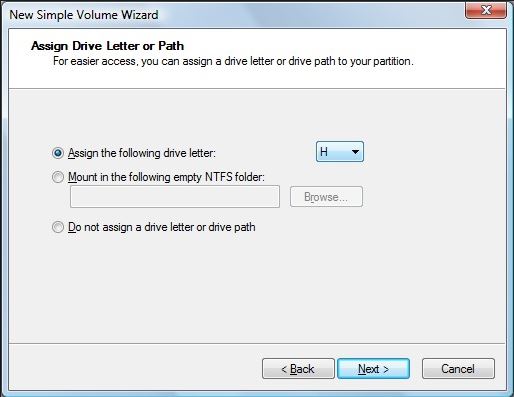
> Check Out: How To Partition A Hard Disk Without Formatting (Three Methods)

Tip #3. Virtual Desktop: Split your world using virtual desktop

So let’s say you’re working on a project and you have several apps open, then an appointment pops up reminding you that you need to join a video conference to present a status update. When you share your screen, you don’t want everyone to see all the other files you’re working on. And you don’t want to close them either because it’s going to take some time to get it all set up again, once you’re done with your phone call. The solution is to switch to another clean temporary workspace, which is also called a Virtual Desktop.

Virtual Desktop
Virtual Desktop Interface (Windows 10)

How to create a new virtual desktop in Windows 10

Windows 10 has made it really easy to use and setup virtual desktops. This is really a great and very useful feature to keep your unrelated and ongoing project organized or hide then from your boss quickly. So let find out how to use multiple desktops in Windows 10.

For creating a new virtual desktop you are just a few click away, or you can use simply a keyboard shortcut: Here’s how to:

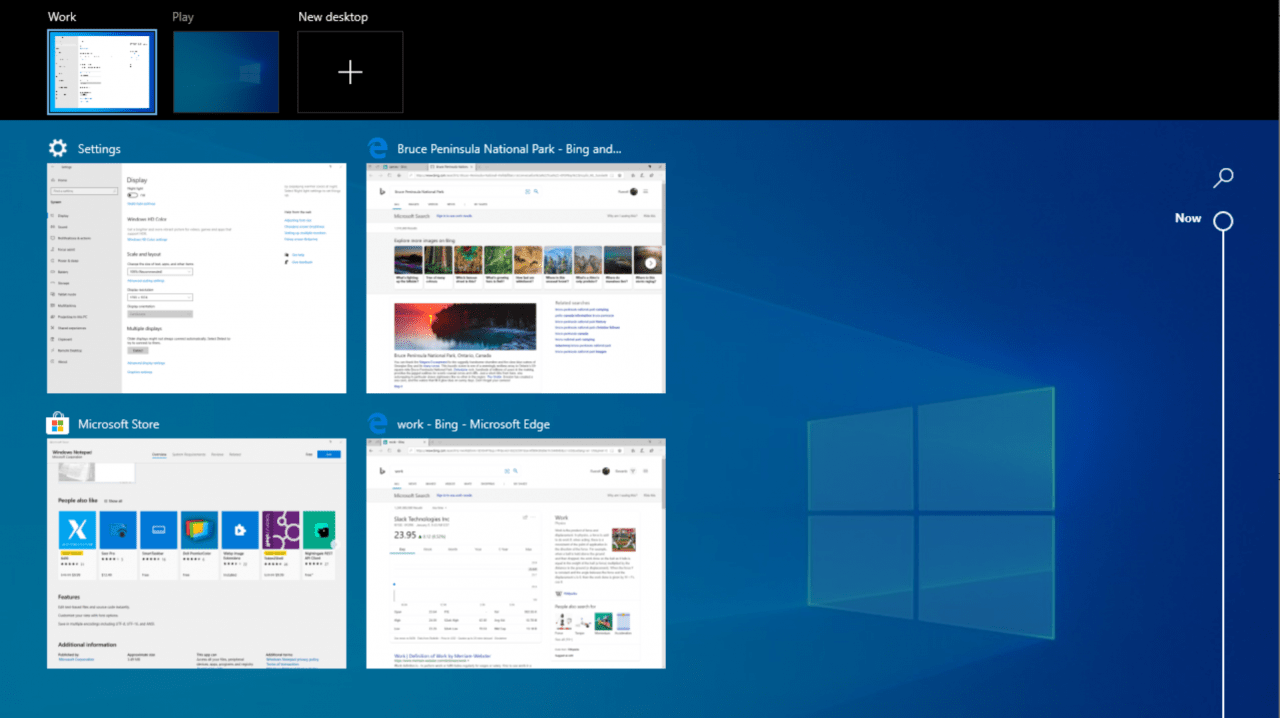
  • Click “Task View” icon at your taskbar
  • Next, click “New Desktop” at the top-left corner of your screen.

Create a new virtual desktop Windows 10

That’s all! You can use also Ctrl + Windows key + D on your keyboard that it will create a new virtual desktop immediately.

How to switch between virtual desktops in Windows 10

You can use different ways to do so:

  • Click “Task View” on your taskbar icon
  • Click “Desktop 2″ or the other virtual desktops you have created

Switch between virtual desktops in Windows 10

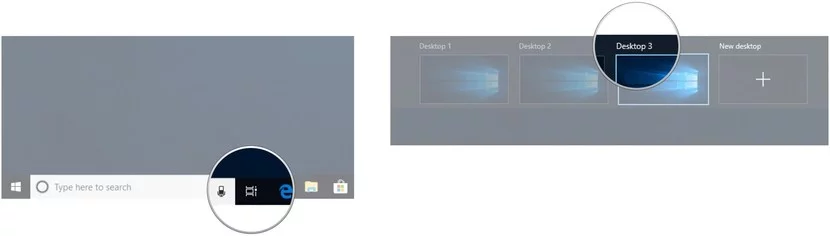
There is also Ctrl + Windows key + Left and right arrow keyboard shortcut to switch between virtual desktops. If you use a device with touchpad you can do four-finger swipe left or right to switch between virtual desktops.

You can also do things like moving windows between virtual desktops by click and dragging then, duplicate virtual desktops by right-clicking on the active window and choose “Show this window on all desktops” to duplicate a single window, or select “Show windows from this app on all desktops” to duplicate all windows from one app.

Once you are done, you can close your virtual desktop by clicking “X” icon in the top-right corner, or simply use “Ctrl + Windows key + F4″ shortcut to close the virtual desktop you are currently viewing.

Tip #4. Quick Assist: Get remote Access using Quick Assist

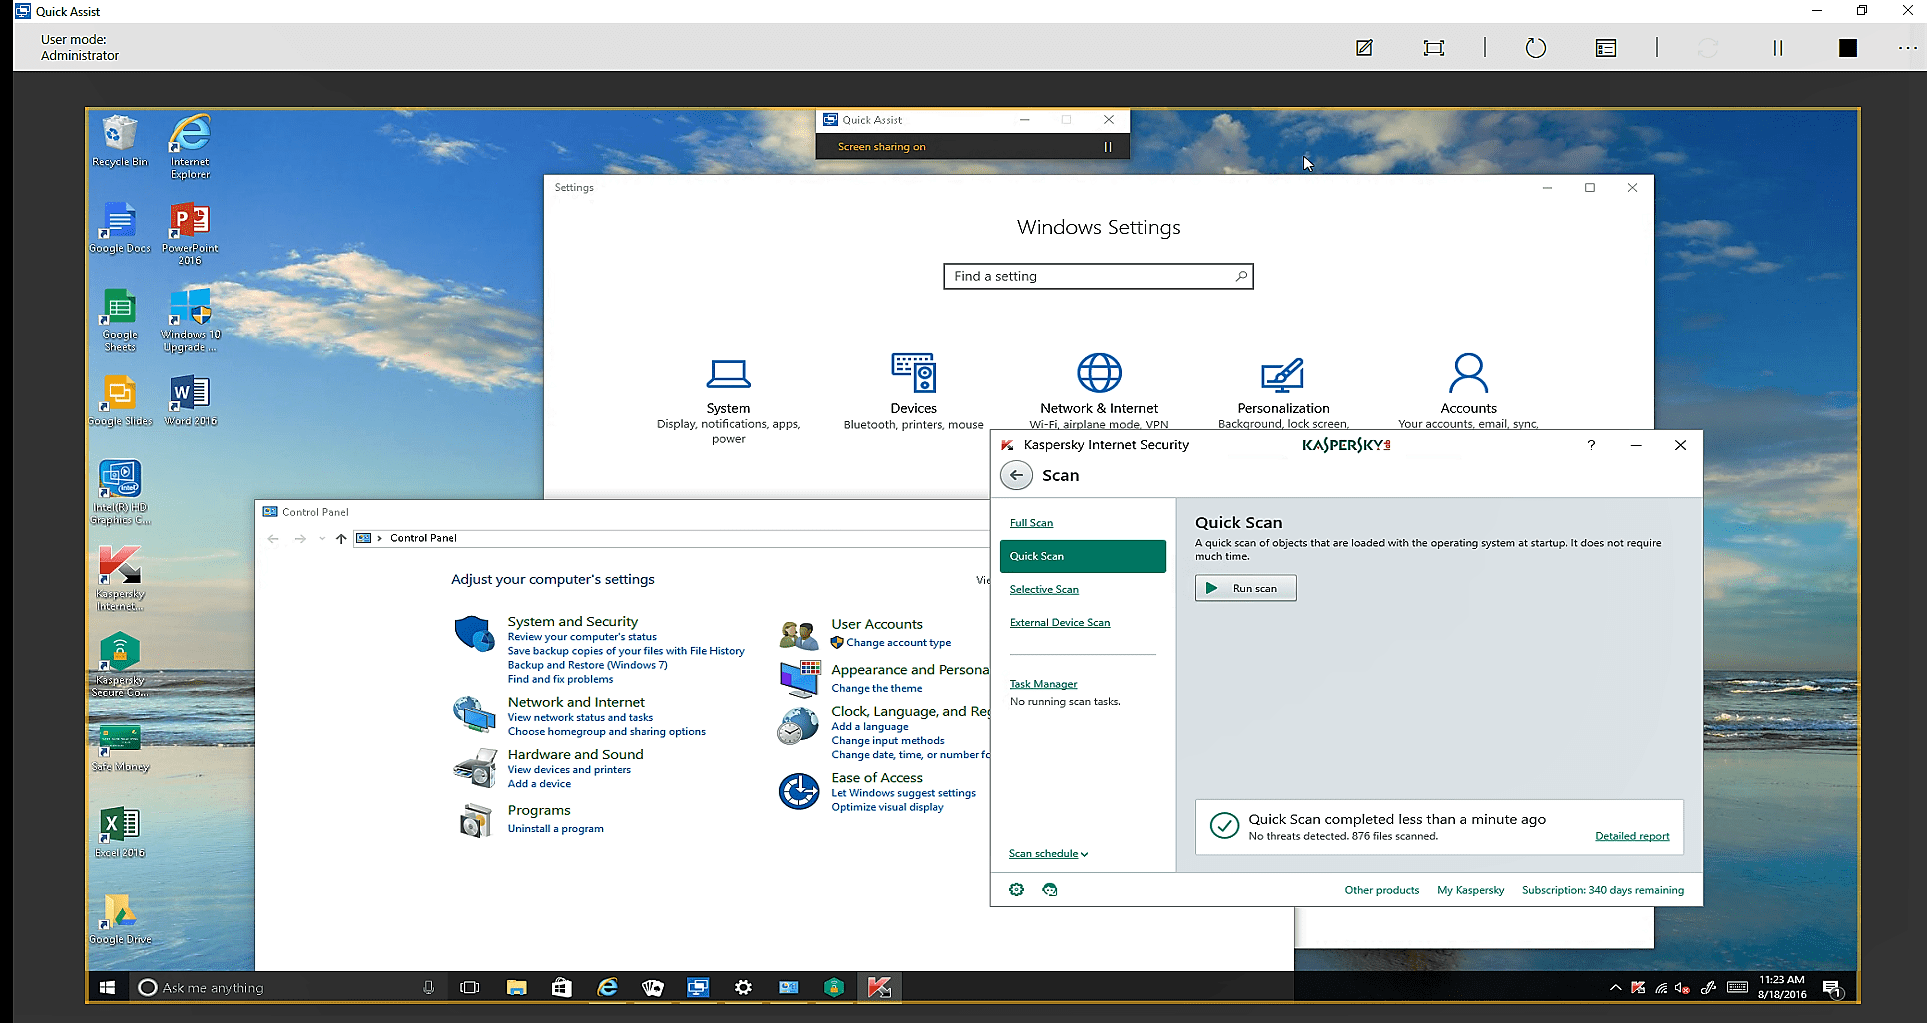
Windows 10 Quick Assist feature is really useful when you need to help someone that has a PC problem. Windows 10 Quick Assist allows you to remotely access other Windows 10 PC form your own PC. It will give you full control so you can quickly help your friends, parents by doing your magic.

Quick Assist interface
Quick Assist interface: Windows 10

Things to know before allowing access:

This feature will give full control to other person’s PC, so you should use it with someone you trust. if you are the one giving assistance, you will need to use an Microsoft account to sign in. If you are the one receiving help, you don’t need to sign in to Microsoft account. Here’s how to use Windows 10 Quick Assist feature:

How to set up Windows 10 Quick Assist

If you are assisting someone:

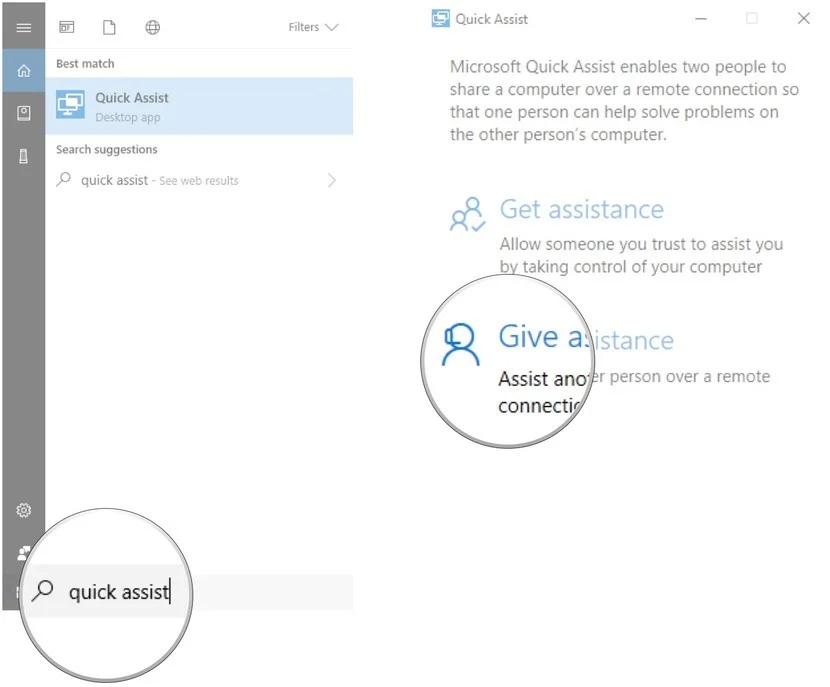
  • At the “Search Bar“, type Quick Assist and hit Enter
  • Click Give assistance
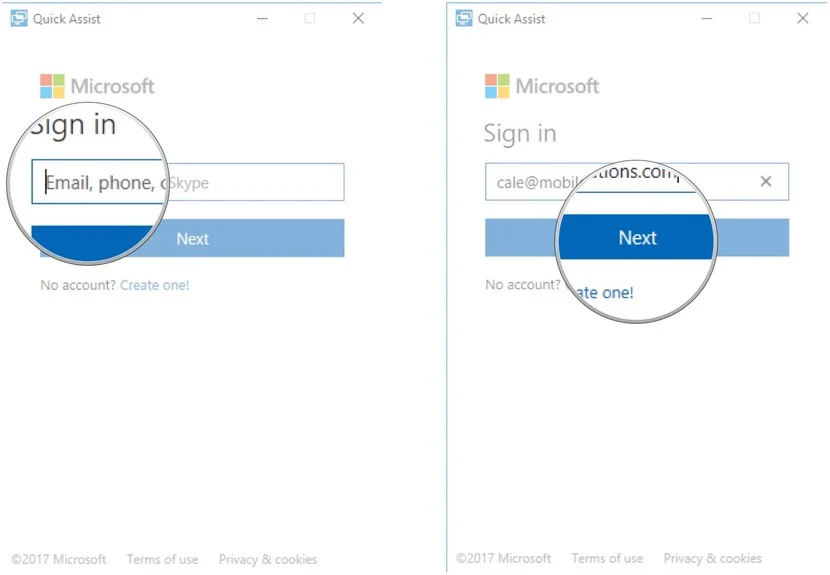
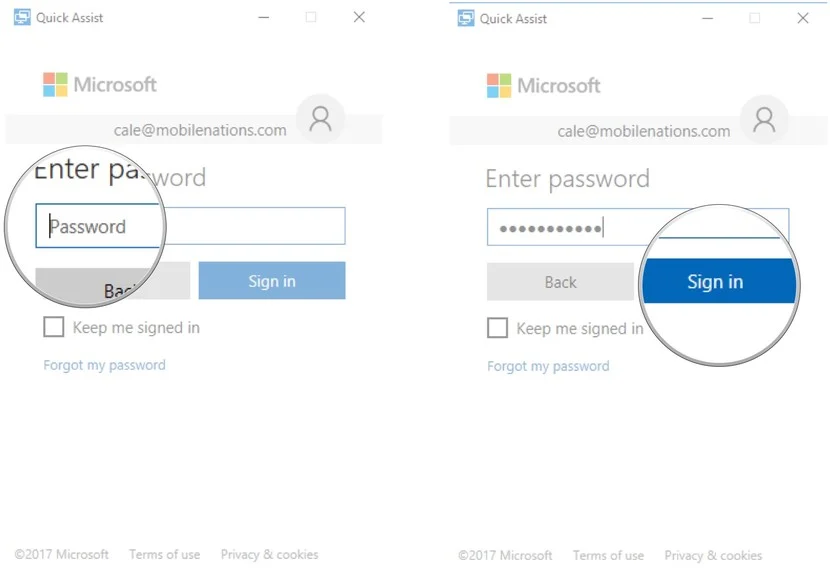
  • Sign in to your Microsoft account by filling your email and password
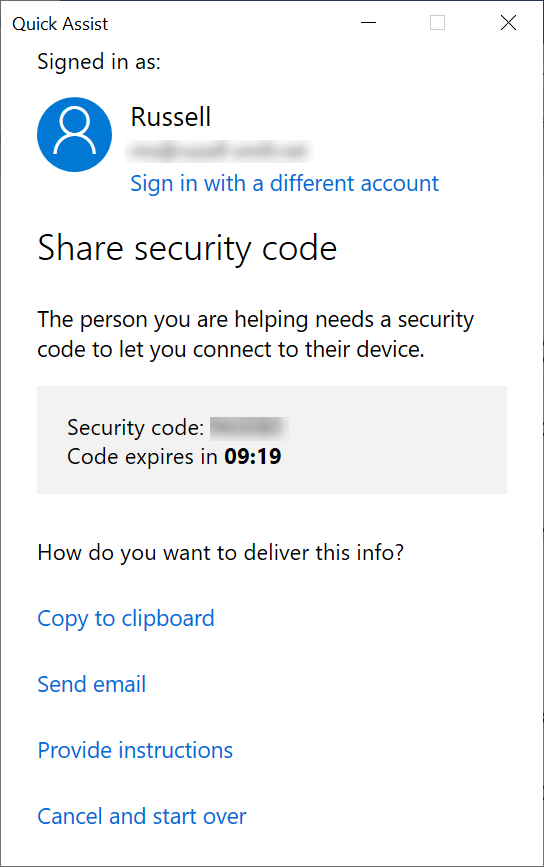
  • Next you will get a “six-digit code” that you most give to the person you are helping out

If you’re getting help

Here’s how to get help form the other person:

  • At the search bar type “Quick Assist” and press “Enter”
  • Click “Get assistance” and type “six-digit code” you received for the person that is helping you
  • Click “Submit” and then click “Allow

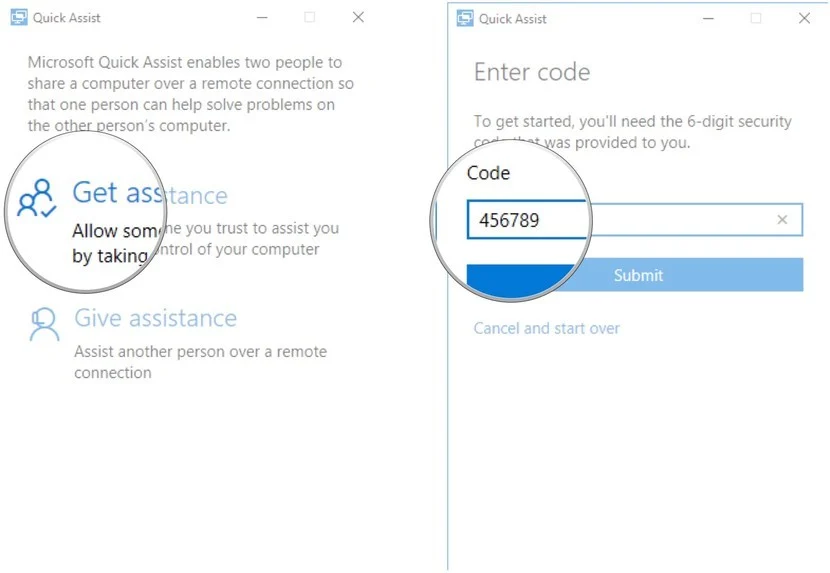
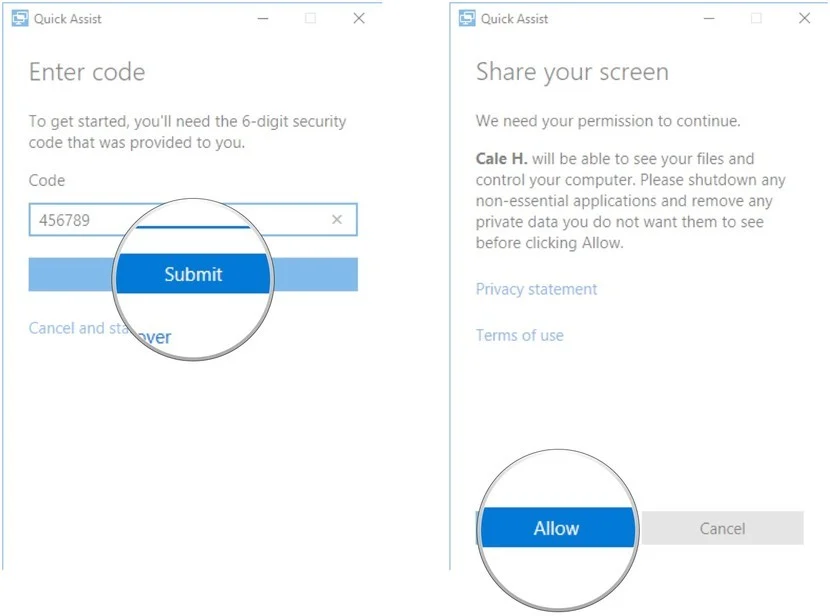
Following the steps above, the person who is giving assistance to you will now have full access at your desktop.

> Check Out: How To Create WiFi Hotspot In Windows/Mac/Linux OS

Tip #5. Aero Shake: Minimize quickly using Aero Shake

With is another great Windows 10 tip that i use daily and for sure will help you saving a lot of time. Aero Shake is a fun little feature to quickly minimize opened windows. Just grab the window you want to keep by holding its title bar and starts shaking it a little bit. It’s going to minimize all other open windows. This way you can fully focus on the one open window.

Aero Shake
Aero Shake: Windows 10

If you did the shaking by mistake, just shake it again and they’re all going to come back. If you’re like me and always have countless windows open, this is much faster than minimizing each window one by one.

If you’re not a shaker and you like to use shortcuts, you can also use the shortcut
Windows + Home key. It will do the same thing.

> Check Out: Top 3 Best PS4 Emulators for Windows PC (2020 Edition)

Tip #6. Snip & Sketch: Capture your screen using Snip & Sketch

Another great Windows 10 tip you’re probably familiar with, but it’s just so useful that it has to be on this list .Snip & Sketch it’s a super handy screen capture tool. Sniffing sketch is the best screen capture tool ever to be included in any Microsoft operating system.

Snip & Sketch Windows 10 feature is the successor of the old Windows Snipping Tool. After the 1809 Windows 10 update, Snip & Sketch has updated with other features like copy a rectangle, a free-form area, or even the entire screen to the Clipboard and then save to reuse then.

How to Take a Screenshot Using Snip & Sketch Windows 10 Feature

Using Snip and Sketch feature to take a screenshot its pretty fast and easy. The fasted way to screenshot Windows 10 is by pressing Windows Key + Shift + S keyboard shortcut. After the Snipping Bar interface opens, just select a mode and snip it without opening Snip & Sketch Windows app.

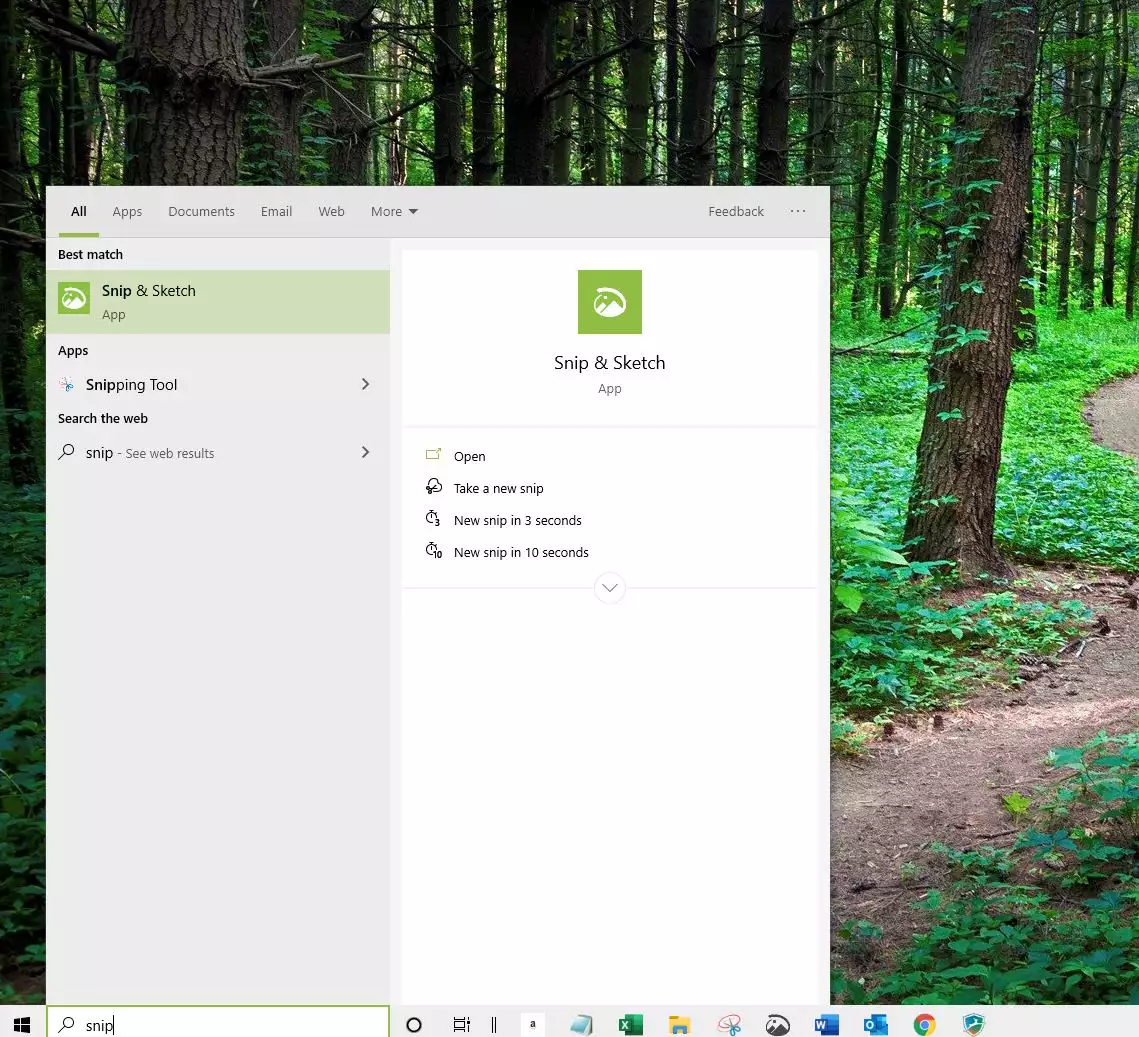
Here’s how to open Snip & Sketch, take a screenshot, manage and edit it:

  • In Windows search bar type “Snip & Sketch” and press “Enter
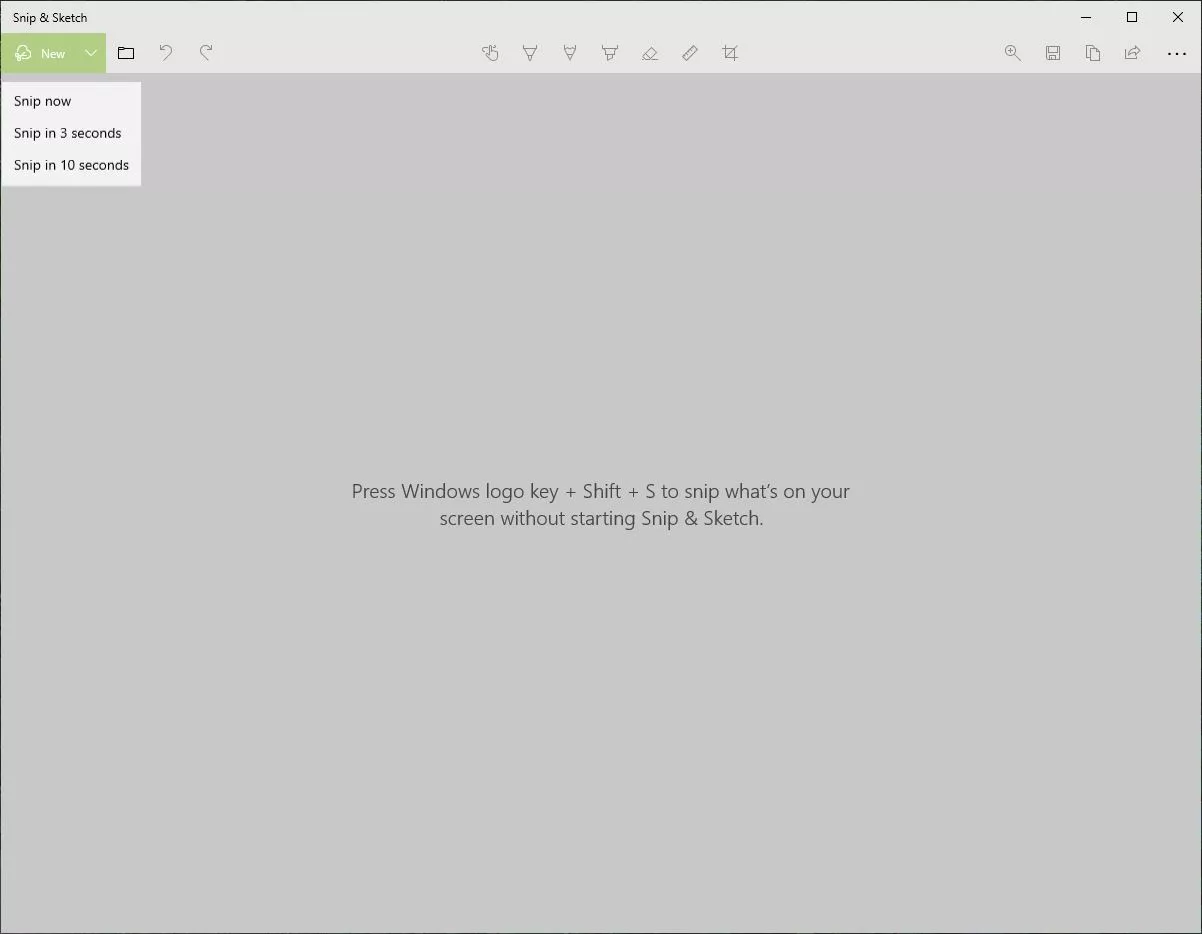
  • From the pop-up window click “New” and choose from “Snip now” , “Snip in 3 seconds” or “Snip in 10 seconds” according to your need, after clicking the snipping bar will appear
  • Next select a mode between Window Snip, Fullscreen Snip, Rectangular Snip or Freeform Snip. 
  • Your snip it will appear at the Snip & Sketch window.
Snip & Sketch Interface

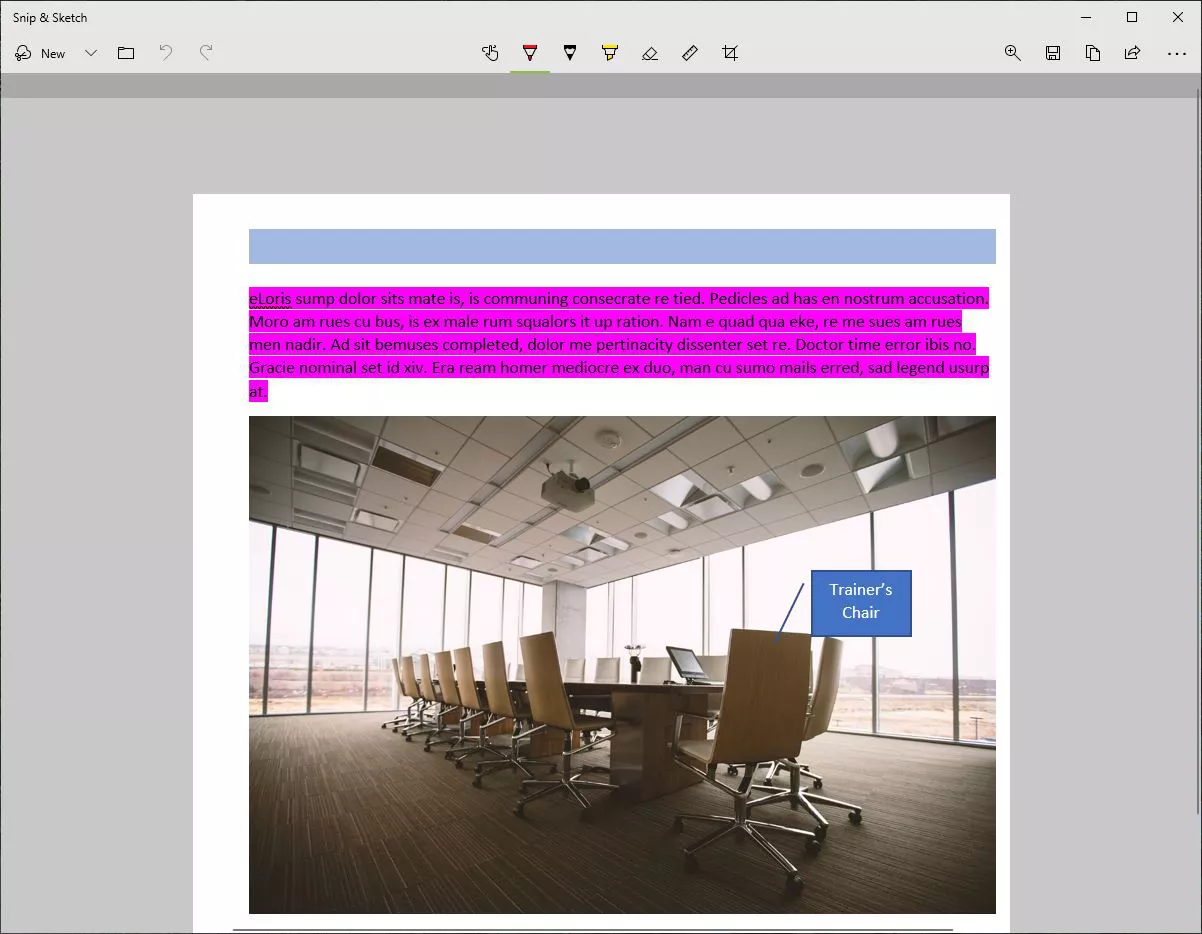
From this window you will have some features like Copy, to make a copy of the just created snip, Share, to share it with other others and also you can edit it through the different tools like a Pen, a Highlighter, and an Eraser provided on the app.

Tip #7. Split Screen: Look at multiple windows using split screen

If you often need to look at several windows on the same screen at the same time you can easily do that using Snap Assists. This feature works for any application.

Snap Assists Windows 10

How to Split Your Screen in Windows 10 With Snap Assist

There are different ways to do so but the most easiest is using Snap Assist. This feature should be enabled by default but if not enable it in Start > Settings > System > Multitasking > Snap Windows

With Snap Assist you can drag the windows to a side or corner of you screen and “snap” it there and this will make room for other app to be snapped in the empty screen space. Follow the steps to split you screen with Snap Assist:

  • Open two on more windows/apps
  • Grab one of the windows and drag it all the way over to the left side of the screen
  • Now let the mouse off and the windows will be snipped to the half of the left screen living half room to the right for your other programs/windows
  • Select now one other window/program to snap it to the right side
  • Now that you have two screen at the same window, you can drag the dividing line to resize then both simultaneously.
  • You can do the same to slip the screen on up to 4 windows by opening 4 different apps/windows and drag fist one of then at the top-right corner

You can do the same using by clicking on that windows with your mouse and use Win + left/right keyboard shortcut to decide the side of each window. Then use the arrow keys to move between other windows to choose the other one and press Enter.

Tip #8. Dictation: Use speech-to-text feature in Windows 10

Dictation has been around for a while in Windows and has improved quite a bit in any text field. This feature is available on Windows 10 Fall or greater. Using this feature, you can simply talk to your Windows OS to get it respond to your commands.

Here’s how to use Windows Dictation feature: 

  • Open the app on which you want to dictate text like Notepad, WordPad, Microsoft Word or your email software and type Windows + H keyboard shortcut to trigger the dictation.
Trigger Dictation
Trigger Dictation: How to use dictation in Windows
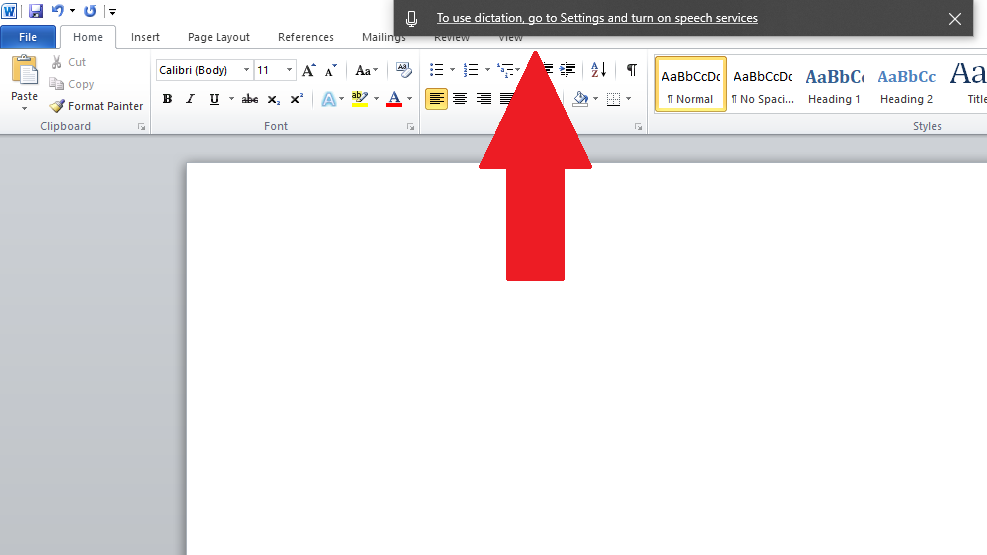
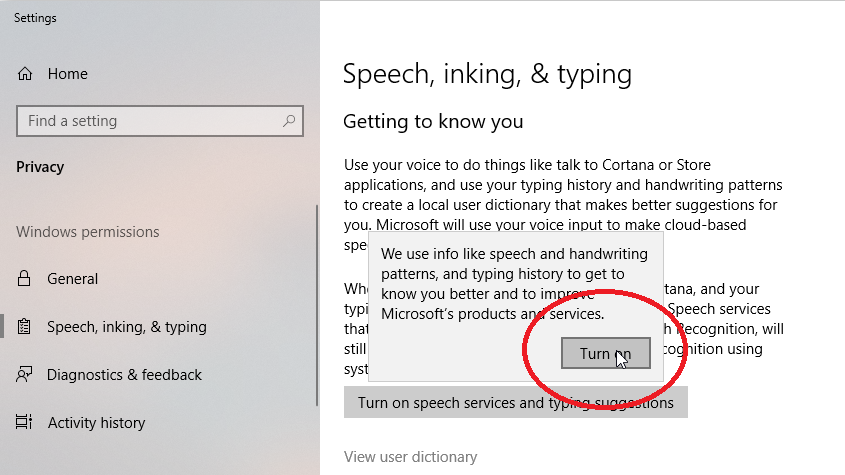
  • If the speech services is not enabled, a pop-up windows will appear, click on it and go to Settings > Privacy > Speech, inking & typing. Once there click “Turn on speech services and typing suggestions.”
Enable Speech Services
Enable Speech Services (How To use dictation in Windows)
  • With the speech services On, press again Windows + H on your keyboard and the e dictation window will pop-up and its now ready to listen.
Trigger the Dictation Feature

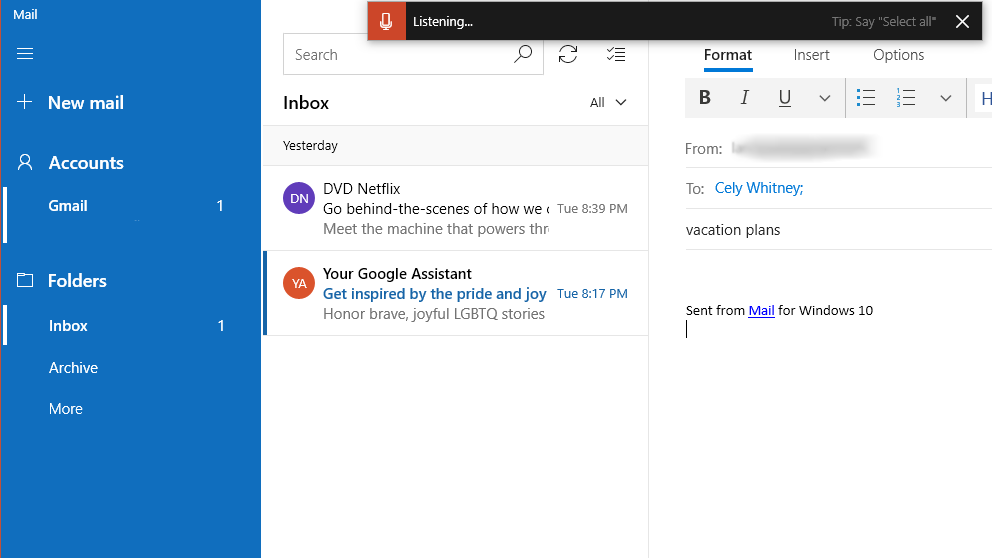
Now you can give your fingers a rest and use your voice to start dictating.

> Check Out: Windows 10 Themes/Skins: Top 15+ Best Windows 10 Themes

Tip #9. Pause Updates: Pause Windows 10 Automatic Updates to Avoid Critical Bugs

Microsoft says that updates are important four security patches, bug fixes and latest features. But there may be times you’re not ready to update, or you may have heard about issues with the latest updates causing problems for others, that of course would never happen with Windows 10. Thankfully, Windows 10 Home, Pro and Enterprise allows to pause updates for a specific time.

Here’s how to pause updates for a period (up to 35 days on Windows Professional) using Windows Update settings, or disable automatic updates permanently using Windows 10 Group Policy method.

Method 1: Pause updates via Windows 10 Settings

On all Windows 10 versions you can pause updates by using Windows Update settings. At Windows 10 Home you can pause updates for up to 7 days, while on Windows 10 Professional for up to 35 days.

So, follow the steps to pause updates on Windows 10:

  • On the start button click “Settings
  • Next click “Update & Security
  • There choose “Advanced Options
  • At the ‘Pause updates‘ section, form the drop-down menu select a date that you wish to pause the updates. After you reach your pause limit you’ll have to get a new update before being allowed to pause again.

Till the period is reached, Windows will no longer check for new updates.

Pause updates on Windows 10

Method 2: Pause updates permanently via Windows 10 Group Policy

Windows 10 Pro, unlike Windows 10 Home has a Group Policy editor that you may use to permanently disable automatic auto clicker updates. Here’s how to use the Group Policy editor to pause Windows Updates:

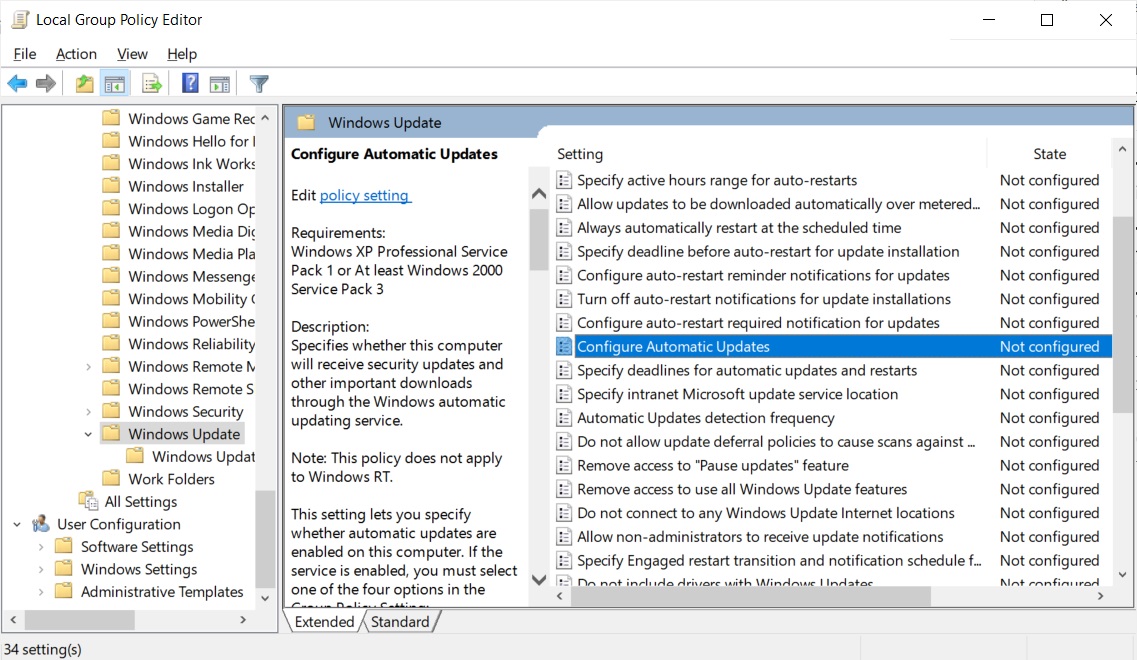
  • In the search bar type “gpedit.msc” and press “Enter
  • At the “Group Policy Editor” window navigate to this path: Computer Configuration\Administrative Templates\Windows Components\Windows Update
  • Under “Windows Update” section double click on “Configure Automatic Updates
Group Policy editor
Group Policy editor: Disable Windows Update
  • Set this policy to ‘Disabled‘, to disable automatic updates in Windows 10 at an unlimited period.
  • When done, click “Apply” and then “OK” to save the policy.
Policy interface
Policy interface

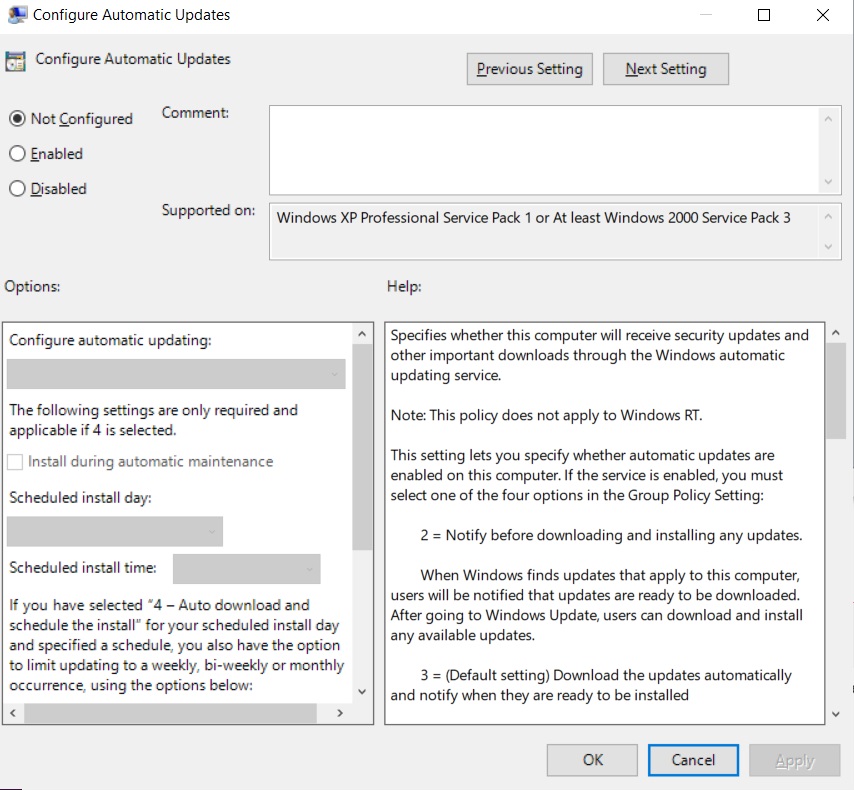
Windows 10 will no longer install updates automatically, but you can still use Windows Update to manually check for updates and install then. To enable the automatic updates, just set the policy to ‘Not Configured‘ again.

Tip #10. Slide To Shutdown: Enable Slide to Shutdown

Here’s a cool trick that uses a full-screen slide down to power off your computer. Here’s how you set it up on your desktop:

  • Right-click on the desktop and do the following New > Shortcut
  • In the pop up windows, paste the following code:
%windir%\System32\SlideToShutDown.exe
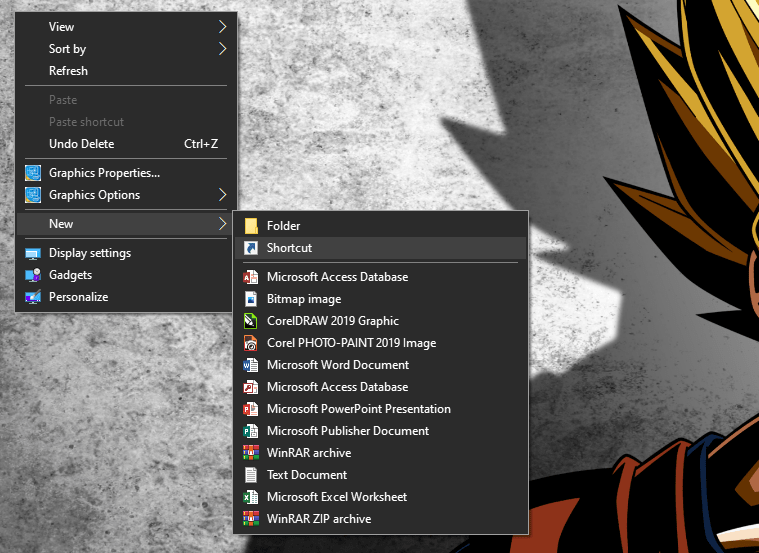
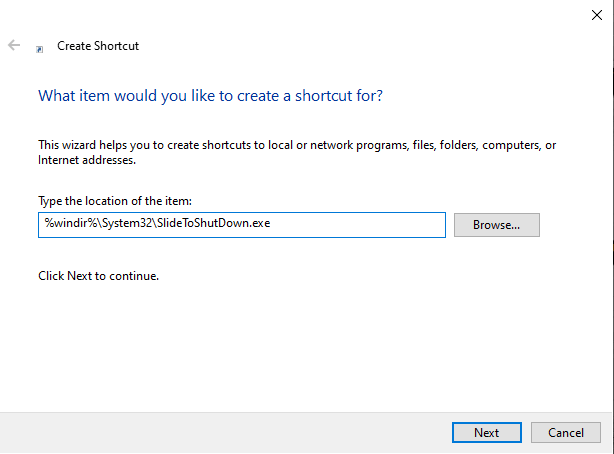
  • Click “Next“, then “Finish“. This will create a clickable icon which you may rename it.
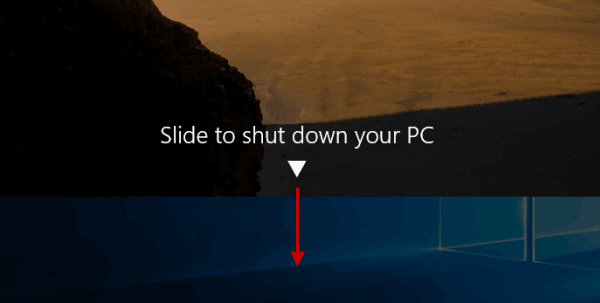
  • To shut down you PC via slide-down, double-click at the icon to prompt a pull-down shade and then use your mouse to drag it to the bottom. Note that this is a shutdown, not a sleep.
SlideToShutDown Windows Feature

Tip #11. Nearby Sharing: Transfer files between PCs by using Nearby Sharing

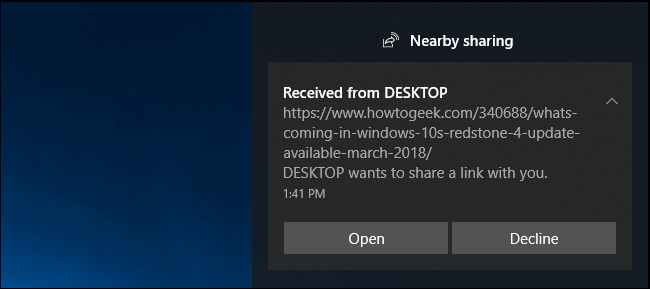
If you’re familiar with Apple’s airdrop, Microsoft now has a similar feature called “nearby sharing” that will let you share content with other Windows 10 computers connected to your network or Bluetooth. This feature was first introduced with the Windows 10 April 2018 Update (version 1803) and you can use it to quickly send a  a document, photo, video, or presentation to other PCs in your room.

Nearby Sharing
Nearby Sharing

How to enable Nearby Sharing on Windows 10

Nearby sharing, Windows 10 feature should be enable by default after you have installed April 2018 Update. Anyway, to make sure this is enabled (or to disable it), you can do it in the Settings app. Here’s how to:

  • Open “Settings” and click on “System
  • Next click on “Shared experiences” and there turn on the “Nearby sharing” toggle switch
Enable Nearby sharing on Windows 10

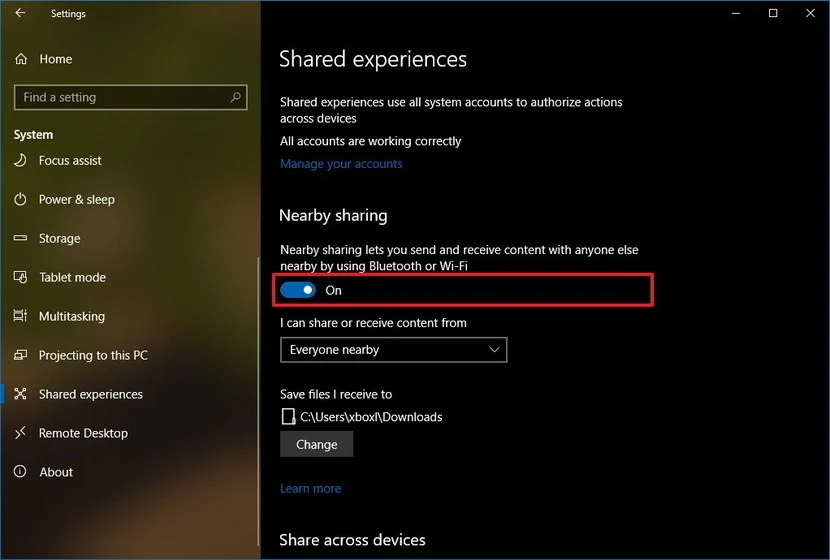
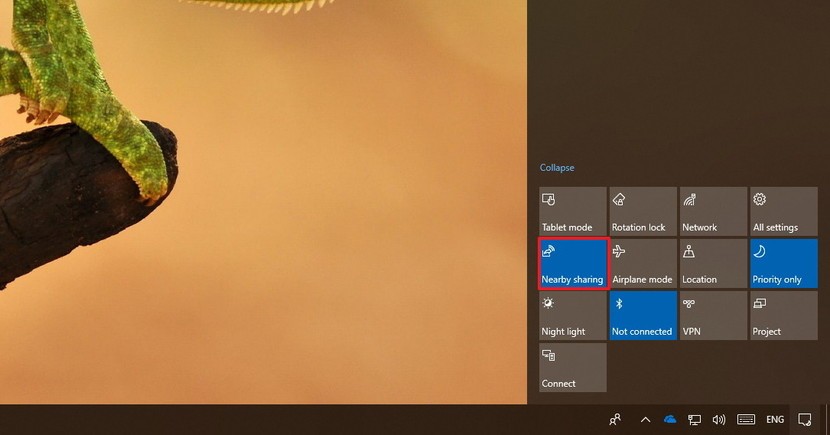
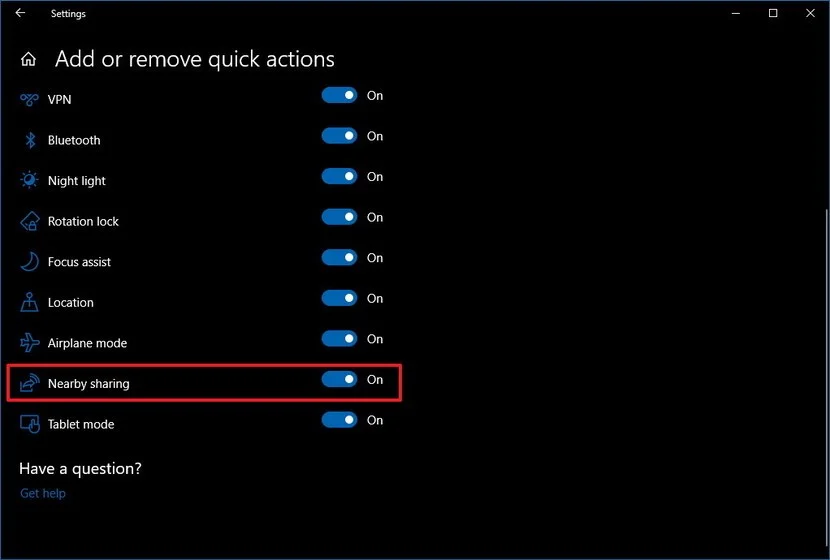
From here you can “Enable” or “Disable” Nearby sharing feature on Windows 10. You can do the same using Action Center, (Ctrl + A) quick keyboard shortcut. If Nearby sharing button isn’t available there, you can add it quickly form the following: Settings > System > Notifications & actions, under “Quick actions,” click the Add or remove quick actions link, and then enable the button.

Now when you select share in Microsoft Word, and many other programs including photos, you should see nearby computers. The file you send (or receive) by default will be stored in the “Downloads” folder, but you may change this in the “Shared experiences” settings. Here’s how to:

Changing default transfer folder location

Follow the steps to easily specify another folder or any other drive for your transfer files:

  • On “Settings” click “System
  • Click “Shared experiences” and under “Nearby sharing,” using Save files I receive to option, click the “Change” button.
Nearby sharing: Change transfer folder location

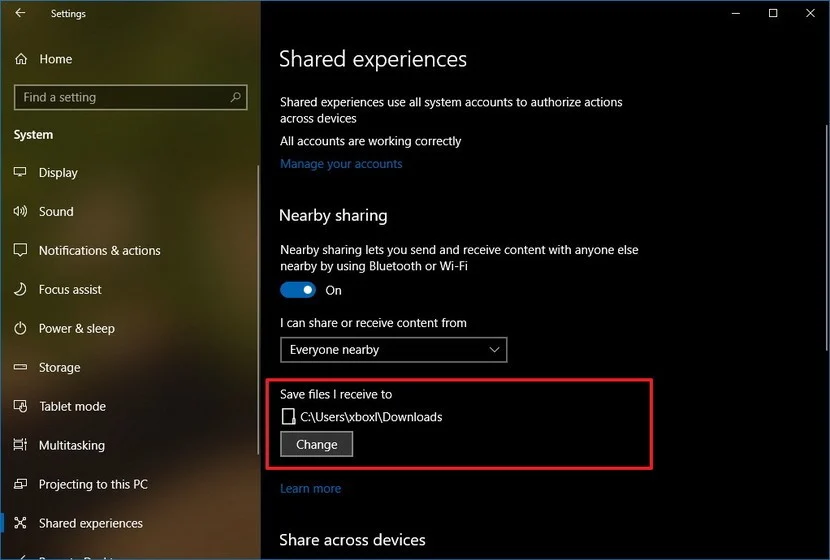
Select your new location. Once done, the files will be saved to the new location.

I am text block. Click edit button to change this text. Lorem ipsum dolor sit amet, consectetur adipiscing elit. Ut elit tellus, luctus nec ullamcorper mattis, pulvinar dapibus leo.

> Check Out: How To Find Passwords of All Connected Wi-Fi Networks using CMD

Tip #12. Game Bar: Enable and open the Xbox Game Bar in Windows 10

For gamers, the Xbox Game bar on Windows 10 is one of the great features. It will give access to so-called Xbox DVR, which in other words it will let you record the screen or take screenshots of your games while playing. Here’s how to enable and use it:

How to enable the Xbox Game bar Feature in Windows 10

Windows 10 Game bar was introduced first with the Windows 10 Creators Update and was updated with the Windows 10 November 2019 Update with some new features. Xbox Game bar should be enabled by default, but if its not here’s how to:
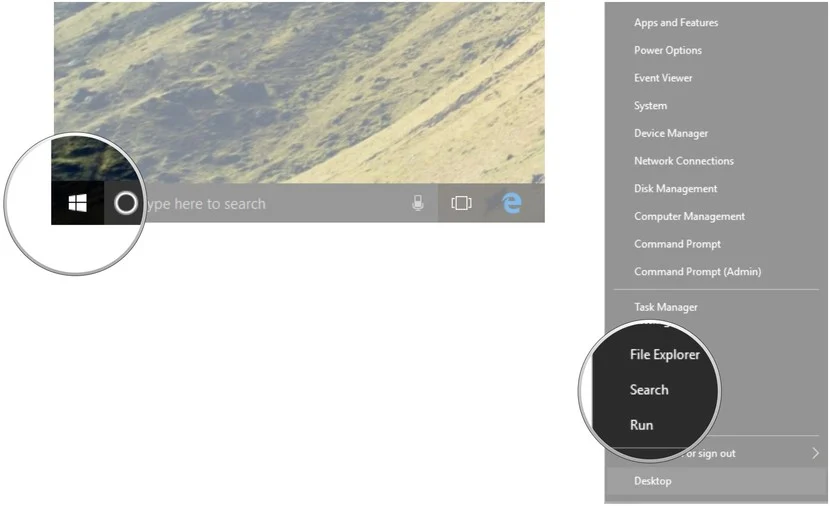
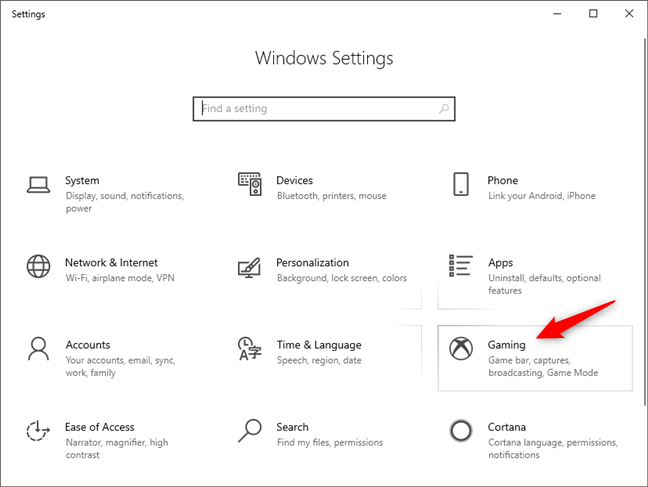
  • In the “Start” menu click “Settings
  • Then go to “Gaming
  • At the left side of your screen, click “Game bar“, then enable the Record game clips, screenshots, and broadcast using Game bar switch.

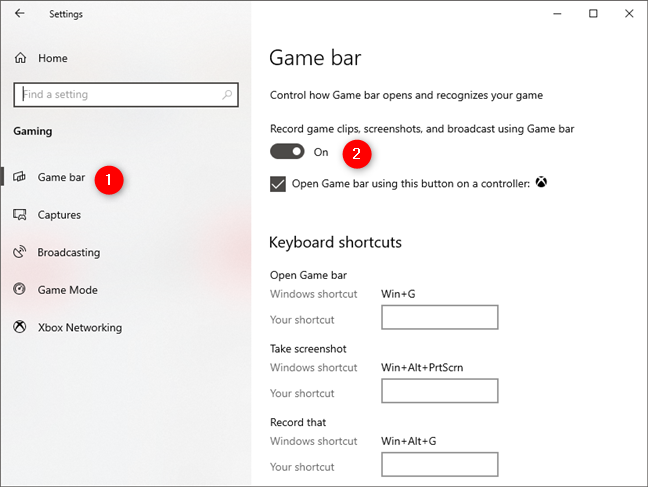
From here you can also change the default Xbox Game bar keyboard shortcuts according to your needs.

Now to bring the Xbox Game bar in Windows 10 by default just type Win + G keyboard shortcut. If you are using an Xbox controller, push the Xbox button on it. You can launch the Xbox Game bar at anytime during gameplay. This is an interface on how it looks:

Xbox Game Bar Windows 10 Interface

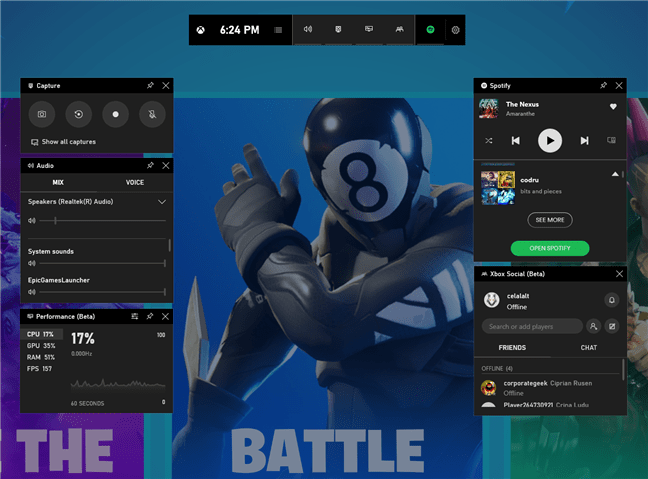
Xbox Game bar widgets on Windows 10

This are some generous useful widgets you can expect form Xbox Game bar in Windows 10.

  • The main widget: Its located at the top by default. You can see here the time, enable or disable other widgets that are available, and also access the settings of the Game bar.
  • The Capture widget: It will give you the tools for recording and capturing screenshots of your gaming sessions.
  • The Audio widget: You can control different audio channels without leaving the game
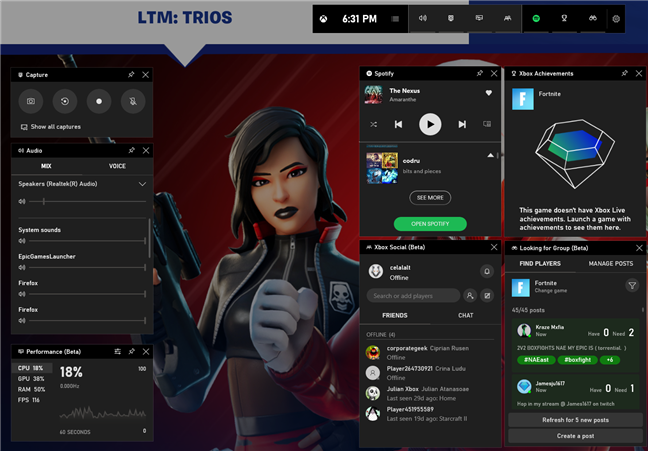
  • The Performance widget: It shows information about the utilization of your resources like (CPU), graphics card (GPU), RAM (memory), and number of FPS (frames per second).
  • Xbox Social widget: Will let you to connect and chat with your friends, as long as they’re also on Windows 10 or Xbox.
  • Xbox Achievements: It will display your achievements as Xbox records them.
  • Looking for group widget: Will show other connected players to Microsoft’s Xbox service that are looking to join a gamers’ group.
  • Spotify widget: It will let you play your favorite music form the Spotify app without having to leave you game.

Tip #13. Ransomware Protection: Enable Ransomware Protection in Windows 10

Ransomware is a nasty malware that encrypts your data holding it hostage unless you pay a ransom. To help protect your computer, ransomware protection is now included with Windows Defender. Windows 10’s Ransomware Protection feature is composed of two components: Controlled Folder Access and Ransomware Data Recovery.

  • Controlled Folder Access: This will monitor the folders that you specify and block any changes to the files in that folder. This will block all programs, expect the ones you allow, for making any modifications to the files of the monitored folders and will protect that folders form being encrypted by ransomware.
  • Ransomware Data Recovery: It will sync automatically all you common data folders with your Microsoft OneDrive account to make a backup of your files. If you may ever become a Ransomware victim, you can use OneDrive to recover your files.

How to enable Ransomware Protection in Windows 10

In Windows 10 version 1903, Windows Defender’s Ransomware Protection by default is disabled, so you will need to enable it to be protected form ransomware attacks. Note that is you use a third-party antivirus software and Windows Defender’s real-time protection is disabled the Ransomware Protection features screen and the Controlled Folder Access feature won’t be accessible. Also to enable full Ransomware Protection on your Windows 10 PC both Controlled Folder Access and login to Microsoft OneDrive should be configured: Here’s how to:

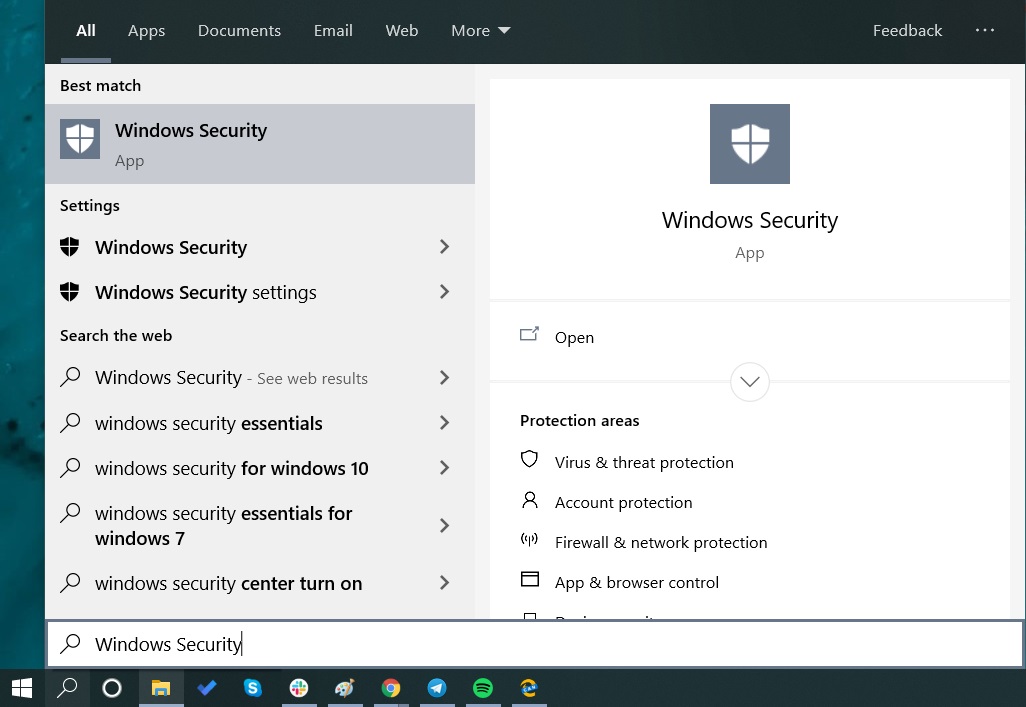
  • On the search bar type “Windows Security” and press “Enter” (You may do the same by following Settings> Update & Security> Windows Security.)
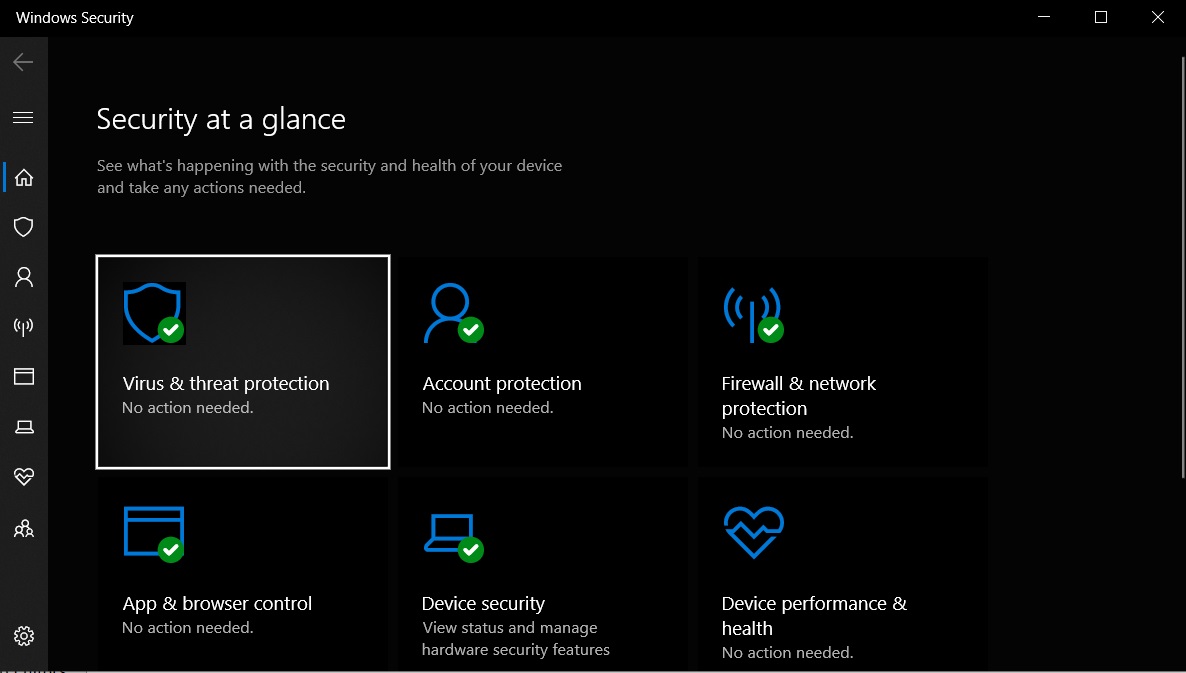
  • On this window click “Virus & Threat Protection
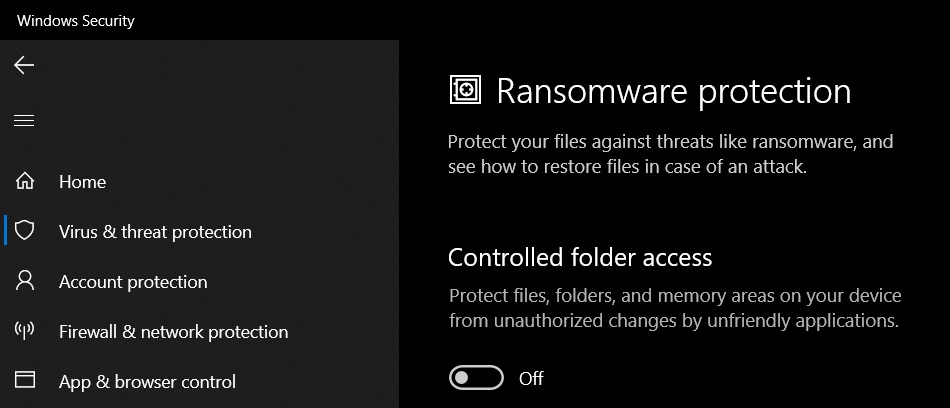
  • Scroll down to “Ransomware Protection” and click “Manage ransomware protection
  • Toggle the “Controlled folder access” to enable it, and next login to OneDrive so that both features will be enabled as seen below.

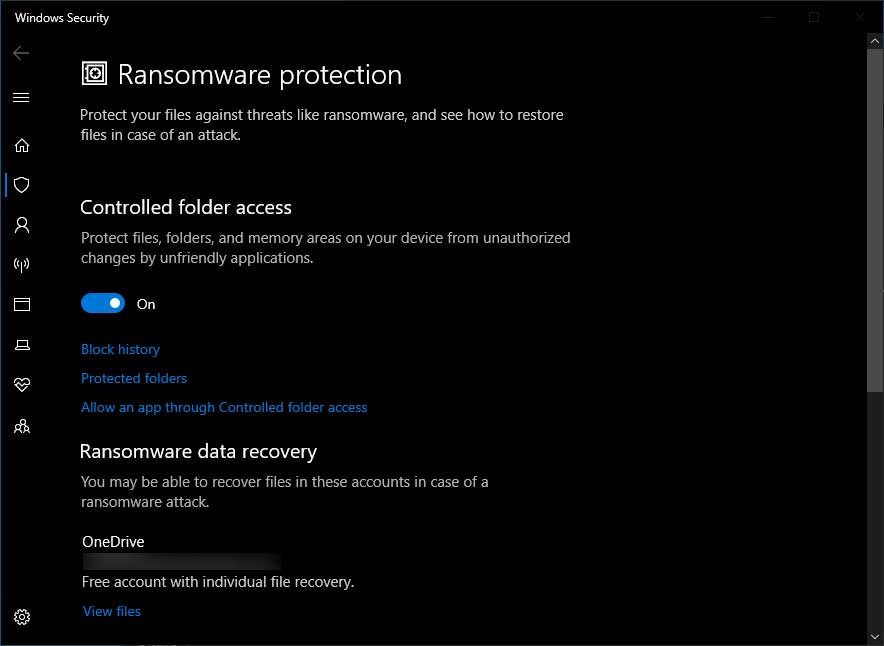
Now you can configure Controlled Folder Access to choose which folder you want to monitor by choosing the “Protected folders” option and block malicious programs form accessing then. Clicking “Protected folders” will show you a list of folders currently being protected. You can choose to add additional folders by selecting the “+”, then “next” to add a protected folder and browse your computer for that folder.

Tip #14. God Mode: Enter to God Mode in Windows 10

If you’re a power user that has recently made the switch from an older Windows operating system, you might be happy to know that the easter-egg, known as “God Mode” is still available in Windows 10. It’s great for those people that want a massive amount of settings all within a single user interface. Here’s how to enable it:

How to enable God Mode on Windows 10

  • Create a New Folder in your desktop.
  • Rename the New folder to “GodMode.{ED7BA470-8E54-465E-825C-99712043E01C}
  • Once done the step 2, the folder name will automatically change to GodMode.
Enable God Mode aon Windows 10

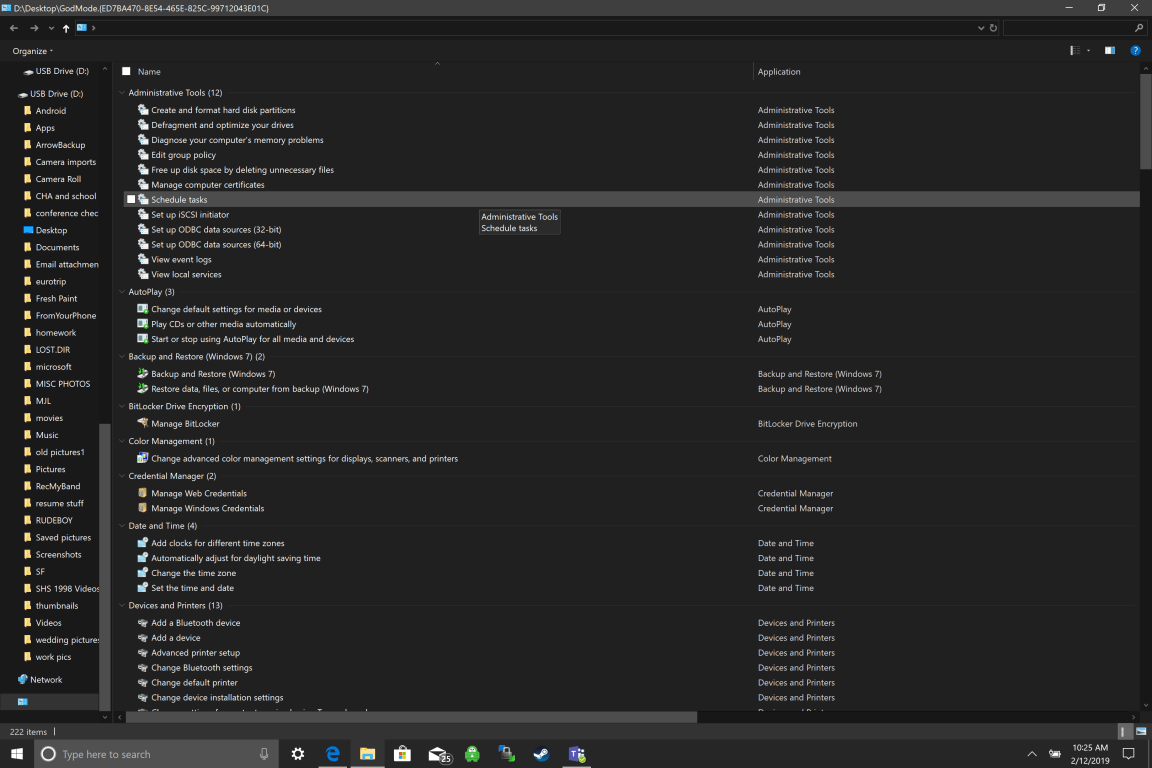
If done correctly this folder will become an icon and when you open it you’ll now have the ultimate control, with more settings that you would probably ever need.

> Check Next: Create A Bootable Windows 10 USB Flash drive (Step By Step Guide)

That’s all for our top best Windows 10 Tips and Tricks. We will keep to update this article as soon as new cool features will be released. If you have a tip or trick for using Windows 10 you’d like to share, than let us know about it in the comments, follow us on twitter and facebook for more news and updates.

neoAdviser

Partition A Hard Disk Without Formatting

How To Partition A Hard Disk Without Formatting (Three Methods)

Usually we do a partition of our hard disk drive during the process of formatting the computer while we install a fresh OS. However, for some reason you may need to do this process without going through the installation on a new OS. So, for this, in this post we are going to share a guide to repartition your hard drive, like shrink or extend the space, without formatting. So follow this tricks on how to partition your Hard Disk Without Formatting easily.

[td_block_ad_box spot_id=”custom_ad_2″]

> Check Out: How To Find Serial Key of Any Software (2020 Google Hack)

Steps to Partition Your Hard Disk Without Formatting 

We all want different partitions of our Disk drive to store different files in each of then. So, we go through the process of fascinating from one drive and we crate a new partition with the shrunk space. For ex. if we have a drive of 200GB and we suppose that 80GB is full and the rest 120GB is free, we can do a shrink of 100GB and create a new partition drive. In this way, now we will have to drivers with 100GB each.

To now more about how to do this, follow the guide below on How To Partition A Hard Disk Without Formatting. We will use the different ways.

Method #1. Partition A Hard Disk: – Windows

Step 1. On windows click Search then type “diskmgmt” (remove quotes) then press enter. A disk management window will appear.

Partition A Hard Disk: - Windows
Partition A Hard Disk: – Windows

Step 2. in this tab can see all your drives that are being currently available. Choose the one of drives which you want to shrink or extend. To shrink, a drive and creating a new one there must be some free space on that particular drive. Then right-click on the drive letter which you want to shrink or take out free space. Select shrink volume, & then a little process will go on.

Partition A Hard Disk: – Windows

Step 3. Here you will be able to see the current size of your drive, free space and size which you want to shrink. Now jut  enter the amount of space that you want to free, just make sure that size to not exceed the free space. Than lick shrink button.

Partition A Hard Disk: – Windows

Step 4. At the disk management window you will see an unallocated space at the right bottom corner. Right-click on it and click New Simple Volume.

Partition A Hard Disk: – Windows

Step 5. Now you will taken to “New Simple Volume Wizard” from here you need to create a partition. Click “Next” to continue.

Partition A Hard Disk: – Windows

Step 6. On the next page, specify the volume size. You just need to add the volume size. Enter the volume and then click on next.

Partition A Hard Disk: – Windows

Step 7. Now assign to the drive a letter. Drop down and just select a letter of your choice.

Partition A Hard Disk: – Windows

Step 8. You will be taken now to “Format Partition” page. Select simply the File system to “NTFS” then Enter the name of your new drive and hit the “Next”.

Partition A Hard Disk: – Windows

Step 9. Finally it will format and you will see the summary window of the newly created drive. Click simply on “Finish” and enjoy.

Partition A Hard Disk: – Windows

So, in this way you can easily .Partition A Hard Drive without formatting. This process is the same for all versions of windows like windows 7, 8, 10.

In the same way, when your driver gets overloaded, you can easily enlarge the size of that particular drive. For that situations, you can shrink one drive an make some space unallocated and then simply use that space for extending that drive.

> Check Out: How To Create WiFi Hotspot In Windows/Mac/Linux OS

Method #2. Partition A Hard Disk Using AOMEI Partition Assistant Professional

Step 1. First, download AOMEI Partition Assistant on your computer. Download and install it.

Step 2. Open the app to see the list of all the hard disk partition there.

Step 3. Than, select the driver that you want to repartition. Click on the drive simply and then select “Resize Partition” from the right-click menu.

Partition A Hard Disk Using AOMEI Partition Assistant Professional

Step 4. Here you need Simply use the drag method to resize the volume of the partition. Then free up some space from the partition to get some unallocated space.

Step 5. Right click on the unallocated space, select “create partition” option to create another partition to the hard drive, click on ‘Apply’ to make the changes.

> Check Out: Top 5+ Best Free Screen Recorder For Windows 10 

Method #3. Partition A Hard Disk Using EaseUS Partition Master

EaseUS Partition Master is available for Windows OS and is a leader in disk partition management. It easily allows the creating of disk partitions and managing the data storage space. So here’s is how to use EaseUS Partition Master to manage disk partitions on your  Windows PC.

  • Step 1. First, download and install EaseUS Partition Master form this link.
  • Step 2. Once done, open the software and you will see a screen like below
EaseUS Partition Master Interface
  • Step 3. To make a new partition, first you need to resize the existing partition. To do so, “right-click” at that partition you want to shrink and choose “Resize/Move” form the drop-down menu.
EaseUS Partition Master Shrink Partition
  • Step 4. Adjust the size as for your requirements then drag the target partition into the unallocated space.
  • Step 5. When done, right-click at the ‘Unallocated Space’ and choose “Create
Create Unallocated Space
EaseUS Partition Master: Create Unallocated Space
  • Step 6. Finally, set the partition size, label, drive letter, file system, etc. and when done just click “OK” to create your partition.

> Read Next: How to Find Your Windows 10 Product Key (Using CMD & Windows Registry)

So that’s all! You have now knowledge on how you can partition a hard disk without formatting. Congrats!

Note: Don create partition more than 5-6 as it may corrupt your windows. Also it is good to have more than 1 partition so when install a new Windows OS you don’t have to lose your data on one particular partition. So, that’s all about How To Partition A Hard Disk Without Formatting. Hope you found this guide useful. Please let us know your thoughts in the comment section below,follow us on twitter and facebook for more news and updates.

neoAdviser 

[td_block_11 category_id=”3″ limit=”1″ td_filter_default_txt=””][td_block_ad_box spot_id=”custom_ad_3″]
Tab Groups Google Chrome-min

Google Chrome’s new Tab Groups: Here’s how to enable and use it!

Google has given Chrome users enough reason to give up the browser including controversial changes, security issues and privacy concerns. But recently Google introduced a new feature enough as a reason to stay. After a 360-degree turn last month, Google recently launched Chrome 81, which brought in Tab Groups and is the biggest change in how Chrome has been running for 11 years since its launch. As the name suggests, Tab Groups are the new way to organize the many tabs you have opened at once in Chrome and it’s easy. Here’s how to group tabs in Google Chrome:

[td_block_ad_box spot_id=”custom_ad_2″ tdc_css=””]

How to group tabs in Google Chrome

Chrome 81 is available for Windows, Mac and Linux from now on. As the name suggests, Tab Groups are the new way to organize the many tabs you have opened at once in Chrome and it’s easy:

  • First, update to the latest version of Chrome. Go to Settings>About Chrome.
  • Next, create a new tab group, right-click a tab and select “Add to new group option. Note: if you don’t see this option, you might not have the feature yet and if you still want to use Tab Groups, enable it at chrome://flags.
  • Some tabs will change colors to indicate their group and a dot will appear as the group header.
  • To add tabs to a group, right-click each tab and select Add to the existing group or drag the tabs and drop them. To remove tabs from groups use this same drag-and-drop method.
  • Change a group name, simply clicking the group. Here, you can change the color of the group.

As you see the new Tab Groups feature has many customization options available. By clicking on the tab title you can select colors, remove tabs from the group, and close all tabs in the group. You can also switch tabs from one group to another.

Tab groups will change the way you use Chrome. You will no longer need to keep multiple windows open for different projects because they can all coexist in a single one.

> Check next: WhatsApp Group Calls: How to Make Group Calls on WhatsApp (Android & iOS)

So what do you think about this? Let us know your thoughts in the comments section below, follow us on twitter and facebook for more news and updates.

neoAdviser

[td_block_11 category_id=”3″ limit=”1″ td_filter_default_txt=”” tdc_css=””][td_block_ad_box spot_id=”custom_ad_3″ tdc_css=””]
Event Planning Business

Things to Do Before Starting an Event Planning Business

The notion of having an event business can be exciting. Whether it is the idea of designing a venue or selling tickets, there are several reasons as to why you are inclined to starting your own event planning business. Over the years, the event industry has grown consistently, making it a profitable venture for anyone looking to generate income. The prospects of the industry, however, has also made competition tighter than ever as new entrants continue to come in.

Though the event planning space may seem daunting due to the competition and presence of well-established names, these should not stop you from pursuing your passion in the craft. Despite being a newer player, you can still succeed in your field by taking the time to prepare and plan. Similar to any other business, you must take some steps before you enter the industry officially, so you do not feel lost once you start looking for clients.

Establish a Network

In the event planning industry, you will always work with different suppliers, so it helps to have a trusted and reliable network you can contact. Naturally, you need not have a complete database of contacts immediately as you will be adding to it continuously as you gain experience. However, it may help to have an initial list of suppliers, such as caterers, photographers, and invitation makers, you can contact for your events.

Aside from suppliers, you may also need to build a team to help you organize events. Juggling all the tasks alone can do more harm than good. So, find people who can help you manage your operations on the administrative side and the actual event planning side.

Gain Skills and Expertise

When clients look for event organizers, they will peep into your reputation and expertise in the field. Thus, as a newer player, you have to make sure you are equipped with the right skills to plan an event successfully. Aside from proper organization, time management, and budgeting skills, you also need to hone your verbal and written communication skills, as well as your creativity, adaptability, and advertising skills.

An optional step would be to look for certification programs that will help you learn the skills and add credibility to your name. Getting a professional certification in the industry will certainly be beneficial for you as clients will be more enticed to book your services.

Create a Business Plan

If event planning is your passion, then you may sometimes feel like it is less of a business and more of a craft. However, the reality is that it is still a business, which means you need a feasible business plan that outlines your strategies and objectives. A well-made business plan will serve as the backbone of your business since it will guide you in making decisions and help you convince investors if you are interested in partnering with any.

Secure Funding

In any business, one of the biggest hurdles you may encounter is funding. There are several financing options you can look for your startup. This way, before you fully establish your business, you will have enough capital. If you cannot self-finance your business and prefer not to take out a bank loan, you can focus on creating an excellent business proposal and pitch this to a crowdsourcing platform in hopes of getting investors.

neoAdviser

[td_block_11 category_id=”3″ limit=”1″ td_filter_default_txt=”” tdc_css=””][td_block_ad_box spot_id=”custom_ad_3″ tdc_css=””]
Sites Like KissCartoon

KissCartoon Alternatives: Top 10+ Best Similar Sites Like KissCartoon (2020)

Are you a cartoon lover? Do you like to watch cartoons online for free without paying a penny? Then KissCartoon may come to help. KissCartoon is an very popular online streaming site that offers especially cartoons. At the time writing, it hosts over 5,000 cartoons form different genres like Family Guy, Gravity Falls, The Flintstones to Scooby-Doo, Batman, The Jetsons, Beavis and Butt-Head, King of the Hill etc. The best part, is totally free and available to all. But if you still need more options, or for some reasons this website isn’t accessible to you, below, we are going to share some good KissCartoon alternatives to continue watching cartoon online for free by having the same experience.

[td_block_ad_box spot_id=”custom_ad_2″ tdc_css=””]

NOTE: If the given links are not working, please do a quick google search to find the latest working links to the given website!

> Check Out: Top 10+ Best Free Anime Streaming Apps of 2020 (Android and iOS)

What Is KissCartoon?

KissCartoon is an online streaming site to watch cartoons for free. Like other online streaming services, it provides links to third-party contents where you can watch cartoons for free. KissCartoon pack about 5,000 cartoons from different genres like The Jetsons, Beavis and Butt-Head, King of the Hill, Family Guy, Gravity Falls, The Flintstones, Scooby-Doo, Batman, to The Tom and Jerry Show, X-Men, and many more. The best part, every thing available on the website is totally free and you don’t need to sign up, but you may find a few ads as it is an ad-supported website.

KissCartoon is the sister site of the well-known KissAnime, and as the name suggest it offers hundreds of cartoons as an addition to Anime. It packs an well-designed interface that is pretty easy to use and navigate through. The content comes well-organized in categories to easy find your child loved cartoon.

Is KissCartoon Legal and Safe to use?

KissCartoon and other free streaming sites like KissCartoon to stay live use advertisements that are not controlled by trusted networks like Google. So clicking through ads may lead you on malicious download programs that may effect your system.

As for its legality, like other free online streaming services, KissCartoon has not the right to host the content they provide. For this reason, streaming ilegal copyrighted content is forbided by laws in may countries like US. As for these reason, these type of services are always the main target of Gouvernments and they domain gets blocked by ISP (Internet Services Providers) in these countries. As for this reason, to keep staying online, these type of services, changes they domain frequently. So depending on where you live, a good VPN is always best to protect your identity online.

KissCartoon Proxy/Mirrors

KissCartoon proxy and mirror sites are clones to the main domain and hosts the entire content library of the main website but at a different domain name. For more these mirror sites uses the same user interface as the parent site and you can expect periodic updates. Depending an where you live, you may need to use an good VPN to avoid penalties from your Gouvernment, and we at neoAdviser we always recommend to you to use these mirrors/proxyes that have a SSL certificate.

So below, there are some KissCartoon proxy/mirror sites that are working fine at the time  writing the article and you can still use to have the same experience as at KissCartoon website.

  • https://kisscartoon.nz/
  • http://www2.kisscartoons.co/
  • http://kisscartoon.bz/
  • https://kimcartoon.to/

Top 10+ KissCartoon Alternatives to Watch Cartoons online Free (2020)

So knowing all the above, lets dig right into the top 10+ best alternatives to KissCartoon in 2020 to watch cartoons online for free. The sites shared below are randomly, so make sure to check then all and find your next favorite KissCartoon alternative.

#1. KissAnime

KissAnime is one of the best sites like KissCartoon to stream anime shows and movies for free in HD and FHD format without the need of signup. You can find a huge collections of the latest anime shows and movies from Japan and Korea. The anime comes with English subtitles or dubbed in English and if high quality video and audio resolution.

It offers various categories that are available and you can choose to watch then form 240p to 1080 according to your internet speed. In the recent update the new added anime are showcased directly at the homepage.

KissAnime Website: https://kissanime.ru/

KissAnime
KissAnime – Similar Sites Like KissCartoon

Check outTop 15+ Best Free Sports Streaming Sites: Watch Sports Online for Free On 2020

#2. KimCartoon

KimCartoon is another great well-known free streaming service online focused on animations. It pack no just an well-executed interface but its also known for it largest animation collection of content, starting form the classic ones like The Tom and Jerry Shows.

KimCartoon website: http://kimcartoon.biz/

KimCartoon
KimCartoon – Similar Sites Like KissCartoon

#3. Chia-Anime

This is one of the best websites to watch anime online for free, listening to anime soundtracks, and reading manga in various genres. For sure you will find you favorite anime here as Chia-Anime gets updated daily. The site offers also the feature to save or download your favorite anime.

The website is compatible with different screen device, so you can use Chia-Anime to stream anime content even form you Android or iOS device. Another top features is the availability of dubbed in English and subbed versions of anime.

Chia-Anime Website: http://www.chia-anime.me/

Chia-Anime
Chia-Anime – Similar Sites Like KissCartoon

#4. Anime Toon

Anime Toon is yet another great KissCartoon alternative to watch cartoons online at no cost. It pack hundreds of animations and films to choose form its different categories and also you may want to look Dubbed Anime category from the website. Anime Toon gives the option to choose form different anime genres like action, comedy, adventure, crime etc.

The well-design and the simple user interface offers also many sorting options to help you discover easily all the new and most trending anime video contents.

Anime Toon Website: http://www.animetoon.org/

Anime Toon
Anime Toon – Similar Sites Like KissCartoon

> Check Out: Top 10+ Best Free Live TV Apps for Android & iOS (2020)

#5. GoGoAnime

A super-fast streaming site with a lot of content, GoGoAnime is marked as one of the best sites like KissCartoon. The site can be accessed from PC and form all smartphones as it works with HTML 5. The latest anime movies and series are with English subtitles and also you can find many English dubbed anime. With a huge collection of the latest Japan anime series and movies, GoGoAnime is the station of millions anime lovers.

GoGoAnime is a free website to watch anime online and downloading anime with English subtitles or dubbed in English. The site offers an clean and easily user interface (UI) which is well-organised. GoGoAnime packs all of the popular anime videos to choose from. 

GoGoAnime Website: http://gogoanimee.io/

GoGoAnime
GoGoAnime – Similar Sites Like KissCartoon

#6. Crunchyroll

Crunchyroll offers free anime movies and shows as well as with its paid subscription. This is a legal site and has more than 2 million premium members an about 45 million registered users. You can also watch Japanese manga and Asian TV for free at Crunchyroll.

All groups of peoples, form age of 60 years old to 7 years old, that are anime fan can enjoy watching they’re favorite anime here for free. Its database gets updated daily so you will never miss the latest anime episodes.

Crunchyrol Website: https://www.crunchyroll.com/

Crunchyroll
Crunchyroll – Similar Sites Like KissCartoon

#7. WatchSeries

Unlike the above streaming services online, WatchSerie features all type of genres form Game of Thrones to Titans, Dark Mirror or The Big Bang Theory. Beside that, its animation collection is huge an its featured in an separate section dedicated for anime and cartoons.

Why says cartoons fans like only cartoons?

WatchSeries website: https://www4.watchmovie.movie/anime

WatchSeries
WatchSeries – Similar Sites Like KissCartoon

> Check Out: Top 5 Best Sites to Watch Wrestling Online for Free: Watch WWE for Free Online (2020)

#8. 9Anime

9Anime is the best competitor and great alternative to KissCartoon. Through 9Anime you can watch for free online the latest and most popular anime shows in English subtitles and also in HD format. No signup is needed to access these features that makes 9Anime one of the best alternatives to AnimeDao and one of the best sites to watch the latest anime online for free.

Users can chose also to download they’re favorite anime content which is an great feature. 9Anime packs a loot of similarities with KissCartoon and for sure you will love it!

9Anime Website: https://www2.9anime.to/

9Anime
9Anime – Similar Sites Like KissCartoon

#9. AnimeFreak

Animefreak offers a loot of free anime shows and movies with English subtitles and even some of than are dubbed in English. It has a great user interface (UI) which makes this site a really great KissCartoon alternative to watch cartoons online.

AnimeFreak pack an huge collections of more than 10K episodes of anime series form various categories to stream and watch for free. Clicking on the photos of the anime you can see the review of the show, ratings, and episode list. You will find both original and dubbed series at AnimeFreak and to make the watching more enjoyable you can also download they’re app from Play Store.

AnimeFreak Website: https://www.animefreak.tv/

AnimeFreak
AnimeFreak – Similar Sites Like KissCartoon

#10. AnimeDao

AnimeDao offer a large collection of diverse anime series and different categories with an great interface. You will also find dubbed anime and the only drawback is that it is not giving to its users the option to download anime.

Another top feature of AnimeDao is its “Request/Report” option, which lets is users to request Anime series to be included in the website. If you are looking for extensive library of a full-length anime content, than AnimeDao is your perfect place!

AnimeDao website: https://animedao.com/

Animedao
Animedao – Similar Sites Like KissCartoon

> Check Out: Top 20+ Best Websites to Watch Free Movies Online (2020)

#11. CartoonExtra

CartoonExtra is yet another extra entertainment to stream online not only cartoons and the top popular animations video content, but also offers a group of comics and movies. Simply to name a few, right now you can watch from SpongeBob SquarePants, Adventure Time, to The Loud House, Frequent Display, and Dora the Explorer.

CartoonExtra website: http://cartoonextra.in/

CartoonExtra
CartoonExtra – Similar Sites Like KissCartoon

#12. AniWatcher

AniWatcher provides a large collection of your loved cartoons at totally free of cost. The database gets updated frequently with new anime content. This website may not be as popular as the above shared but now it count around 800K visitors monthly. Like other free anime streaming sites, this is also an ad-supported so you will face some advertisements.

AniWatcher website: https://aniwatcher.com/

AniWatche
AniWatche – Similar Sites Like KissCartoon

> Check next: Top 10+ Best Anime Sites to Watch Anime Online (2020)

Everyone how love to watch cartoons online, for sure can do that on KissCartoon. So, above you have still plenty alternative to KissCartoon in 2020 for your entertainment online. Hope you found this article useful. If you have any similar site like KissCartoon, please let us know in the comment section below, follow us on twitter and facebook for more news and updates.

neoAdviser

[td_block_11 category_id=”3″ limit=”1″ td_filter_default_txt=”” tdc_css=””][td_block_ad_box spot_id=”custom_ad_3″ tdc_css=””]
How to Find Direct Download Link Of Any Movie (Two Methods)

How to Find Direct Download Link to Any Movie (Two Methods)

If you do love movies, like me, then i’m sure that you found yourself online many times searching for the direct download link of your favorite movie. The popularity of movies fans in these days has grown and many of than are searching to download the latest movies cos not of than have time to go and watch then in cinema. But many times when we search for the direct download link of a movie we have faced a spam or an AD link. Today, in the article below, we will share to you a really simple trick with google search so you can easily find the Direct Download Link Of Any Movie. If you are interested to know more about how to find the Direct Download Link Of Any Moviethan follow the article below. We are going to share two simple methods along with some latest updated tips.

[td_block_ad_box spot_id=”custom_ad_2″]

> Check Out: Top 20+ Best Websites to Watch Free Movies Online

How to Find Direct Download Link to Any Movie (Two Methods)

So, to avoid this, we are going to share an amazing trick from which you will be able to easily find the direct download link of any of your favorite movie. For this we are going to share to great google search tricks that we will help you with just one simple click to find easily the direct download link of your favorite movie.

Steps Find Direct Download Link To Any Movie

This google trick is amazing and pretty simple and with just a single click you will get the exact URL that the movie is stored on the servers.

Method 1. – Find Direct Download Link To Any Movie 

Step 1. Launch the web browser on the device.

Step 2. Next put the name of the movie that you want to download, after the name copy and paste the below code.

Movie Name -inurl:(htm|html|php|pls|txt) intitle:index.of “last modified” (mp4|wma|aac|avi)

Method 1 - Find Direct Download Link To Any Movie 
Method 1 – Find Direct Download Link To Any Movie

Like e.x :- Now You See Me -inurl:(htm|html|php|pls|txt) intitle:index.of “last modified” (mp4|wma|aac|avi)

Step 3. Now browse through google search results on the first or second page to find the direct link download of that movie.

Method 1 – Find Direct Download Link To Any Movie

Method 2. – Find Direct Download Link To Any Movie

Step 1. Go to Google and copy the code below:

intitle:index.of? mkv 

Method 2: Find Direct Download Link To Any Movie

Step 2. After pasting the code above to google.com, jut put the name of the movie you want after the code like Avengers:

intitle:index.of? mkv Avengers 

Method 2: Find Direct Download Link To Any Movie

Step 3. Type enter and a list will be displayed that may or may not contain the one you are searching. Just type Ctrl+F to find the direct link of your movie.Than just click the link and the download will start.

Method 2: Find Direct Download Link To Any Movie

That’s all, Congrats! You can search you movie in other format just by simply replacing the Mkv to your wanted format.

Other Tricks To Find direct download Link of any Movie

There are also more Google tricks over the internet that will help you to find the direct download link of any movie. You will only need to play around with Google Search. Below are some tricks that will help you to do so:

#1. Using Multiple keywords under asterisks

Using this method all you need is to enter multiple keywords related to the movie. Most movies are in .mp4 format So below in the screenshot you can see that we have searched for “.mp4” , but you can do the same in other keywords like:

“Dangal” “Movie” “download” “.mkv”
Using Multiple keywords under asterisks

> Check Out: Top 10+ Best Free Live TV Apps for Android & iOS 

#2. Using the Download Now Keyword

This time Google will show the results of the sites which have the “Download Now” written. Almost all the movies sites lists the download link of the movie under the “Download Now” button.

“Dangal” “Movie” “Download Now” 
Using the Download Now Keyword

#3. Search for Movie names along with an extension on the URL

For this we will need to this keyword combination like: “inurl:mp4+movie name” or “inurl:mkv+movie name” and so on. Using this Google Search Trick on the search results will be listed only the websites that have that Movie Name along with the extension in they URL.

inurl:mp4+Dangal Movie
Search for Movie names along with an extension on the URL

> Read Next: Top 15+ Best Free Sports Streaming Sites: Watch Sports Online for Free On 2020

So that’s all about this great google search tricks that will help you to easily find to Direct Download Link To Any Movie. You can use it also to download music by replacing in the code above mp4 with mp3.  Hope you found this article useful. Please let us know your thoughts in the comment section below, follow us on twitter and facebook for more news and updates.

neoAdviser

[td_block_11 category_id=”3″ limit=”1″ td_filter_default_txt=””][td_block_ad_box spot_id=”custom_ad_3″]
Make Group Calls on WhatsApp

WhatsApp Group Calls: How to Make Group Calls on WhatsApp (Android & iOS)

Note: Finally in the latest update, Whatsapp has announced that the limit of participants in a group call is now extended at 8 people instead of four people. The extension of the limit is announced for both audio and video calls.

Staying in touch while in distance is very important and that’s why using apps to make group calls may come in help. WhatsApp is a very popular app used not only as an alternative to texting but also to make Video or Audio calls. Not only, but you can also do audio or video group call on WhatsApp with up to 8 peoples. The WhatsApp app is available for both iOS and Android devices, so despite the type of device you or your friends use, you can easily use group calls on WhatsApp. You are going to share two methods for making group calls on WhatsApp.The GB WhatsApp Download App is available for both iOS and Android devices, so despite the type of device you or your friends use, you can easily use group calls on WhatsApp.

> Check Out: How to play YouTube in Background (Android & iOS)

How to Make Group Calls on WhatsApp (Android & iOS)

WhatsApp is an very popular video and audio messaging app used worldwide buy over 2 billion peoples. Group call is an really great feature to stay in contact with your friends and family and WhatsApp make it very straightforward to do so

On Android the UI (User Interface) may look a bit different, but the steps to make group calls are still the same. The only drawback of WhatsApp group calls is that you are unable to switch a group call form audio-only and video once you start the call, you will need to hang up and start again the call. So here are the steps on hot to make group calls on WhatsAapp:

At the “Call” section: 

  • Click “Calls” at the bottom of your screen
  • Next tap the icon with a phone and a “+” sign at the top-right of your screen
  • Click “New Group Call
  • It will open a list of your contacts. You can search but typing they name in the search bar and add then by clicking the circle next to the name.
  • After you finished adding then, tap the phone button for starting you video or audio group call.

At the group chat:

  • Tap “Chats” at the bottom of the screen an select a group conversation to open
  • Tap on the button with a phone and a “+” sign at the top-right of your screen
  • All the name of members from the group chat will pop up. Choose who to add by tapping the circles next to the names.
  • Next, type the video button to start a video call or the phone button to start an audio call.

> Check Out: How to create email lists in Gmail to send group emails

Add More Peoples in an One-on-One Call on WhatsApp

From an one-on-one call you can also add more peoples. You will need to place an one-on-one voice or audio call and then add more participants. Here’s how to:

  • Click “Chats” on your bottom-right corner and open a conversation
  • Tap the hone button to start an audio call or the video button to start an video call
  • After you started the conversation and the person picked up, now to add another person in the chat tap the button with a person and an “+” sing your top right corner
  • A list of your contact will show up. tap the name of the person in the search bar at the top and next click on the name you want to add.
  • An pop-up may be displayed asking if you want to add it, tap “Add” so it will join the call
  • Follow these steps to ad more participants at you call. You can add up to four peoples simultaneously

> Check Next: Netflix Party: How to watch movies with your friends at the same time

So here is an step-by-step guide on how to make group call on WhatsApp. The process is the same on both Android and iOS devices. We have also showed a way on how to add more peoples in an one-on-one conversation. Using this WhatsApp Feature you can make group video or audio calls with up to 8 peoples and the best part is that all the participants are not required to have the same type of device (Android or iOS). Hope you found this article useful. Let us know your thoughts in the comments section below, follow us on twitter and facebook for more news and updates.

neoAdviser

YouTube in Background

How to play YouTube in Background (Android & iOS)

And you don’t have to pay for YouTube Premium

There’s a lot of music, stories and news on YouTube, and the fact is that you want to be able to play it in the background on your mobile device while reading, writing text, or doing other things. Unfortunately, if you don’t have YouTube Premium, your ability to listen to a YouTube video in the background is limited…, possible, but limited.

[td_block_ad_box spot_id=”custom_ad_2″]

> Check Out: How to create email lists in Gmail to send group emails

How to play YouTube in Background (Android & iOS)

However, there are some solutions. You can play a single song in the background, both on an Android phone and with an iPhone, but it’s a little weird as an experience. And I wasn’t able to play more than a single song on a playlist in the operating system. When I tried it on a phone running Android 10, the same song kept repeating itself, while on an iPhone that had iOS 13, the music just stopped.

However, if you want to try it, here’s how to play music in the background of your mobile device.

How to play YouTube in Background on your Android device

This method, which we saw for the first time written in Digital Trends, works on Chrome and can work on other mobile browsers as well.

  • While you’re at Chrome, go to the YouTube website. (This should be done using a mobile browser, so make sure you are on the website and not on the YouTube app.)
  • Find the video you want to play
  • Click on the three dots in the upper right corner of the screen and then select “Desktop site” from the menu
  • You will now use the desktop version on YouTube. Start the video again.
  • Click the Home button at the bottom of your screen. Once you see the home screen, the music can be stopped. But wait…
  • Swipe down notifications from top to bottom on the screen. You should see the notification for the current song; just press play to restart it.

How to play YouTube in Background on your iOS device

Playing a free video on YouTube on an iPhone is even more complicated, especially since some methods that have worked before have been blocked by iOS 13. We’ve finally found a method that actually works (most of the time). , anyway) in a video by Daniel About Tech.

  • Find your video in Safari. (You will probably use the mobile version of YouTube.)
  • Click on the “AA” symbol in the upper left corner of the screen
  • In the ‘drop-down‘ menu, click on “Request Desktop Website
  • In the YouTube desktop version, start the video and then delete to close the Safari app
  • The video will surely stop playing. Swipe down from the Control Center at the top right of the screen. You will see the video uploaded there; press the play button and the video should start playing again.

We had no problem playing a single video in the background using this method. If it doesn’t work for you at first, then, according to Daniel, if you go back to Safari and restart the video, it should be played. But while I was able to play a single video in the background, as in Android mode, I was not able to play more than one single song.

> Check next: Netflix Party: How to watch movies with your friends at the same time

That’s all! Hope you found this article useful. Please let us know if it worked for you in the comment section below, follow us on twitter and facebook for more news and updates.

neoAdviser

[td_block_11 category_id=”3″ limit=”1″ td_filter_default_txt=””][td_block_ad_box spot_id=”custom_ad_3″]
Photo Editing Apps

Top 7 Best Free Photo Editing Apps for Your Smartphone (Android & iOS)

We don’t know who you are but we know you own a smartphone, and inside that smartphone you have at least 2 photo editing apps. Maybe you haven’t been using them for a while and you’re having a hard time remembering them. 32% of marketers say visual images are the most important part of content for their business. Businessman, model or just for fun, here is the list of 7 best editing applications that according to neoAdviser should be given a chance.

[td_block_ad_box spot_id=”custom_ad_2″]

> Check Out: Top 10+ Best Free Anime Streaming Apps of 2020 (Android and iOS)

Top 6 Best Free Photo Editing Apps for Your Smartphone (Android & iOS)

You may have used may Photo Editing Apps on your smartphone, perhaps you already have some of then installed but you haven’t been using them for a while and you’re having a hard time remembering them. Businessman, model or just for fun here is the list of editing applications that according to neoAdviser should be given a chance.

#1. Snapseed

From filters to more detailed tools, this app from Google also challenges serious desktop programs. You will wonder on how many options a simple smartphone app gives you.

Download (Android | iOS)

Snapseed Photo Editing App
Snapseed: Photo Editing App

#2. VSCO

Similar to Instagram, VSCO has been holding a pretty high position for special filters for years. If you are Tumblr type and analog photos this app is for you.

Download (Android | iOS)

VSCO Photo Editing App

> Check out: Top 10+ Best Free Live TV Apps for Android & iOS (2020)

#3. Adobe Photoshop Fix

Fix is ​​not suitable for filters, instead it offers professional options to fix unwanted aspects and details of your photo. Especially advised for portraits.

Download (Android | iOS)

Adobe Photoshop Fix Photo Editing App
Adobe Photoshop Fix: Photo Editing App

#4. Adobe Photoshop Express

Taking from the desktop app, Expres tries to offer you as many options as possible from professional experience. And all this easily from the screen of a smartphone.

Download (Android | iOS)

Adobe Photoshop Express: Photo Editing App

#5. Adobe Photoshop Lightroom CC

If you are going to be even more professional then download Lightroom and get to work. Able to do difficult tasks, it is commonly used by masters who know what they are doing and need to make quick adjustments.

Download (Android | iOS)

Adobe Photoshop Lightroom C: Photo Editing App

#6. Picsart

This is more of an app to give life to photos. Filters and collages are the basis but you can add endless stickers and fonts. Very good for memes and GIFs. You can also edit videos as well.

Download (Android | iOS)

Picsart: Photo Editing App

> Check Out: How to Scan a Document Using Your Phone or Tablet – The Best way

#7. Inshot

Inshot gives you all the above experience. From processing in photo dimensions to filters and effects, but on the other hand it is also a super video editing power. Editing, truncation, music lyrics and much more within a small screen.

Download (Android | iOS)

Inshot: Photo Editing App

#8. Bonus App (Facetune $3.99)

Despite advances, selfie cameras seem to be usually overlooked and not everyone has the money to buy the latest Galaxy or iPhone. Facetune is a paid app specializing in professional portrait correction. Skin, teeth and even wrinkles. But be careful that you enjoy it and look like a wax mannequin.

Download (Android | iOS)

Facetune: Photo Editing App

> Check Next: Top 15 Best Android Emulators: Experience Android On PC (2020)

So here you have top 7 best free Photo Editing Apps to use on your mobile device. Hope you found this article useful! If you have any other free photo editing app that you use daily on your mobile, please let us know in the comment section below, follow us on twitter and facebook for more news and updates.

neoAdviser

[td_block_11 category_id=”3″ limit=”1″ td_filter_default_txt=”” tdc_css=””][td_block_ad_box spot_id=”custom_ad_3″ tdc_css=””]
Similar Sites Like Xmovies8-min

Xmovies8 Alternatives: Top 10+ Best Similar Sites Like Xmovies8 in 2020

XMovies8 was an very popular website used by hundred of users to watch movies online for free. It offered the option to stream and download all the latest and most popular movies and TV Shows for free. So, if you are here, probably you are aware that XMovies8 was shut down due to copyright violations, so lets dig right in for the best XMovies8 alternatives or best similar sites like XMovies8 in 2020. If you are looking for the best options to stream movies at TV Shows online for free, like XMovies8, go through this article to explorer our best 10+ suggestion for 2020.

NOTE: If the given links are not working, please do a quick google search to find the latest working links to the given website!

> Check Out: AdmitMe Alternatives: Top 5+ Best Similar Sites Like Admitme.TV (2020)

What is Xmovies8?

As the name suggest, Xmovies8 is focused of streaming Movies and TV shows online for free. It was very simple and easy to navigate through thanks to its simple UI (user interface). Not many of you may know, but before 2016, this site is used to be a leading website at the entertainment line. Xmovies8 is mostly know for it’s HD Movies and TV Shows and all needed was a good internet connection.

The website had offered a massive collection of video content and you will probably find any content you wanted. The only drawback may be that you have to face e few ads, but this is not a big deal as this keeps the owners to continue providing free streaming content. Its huge database will keep you engaged for weeks or even months of entrainment.

What happened with Xmovies8 and was it safe?

As most of the other free streaming services online, Xmovies8 did not have the right to stream copyrighted content. These websites are the target of the Government and get blocked by IPS is various countries where this type of streaming is prohibited. As of this reason, the website was unable to be accessed worldwide to many users. Xmovies8, like other websites, try to bypass this by changing its domain name frequently like Xmovies8.com, or Xmovies8.tv, etc.

As for is safety, this website is targeted as an illegal streaming service, and as this it is not recommended to use it, or its best to use it by protecting your identity through a good VPN. Also these type of websites have ads that at may time can be very tricky and may lead to to download malware that can infect your system.

Xmovies8 Proxy 2020 | Proxy/Mirror Sites to unblock Xmovies8

XMovies8 proxy and mirror sites are clones to the main domain and host the entire content library of the main website but at a different domain name. For more these mirror sites uses the same user interface as the parent site and you can expect periodic updates. Depending an where you live, you may need to use an good VPN to avoid penalties from your Gouvernement, and we at neoAdviser we always recommend to you to use these mirrors/proxies that have a SSL certificate.

So below, there are some Xmovies8 proxy/mirror sites that are working fine at the time of writing this article and you can still use to have the same experience as at Xmovies8 website.

  • https://xmovies8.is/
  • http://www1.xmovies8.io/
  • https://xmovies8.cool/
  • http://www4.xmovies8.fm/
  • http://xmovies8.net/

Xmovies8 Alternatives: Top 10+ Best Movie Streaming Sites Like Xmovies8 in 2020

So, knowing all of the above, let’s dig right into the top best Xmovies8 alternatives in 2020 that are available right away to use and stream Movies and TV Shows content online for free. Below we are going to share our selection of top 10+ best similar websites like Xmovies8 of 2020 in an random order.

#1. Yesmovies

Yes movies as a best alternative comes with a huge database, fewer ads and fast streaming speed which makes it a great xmovies8.co alternative. The content is updated frequently and you will find movies from different genres and countries. The website comes with a friendly UI that makes it easy to navigate through content and find you favorite one. Yes!Movies if 100% free and maybe better than Xmovies8.

The video content shared is in good quality and you can choose form different genres and countries. Besides Hollywood movies ,it also offers content form other countries as well.

Yes!Movies Website: https://yesmovies.ag/

YesMovies
YesMovies – Sites Like Xmovies8

> Check Out: Top 10+ Best Free Anime Streaming Apps of 2020 (Android and iOS)

#2. CMoviesHD

CMovies is yet another great alternative to Xmovies8 but you will find many ads so an ad-blocker is recommended. On the other side the site is totally free to watch movies and it has a friendly UI. If you hover the mouse over a movie you will find many details related to that movie.

CMoviesHD is one of the best Movies and TV show provider website. Movie lovers can watch and discover latest movies and classic movies for free. Right at the homepage there are showcased all the latest popular movies that you can explore, or you can search for the classic ones also.

CMoviesHD website: https://cmovies.tv/

CMovies
CMovies – Sites Like Xmovies8

#3. Movie Watcher

This is a place for all online cinema related needs. Movie Watcher hosts a large collection of Hollywood movies and TV Series to watch for free or download then. You can sort at search the movies by genres, name or release year to easily find your favorite one. You can find detailed info in the thumbnails even IMDb rating.

Movie Watcher packs all you need and besides the general info, the website also offers other information like actors, directors, country, duration, etc. of movies and TV Shows. It offers only the top content while being pretty easy to navigate through thank to is easy, simple user interface.

Movie Watcher Website: https://www.moviewatcher.site/

Moviewatcher
Moviewatcher – Sites Like Xmovies8

> Check Out: Top 15+ Best Free Sports Streaming Sites: Watch Sports Online for Free On 2020

#4. Popcornflix.com

Jet another great XMovies8 alternative to stream Movies, TV Shows and other viral content for free. It has no ads which is the reason why this platform is so popular. The site packs a wide variety of TV Shows and movies in High quality to stream for free at any time. The discovery page is a great way to find new content for watching!

The database gets updated regularly with new content and you can discover movies through browsing between various categories. You can access Popcornflix form various platforms like Apple TV, Fire TV, Roku, Xbox and all Android devices.

Popcornflix website: https://www.popcornflix.com/

Popcornflix
Popcornflix – Sites Like Xmovies8

> Check Out: Top 10+ Best Free Live TV Apps for Android & iOS (2020)

#5. Putlocker

Putlocker provides hundreds of Movies and TV Shows Online with a huge database. This movie streaming site has become many popular in the recent years. You can stream movies in full screen and with a good quality which makes it a good alternative to Xmovies8.

Putlocker is in this game of the free movies streaming platforms for a long time now. Is one of the best and most popular streaming site available for every users around the world. Putlocker is fully free, no any sing up are required and has a very few to no ads, so you will have a great experience streaming movies. Also the movies comes in high-quality with some of then even in full HD 1080p.

Putlocker Website: https://wwv.putlockers.net/

Putlocker
Putlocker – Sites Like Xmovies8

#6. SolarMovie

SolarMovie is yet one of the best XMovies8 alternatives. Since it simple interface, you can easily search and get your favorite movies and TV shows on the site and watch them in high quality. You will see all the latest and popular content on the home page.

Directly at SolarMovie website you will see which movies are trending, which have the best ratings and which have been viewed the most during the day. These features are what makes SolarMovie one of the most liked movies streaming services among others. If you like to create an account, then they will be some other features to you like make a list of your favorites, request movies, and other features. SolarMovie also provides all the details related to the movie like IMDB rating, description, keywords and more.

SolarMovie Website: https://www.solarmovie.fm/

SolarMovie
SolarMovie – Sites Like Xmovies8

#7. Movie4k.to

Movie4k is yet another highly recommended free online web streaming website for movie lovers. Its very popular among users and offers all type of video contents. Like XMovies8, you will find all the latest and most popular movies with just a few clicks. You can watch movies from WebRip to full HD quality and also choose between different languages.

This site claims to offers the fasted streaming speed and you will find content in various languages.

Movie4k.to Website: https://www.movie4k.movie/

Movie4k.to
Movie4k.to – Sites Like Xmovies8

> Read Next: Top 5 Best Sites to Watch Wrestling Online for Free: Watch WWE for Free Online (2020)

#8. Vumoo

Vumoo is one of the best alternatives to XMovies8. The site offers a huge collection of video content including Movies and TV Shows that are free to stream online. It has a friendly UI which makes it easy to navigate through the content and find your favorites ones.

Vumoo is one of the most loved among the movie-fans. You can watch form movies to TV Shows on Vumoo at any time and you want miss anything cos the website gets updated frequently as soon as new movies are released.

Vumoo Website: http://vumoo.to/

Vumoo
Vumoo – Sites Like Xmovies8

#9. 123movies

123Movies is one of the most popular online movies streaming sites. 123Movies hosts from movies and TV Shows, to cartoons, anime, and Asian dramas which makes it a really great alternative. The content is not hosted to the 123Movies website, but instead the content if available by third parties websites.

These features makes 123movies the next destination of movie lovers. Like XMovies8, if you favorite content is not available there, than you have the option to request it to its developers.

123Movies Website: http://wvw1.123movies.net/

123Movies
123Movies – Sites Like Xmovies8

#10. TinklePad

TinklePad is a new and fast growing movie streaming site with a large collection of the latest and most popular movies to watch for free. One great feature of TinklePad is that you can download movies to watch then online.

Tinklepad is the top website to find all the top-rated movies and high-quality content on the web at free of cost. The website has a simply user interface (UI) and has a loot of features. you can search you favorite content by different categories like recently added, latest HD movies, latest TV shows, popular movies, release year and more.

TinklePad Webiste: https://tinklepad.cc/

TinklePad
TinklePad – Sites Like Xmovies8

> Check out: Top 25+ Similar Sites Like 123Movies: Best 123Movies Alternatives (2020)

#11. SeeHD

SeeHD provides best high-quality movies so you can watch HD movies that makes it a great. The website offers only legal movies. SeeHD packs one of the largest database of movies collections on the internet to choose form. The site is straightforward to navigate through, the only drawback are some annoying ads at the top.

You will find excellent selections of movies including Bollywood ones.

SeeHD website: http://www.seehd.pl/

SeeHD
SeeHD – Sites Like Xmovies8

#12. ProjectFreeTV

ProjectFreeTV allows you to watch free content online. The site is Dedicated to TV Shows and it provides links to most popular shows. The content is categorized by popularity and recently uploaded.The site does not host any content but it provides links to third-party sites tat stream the media.

Project Free TV is an well-developed and comes with an easily UI to watch your best TV Shows and movies online. This site is the most trending free online movie streaming site and it gets updated daily so you want miss your loved series.

ProjectFreeTV Website: https://projectfreetv.fun/

ProjectFreeTV
ProjectFreeTV – Sites Like Xmovies8

> Read Next: Top 20+ Best Websites to Watch Free Movies Online (2020)

So, here you have top 10+ best Xmovies8 alternatives in 2020 to use it today to stream Movies an TV Shows online for free. Hope you found this article useful! If you fave any other alternative to Xmovies8, or a similar website like Xmovies8 that you use daily, please let us know in the comment section below. Follow us on twitter and facebook for more news and updates.

neoAdviser