PUBG Mobile on PC

How to play PUBG Mobile on your PC

If you do not have a smartphone with the right settings to play PUBG Mobile, a PC can help you

You may not have a smartphone on which you can play games like PUBG Mobile as this game requires a smartphone with high specs. If you have a PC that can hold an emulator then you can play PUBG Mobile directly on your PC.

[td_block_ad_box spot_id=”custom_ad_2″]

> Check out: Top 15 Best Android Emulators: Experience Android On PC

These are the specs you will need to open the emulator on your PC:

  • OS: Windows 7/ 8.1/10
  • CPU: AMD/Intel CPU 4 core @ 2.5ghz
  • RAM: 4/8 GB
  • HDD: 5 GB (may be larger depending on the software/games you use)
  • GPU: AMD/Intel/Nvidia 1 GB dedicated

You must also enable Virtualization. To enable Virtualization follow this tutorial.

The Android Emulator that can give you the best performance, in this case, is Bluestacks which you can download here.

  • Once you have downloaded and installed Bluestacks, open it and wait for it to launch.
  • Then open Google Play and log in with your Google Account.
  • Once you have logged in to Google Play download PUBG Mobile.
  • While PUBG Mobile is downloading, go to settings, and set them according to the images below.
PUBG Mobile Bluestacks Settings
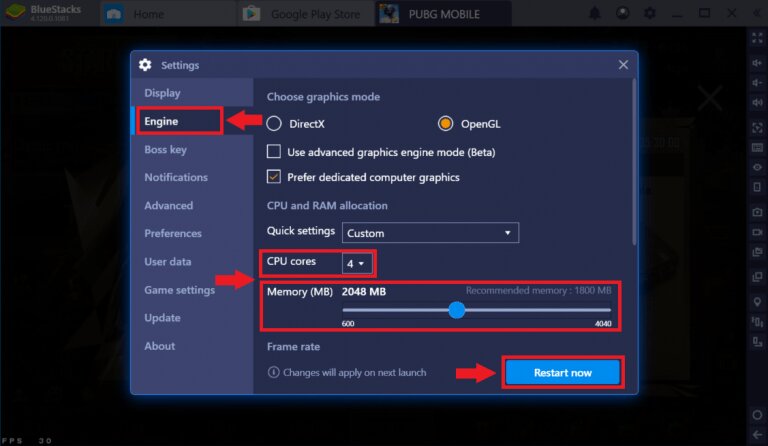
  • If you have 8GB of RAM, you can change the Memory from 2048 MB to 3072 MB
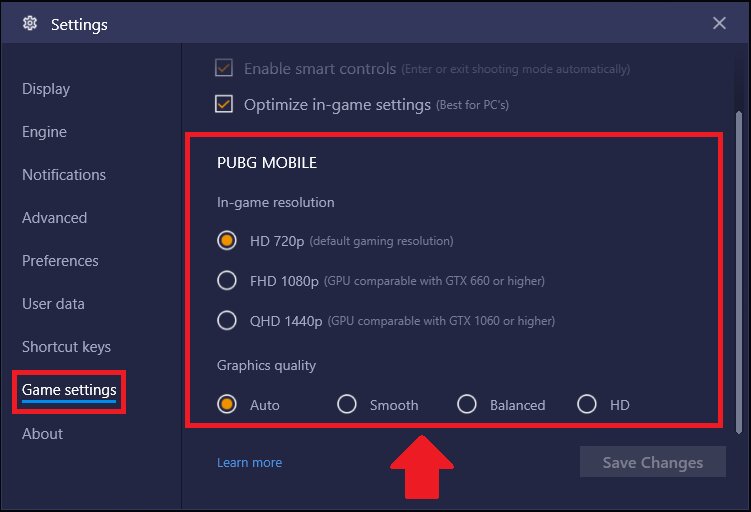
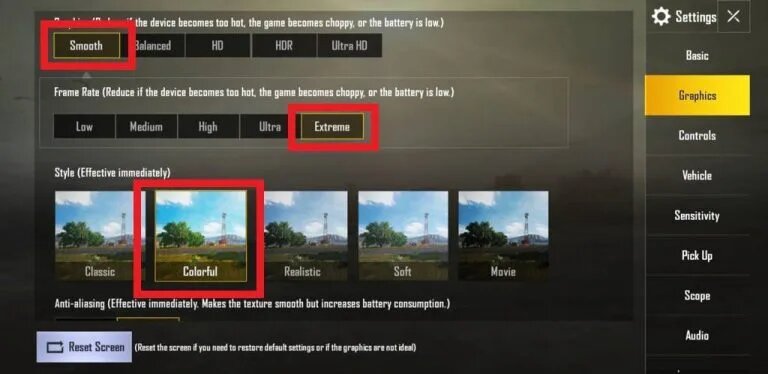
  • Once PUBG Mobile is downloaded and installed, log in and go to settings and set settings according to the image below.

Once you have done all this you can play PUBG Mobile on your PC and smoothly. It should also be noted that by playing PUBG Mobile on PC, you will be accessing emulator servers and most of the time you will be playing against other people who are using an emulator.

> Check next: Top 3 Best PS4 Emulators for Windows PC (2020 Edition)

So here’s how to play PUBG Mobile on your PC. Hope you found this article useful! Please let us know in the comment section below, follow us on Twitter and Facebook for more news and updates.

neoAdviser

[td_block_11 category_id=”3″ limit=”1″ td_filter_default_txt=”” tdc_css=””][td_block_ad_box spot_id=”custom_ad_3″ tdc_css=””]
The best way to post panoramic photos on Instagram

The best way to post panoramic photos on Instagram

When Instagram first hit smartphones, every uploaded photo had to be in a square shape

This is not a problem in terms of photos and selfies, but for panoramic photos, Instagram has always encountered difficulties. Now, you can upload any photo to Instagram. However, not all will look good. Below is an explanation of the best way to post panoramic photos on Instagram on your iPhone and Android devices, along with an iPhone app that will make the photos look better.

[td_block_ad_box spot_id=”custom_ad_2″]

> Check next: How to automatically delete your location, search and web history from Google

How to post panoramic photos on Instagram

The simplest way to post panoramas is:

  • Open Instagram on your iPhone or Android, and press the plus icon below the screen to upload photos.
  • Once your photo gallery opens, select the panoramic photo you want to post
  • Touch the image with two fingers, and then reduce the photo so that the whole photo looks panoramic.
  • Add filters and post as usual.

The result is a rectangular photo with white space at the top and bottom. This method can adjust the size of the photo, but for full-size panoramic photos, it may not be possible to post the full photo.

Here is a program like Photoshop to cut the photo. If you have an iPhone, there is an app that will do all the work for you automatically: “Unsquared for Instagram“.

Download the app and give permission to access the photos. Then follow these steps:

  • Open the Unsquared app and click the photo stack icon at the bottom right.
  • Click the photo from the gallery you want to use, and then click the blue sign.
  • The photo will be presented with the Unsquared sign on it.
  • Press the blue icon that looks like a series of squares at the bottom of the screen, and you can now choose how many photos you would like the panoramic photo to be shared.

If you want to include each part of the photo, divide it into 3 parts. However you can split it into as many pieces as you want, but you can lose the top and bottom of the photo.

  • Once done, press “Done”. Separate photos will appear in your gallery, and you can post them on Instagram

sources/ businessinsider.com

> Check next: How to search for specific words in a YouTube video

So, that’s all about how to post panoramic photos on Instagram. Hope you found this article useful. Feel free to comment your opinions down in the comments section belowfollow us on Twitter and Facebook for more news and updates.

neoAdviser

[td_block_11 category_id=”3″ limit=”1″ td_filter_default_txt=””][td_block_ad_box spot_id=”custom_ad_3″]
change your Apple ID password-min

How to change your Apple ID password (iOS 10.3 and up/MacOS)

Your Apple ID gives you the ability to connect to your Apple account on some devices, new and old, wherever you are. But this accessibility has a cost, security. The Apple ID password addresses this concern by asking you to set it every time you use a new device. The security measure in question can sometimes be compromised by compromising your sensitive personal data and information. If you want to make your Apple account more secure, then you can change your Apple ID password.

[td_block_ad_box spot_id=”custom_ad_2″]

> Check out: How To Change/Update Your Outlook.com Account Password (Updated)

Here’s how to change the password on iOS 10.3 and up

To change the password on your iOS 10.3 and up device, just simply follow the steps below:

  • Open the Settings app
  • Click on your name
  • Select the “Password and Security” option
  • Click on “Change Password” at the top of the screen. This option has a blue hyperlink.
  • Enter the new password
  • Click “Change” or “Change Password
  • Log in to your account again using the new password

> Check out: How to search for specific words in a YouTube video

How to change your MacOS Catalina password

  • Click the Apple icon in the top left corner and select “System Preferences
  • Click “Apple ID
  • Select “Password & Security
  • Click “Change Password
  • Set the password you use to log in to Mac
  • Double-enter the new password and click “Verify

How to change your Apple ID password for your browser

  • Open the browser and go to the Apple ID page
  • Select “Change Password
  • Enter the current password
  • Enter the new password twice
  • Click “Change Password.”

> Check next: How to block YouTube ads quite simply

So, here’s how to change your Apple ID password. Hope you found this article useful. Let us know your thoughts in the comments sections below, follow us on Twitter and Facebook for more news and updates.

neoAdviser

[td_block_11 category_id=”3″ limit=”1″ td_filter_default_txt=””][td_block_ad_box spot_id=”custom_ad_3″]
Search for a specific words in a YouTube video

How to search for specific words in a YouTube video

In this article we show you how to search for specific words in a YouTube video

If you’ve found yourself going through a YouTube video to find a certain piece you want to watch or listen to, then this article is for you. It is a phenomenon that consumes time and nerves for users to find a specific moment in a YouTube video. But you don’t have to.

In this article, we will show you how to search for specific words in a YouTube video.

[td_block_ad_box spot_id=”custom_ad_2″ tdc_css=””]

> Check out: How to block YouTube ads quite simply

Here’s how to search for specific words in a YouTube video

  • Navigate to the YouTube video you want to search for
  • Click on the three horizontal dots below it
  • Click Open Transcript
  • Press Ctrl + F to open the browser search function. Enter the word you are looking for and if it is in the transcript it will be marked
  • Then click the line where it is located to go directly to the part of the video you are looking for

Remember that it all depends on the accuracy and spelling of the subtitles. It is never guaranteed that the subtitles are proper especially if they are generated automatically.

Here’s how to search for words on many YouTube videos

  • Go to YouGlish
  • Put the word or expression you want to search for and press Say it
  • Use the controls below the video to play and skip to the part where the word or expression appears
  • Press Ctrl + Right Arrow to switch to the next video

YouGlish does not work with automatically generated subtitles but only with manual ones.

> Check next: How To Convert Text Into Audio Using Notepad

So, that’s all about how to search for specific words in a YouTube video by using this simple trick. Hope you found this article useful. Feel free to comment your opinions down in the comments section belowfollow us on Twitter and Facebook for more news and updates.

neoAdviser

[td_block_11 category_id=”3″ limit=”1″ td_filter_default_txt=”” tdc_css=””][td_block_ad_box spot_id=”custom_ad_3″ tdc_css=””]
block YouTube ads

How to block YouTube ads quite simply

A Redditor under sub/ in / r /webdev has posted a very simple trick to block YT ads

And who would have thought that a simple website where you could upload videos would one day turn into a source of income and even a career for some others? YouTube and its monetization process can sometimes become annoying from multiple ads, both as a pop-up and even worse when they interrupt the video in the middle just like on TV.

[td_block_ad_box spot_id=”custom_ad_2″]

A Redditor under sub / in / r/webdev has posted a very simple trick to block YT ads. This trick does not require you to be a master in coding or web development. Just add a “.” in the video URL its enough. Once you have opened the video, in the box above the page where the video address is written, after “.com” add a “.” and most or all of the ads will be blocked.

  • So instead of: “https://www.youtube.com/watch?v=”
  • Add: “https://www.youtube.com./watch?v=”

These changes to the URL can be made through the computer, for the smartphone, you will need to open the video in a browser, not from the application. The point is that there is no combination with the host and as a result, the video is transmitted but other contents such as ads fail to connect. And not only blocks ads, but also other things like cookies.

But before you go and watch videos without ads, remember that many of your favorite creators work and benefit from watching those ads. If you continue to watch videos from your favorite YouTube, such support is key.

> Check next: How To Convert Text Into Audio Using Notepad

So, that’s all about how to block YouTube ads by using this simple trick. Hope you found this article useful. Feel free to comment your opinions down in the comments section belowfollow us on Twitter and Facebook for more news and updates.

neoAdviser

[td_block_11 category_id=”3″ limit=”1″ td_filter_default_txt=”” tdc_css=””][td_block_ad_box spot_id=”custom_ad_3″ tdc_css=””]
Convert Facebook Profile To Page

How To Change/Convert Facebook Profile To Page

Facebook is rather a great place to connect with people around the world. Facebook developers are providing new features after a short period of time. As normally we have joined some groups, events and also like pages. All these features are the best way to establish a relation between people. Some of us are using Facebook for enjoyment and others are doing business on Facebook. Pages are more likely preferred by small businesses, celebrities, etc to target more audiences. But it’s not easy for everyone to grow their Facebook page. We all have to implement some strategies like to convert Facebook profile to page which are helpful to increase likes effectively.

But there is rather a difference in targeting and reach between normal profile and page. Profiles are limited having less reach as compared to a page. We can only add up to 5000 friends and then others can only follow. We can send more messages. We can boost posts on profile. These just a few issues which are normally faced by users are using a profile for business. In that case, the best possible solution is to convert Facebook profile into a page. That means we can easily migrate Facebook profile to page.

[td_block_ad_box spot_id=”custom_ad_2″]

> Check out: How To Merge Facebook Pages: All You Need To Know 

How To Convert Facebook Profile To Page.

  • First of all login your account which you want to convert into a page. Then change the name of the account to desire name. The Page will become for the name which you used on the account.
  • Then you need to proceed with migration form. Which will convert the profile to a page. You can search it on the Facebook help center. Even you can directly access from below button.
  • In the help center, everything about migration is explained and understanding you can proceed with migration through the link provided there. If you are not able to find then,


  • Visit here

  • Now Click on Get Started to proceed for migration from profile to page.
  • Then select your page category like business, brand, or community, etc. After selecting the category they get required your password as you won’t convert or not.

Sometimes it also shows this error that logs in into your account from the previous device you used for login. So don’t worry it take 24-48 hours because of account security after this time period you will be able to migrate.

After complete conversion, your page is ready to use. you can also enjoy your page from the existing account of also you can make your other account as admin by email adding at the admin panel.

Changes After Conversation To Page.

When you convert your Facebook profile to a Page, there are certain changes made to it. We feel to make you aware of those changes so you can manage your new page better. Keep them in mind before converting your profile into page as you will loose a lot of information.
These changes are :

  1. All your friends will become followers of your new page. IE. All friends will become users who have liked the page.
  2. The links to your Facebook profile will change to the links to your Facebook page. Anyone clicking on your name anywhere will now be directed to your Facebook page.
  3. Your Facebook page will have the same Name and profile picture of your Facebook profile.
  4. You will loose all the updates and photos that you uploaded from your profile. So make sure you have a backup.
  5. You will loose all your messages and conversations. Your inbox will now become page’s inbox.
  6. You will not be a member of groups that you once were.

How To Revert Back Page Into Profile?

Yes, It is possible to revert the page back into the profile. But only once, So if you migrate Facebook profile to page accidentally. Facebook provides a form to appeal to the reverse page back into the account. This form requires ID proof. Whose Name and D.O.B should match with profile which get converted. So if you are able to provide then you can appeal  here.
After appealing, if application get approved then your page will become normal profile automatically.

> Read Next: Add all friends to Facebook group By Single Click (How To)

In conclusion, we hope you guys learned something new and understand the concept to convert Facebook profile to page. If you have any doubt please let us know in comments, follow us on Twitter and Facebook for more news and updates.

source/ safetricks.com

neoAdviser

[td_block_11 category_id=”3″ limit=”1″ td_filter_default_txt=”” tdc_css=””][td_block_ad_box spot_id=”custom_ad_3″ tdc_css=””]
Convert Text Into Audio

How To Convert Text Into Audio Using Notepad

Everyone loves to hear what is written in a paragraph or in a document. This is the reason why audiobooks are getting popular nowadays. In this article, i will show how you can convert text into audio using the Notepad.

[td_block_ad_box spot_id=”custom_ad_2″ separator=””]

> Check out: How to Scan a Document Using Your Phone or Tablet – The Best way

Why Use Notepad?

Because it is the most commonly used text editor everyone uses. That’s the reason.

How To Convert Text Into Audio Using Notepad

  • STEP 1: Open Notepad. You can do this by searching for “Notepad” in the windows search Or Press “Win+R” and type “Notepad” and press “Enter”.
  • STEP 2: Now, copy the following program and paste it in Notepad–
Dim message, sapi
message=InputBox("Enter your text for conversion | #LLSINFO","Sound Testing #llsinfo")
Set sapi=CreateObject("sapi.spvoice")
sapi.Speak message
Notepad: Paste The Code
  • STEP 3: Now save the code that you have entered above. The code has to be saved in .vbs format. Example sound test.vbs or any other name that you desire and save it.
Save The File as .vbs
  • STEP 4: Now navigate yourself to the location where the code is stored. in my case it was stored on the desktop so i will just go to the desktop and check for it. You can see that the file we saved was in the Visual Studio Script (.vbs) format.
  • STEP 5: Now just “double click” on the saved file and “Enter the text” you want to hear in the text box. The moment you click “OK“. You can hear the text you entered as Audio.

> Check next: Convert a PDF File Into an Editable Text Document (How to)

So, that’s all about how to convert a Text into Audio simply by using Notepad. Hope you found this article useful. Feel free to comment your opinions down in the comments section below, follow us on Twitter and Facebook for more news and updates.

neoAdviser

[td_block_11 category_id=”3″ limit=”1″ td_filter_default_txt=””][td_block_ad_box spot_id=”custom_ad_3″ separator=””]
Merge Facebook Pages

How To Merge Facebook Pages: All You Need To Know (June 2020)

Facebook is the most significant social networking used not only to connect peoples but nowadays it has become an internet advertising hub. Brands and businesses use Facebook groups and Pages to engage with customers. For major brands, merging Facebook pages is a very important process, because while merging Facebook pages, all the likes and the followers from the previews page will merge with the new one. In this way, the likes and check-ins of both pages will be combined to a single Facebook page which can result in a decrease of the management work needed. So, to help admins merge their Facebook pages, in this article we are going to share everything they need to know and the simple steps to merge Facebook pages. The same method work even if you need to merge Facebook business pages.

[td_block_ad_box spot_id=”custom_ad_2″ separator=””]

> Check out: How to Clear your Search History on Facebook (Mobile&Desktop)

Why Should You Merge Facebook Pages?

There may be multiple reasons why you want to merge Facebook pages.

  • Reason #1: You may have multiple Facebook pages with the same name that are usually created a mistakenly long time ago.
  • Reason #2: You may have brand pages that ar created with different names and wat to merde then in a single one.

Merging duplicated pages will help keep your customers, fans in one place and let you have full control of messages and marketing.

Preparation For Merging Facebook Page

You will be eligible to merge only these pages that have a similar name and represent apparently the same thing. Also before merging, you need to do some changes to your pages:

  1. Change the names of the pages to the same. If the same isn’t possible, then make them as similar as possible. For example, neoAdviser and neoAdvisers both are almost similar possible to merge.
  2. Update the about section with similar information. This probably maybe your website, address, and description.

Points to be noted:

  • To merge two or more Facebook Pages, you should be admin of then both
  • The pages should have the same name and represent the same thing
  • Local pages should have the same address
  • In no option to merge is available, they may be different reasons. In this time you can request Facebook for a review.

Note: You probably may want to merge the page that has fewer likes into the one with more. You most understand that content of the merged page will be wiped totally. So, before continuing to the Page merge steps, you may need to download all the essential photos and another stuff you may need.

Steps to Merge Two Facebook Pages

Sometimes admins have more than one page. If these pages are for the same purpose, admins would rather want to merge the pages together to engage more audience. In this way, admins can combine the likes and check-ins of both pages into a single Facebook page. This decreases management work.

So, follow the steps below to simple merge Facebook pages:

Part 1: Steps To Merge Facebook Pages With Similar Name.

If you fave pages with similar names, then follow these easy steps given below to merge pages on Facebook together :

Merge Facebook Pages With Similar Name
  • Step 2. Type the names of the two pages you’d want to merge and press “continue
  • Step 3. Pick which Facebook Page you wish to keep and press “Keep Page” button
Merge Facebook Pages With Similar Name: Keep Page
  • Step 4. Confirm the Merge Request by pressing the “Request Merge”.
Request Merge
Request Merge
  • Step 5. Finally, you will get a “merge request successful” message.

By doing this successfully, you will not end up with a single Facebook page that has combined all the check-ins as well as likes.

> Check out: How To Accept All Friend Requests On Facebook At Once

Part 2: Steps To Merge Facebook Pages With Different Name.

As per Facebook page policies, you will be able to merge only pages with similar names. If you are looking to merge Facebook pages with different names, before going to the steps shared above, you will need to make some changes to your Facebook page name. Follow the steps below to change your Facebook name:

So let suppose, for example, you have to different page name, the 1st is neoAdviser Name and 2nd is Endrit. Now you to merge Endrit into neoAdviser. For this, you need to change Endrit’s page name to neoAdviser. To better understand, if the page name too much different then change the name in 2 or 3 processes.

  • In first request, Endrit => neoAdviser Endrit
  • In second request neoAdviser Endrit => neoAdviser

You can do those names change according to you your page name.

Part 3: “Pages can’t be merged” Error Solution

1st Error:

“AN ERROR HAS OCCURRED WHILE MERGING PAGES. THIS MAY BE CAUSED BY YOUR ATTEMPT TO MERGE TOO MANY PAGES.” 

This error occurs when admins are treating to merge more than 5, 6 pages. At this time Facebook restricts automatic merging. To resolve this, you can reduce the total merging pages. Another tip is to merge multiple Facebook pages that have a very similar number of likes.

2nd Error:

“THESE PAGES CAN’T BE MERGED BECAUSE THEY ARE TOO FAR APART. EACH PAGE CAN ONLY HAVE ONE PLACE ASSOCIATED WITH IT. DON’T USE THIS TOOL TO MERGE DIFFERENT BRANCHES OF YOUR BUSINESS. IF THESE PLACES REFER TO THE SAME PLACE, TRY CHANGING THE ADDRESS ON THE DESTINATION PLACE AND WAITING FOR THE LOCATION TO UPDATE.”

The solution to this is to remove the addresses of both pages before starting the margin procedure. Remove also Map.

What to do after successfully merging two Facebook Pages?

  • Update the profile picture, cover image, and fill the About section with relevant information. Also, put in the most important keywords.
  • Set the Facebook page to local and allow check-ins.
  • For the business Facebook pages, make sure to verify it. After successfully verification you page visibility in search engines will be improved.

> Check out: Invite All Friends To Like A Page On Facebook (2 Methods)

So, that’s all about how to merge Facebook pages easily. The same method shred above works even if you want to merge Facebook business pages. Hope you found it useful! If you have any question, please let us know in the comments section below, follow us on Twitter and Facebook for more news and updates.

neoAdviser

[td_block_11 category_id=”3″ limit=”1″ td_filter_default_txt=””][td_block_ad_box spot_id=”custom_ad_3″]
Flip Clock Screensaver (Windows and MAC)

How to make “Flip Clock” as a Screensaver (Windows and MAC)

If you are bored with the original screensaver of your computer and are looking for another alternative, neoAdviser has the right one. Flip Clock are hourly indicators that change the page whenever the number changes, a very interesting digitalization of an analog camera that other than an accountant’s office can hardly find anywhere else. So here are the simple steps on how to make Flip Clock as default screensaver on your Windows and MAC device. 

[td_block_ad_box spot_id=”custom_ad_2″]

> Check Out: How to Turn Your Windows 10 PC into a WiFi Hotspot

Turn Windows/Mac device into a Flip clock

To tun your Windows/Mac device into a Flip Clock we are going to use an app called Fliqlo. Fliqlo is a clock screensaver that will allow you to turn your screen device into a flip clock. The Flip Clock look displays the time in large white numbers with flip animations into a black background.

Fliqlo features:

  • Enlarge/Reduce the size
  • Switch between 12/24 hour format
  • On Mac: Switch between portrait/landscape screen orientation
  • On Mac: Brightness control
  • On Mac: Show/hide background
  • On Mac: Show the clock on a single primary display

How to Make “Flip Clock” as a Screensaver (Windows and MAC)

Steps to make Flip Clock as a screensaver 

  • Step1: Search on Google for “flip clock screensaver” and select the first result, or simply follow this link.
  • Step 2: Click inside the first image to appear and select between “Screensaver” or “Mobile App” at the top. In this case, the first, since we want to change it in the computer, but also because it costs mobile.
  • Step 3: Choose for “Mac” or “Windows” version and download it.
  • Steps 4: Flom the downloaded folder, select “Fliqlo Setup.exe” and open it.
Flip Clock Settings
Flip Clock Settings
  • Step 5: A window like above will be opened. Under “Screen saver“, just select “Fliqlo“, choose your preferred “Wait time” (the time when the Flip Clock will appear), next “Apply” and “Ok
  • Step 6: At this window, by clicking on “Settings” you will have some limited options like changing the “Format” and the “Size” of the clock in you are using it on windows.
Flip Clock Settings
Flip Clock Settings

> Check Next: How to use your Android smartphone as a webcam for your PC

So, here you have a Flip Clock screensaver for your Windows/Mac device. Hope you found this article useful. Let us know your thoughts in the comments section below, follow us on twitter and facebook for more news and updates.

neoAdviser

[td_block_11 category_id=”3″ limit=”1″ td_filter_default_txt=””][td_block_ad_box spot_id=”custom_ad_3″]