Create WiFi Hotspot In Windows/Mac/Linux OS (How To)

How To Create WiFi Hotspot In Windows/Mac/Linux OS

You are able to setup a WiFi hotspot on Windows, Mac and Linux Os by reading the guide shared below. With this you will be able to share your internet with all the devices around you and without using a third party app. So, if you want to know more, please follow the guide shared below.

> Check Out: How to Find Your Windows 10 Product Key (Using CMD & Windows Registry)

[td_block_ad_box spot_id=”custom_ad_2″]

1) Create WiFi Hotspot In Windows – Using CMD

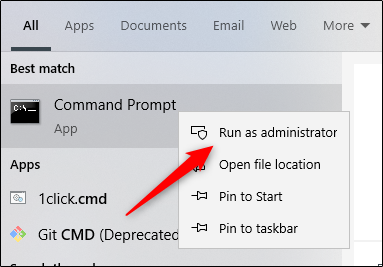
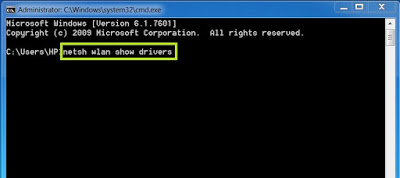
Step 1: Open cmd (command prompt) with the administrator privileges. Press Windows + X key on the keyboard then select Command Prompt (Admin) from the pop-up menu.

Step 2: Put netsh wlan show drivers than press ↵ Enter. The command will display information that will help you confirm that your device can create a hotspot with Command Prompt.

Create WiFi Hotspot In Windows – Using CMD

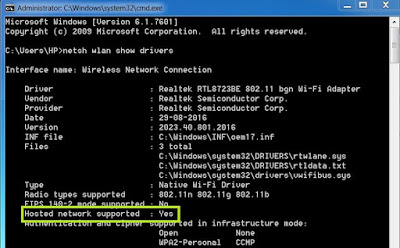
Step 3: Check for “Yes” next to “Hosted network supported”. If you see “Yes” there, your computer does supports the Hosted Network feature, which will allow you to create a Wi-Fi hotspot.
Note: If you don’t see “Yes” here, then your computer will not be able to create a wireless hotspot with Command Prompt.

Create WiFi Hotspot In Windows – Using CMD

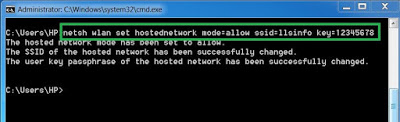
Step 4: next Type this code : netsh wlan set hostednetwork mode=allow ssid=llsinfo key=12345678 And press Enter.
Note : Change “llsinfo” with the name you want.
Change “12345678” with the password you want.

Create WiFi Hotspot In Windows – Using CMD

Step 5: Type netsh wlan start hostednetwork , press  Enter. It will turn your Wi-Fi hotspot on.

Step 6: Now your WiFi connection is ready and you can connect your devices through this.

Step 7: To turn off the hotspot , use the following command: netsh wlan stop hostednetwork then press ↵ Enter

> Check Out: Activate GodMode On Windows 7, 8 and 10 (How To)

2) Create WiFi Hotspot in Mac

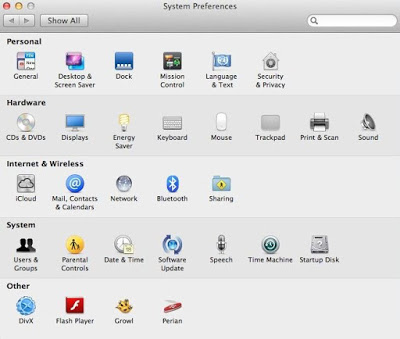
Step 1:Go to System Preferences.

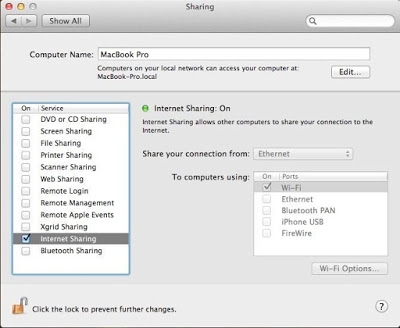
Step 2: Click Sharing, in Internet and Wireless Section.

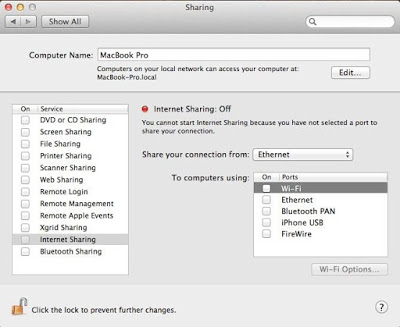
Step 3: Select Internet Connection option.

Create WiFi Hotspot in Mac

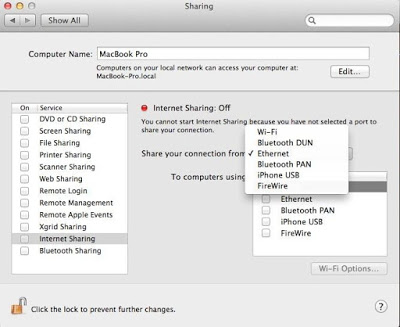
Step 4: Select Wifi Option Below.

Create WiFi Hotspot in Mac

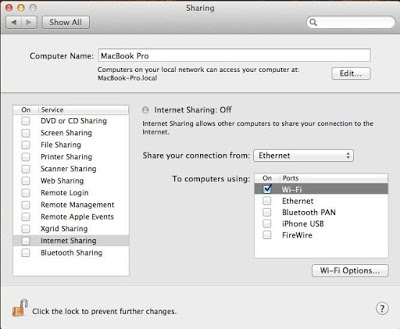
Step 5: Next Go to Wifi Options and then Set the Password.

Create WiFi Hotspot in Mac

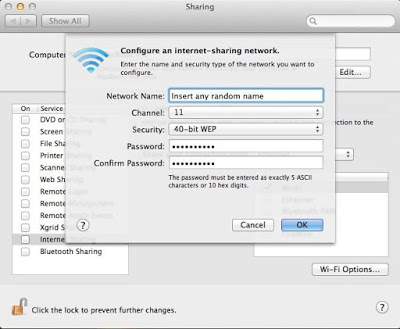
Step 6: next Tick Internet Sharing Option, on the Left Side.

Create WiFi Hotspot in Mac

Step 7: That’s all. use WiFi.

> Check Out: Convert a PDF File Into an Editable Text Document (How to)

3) Create WiFi Hotspot in Ubuntu

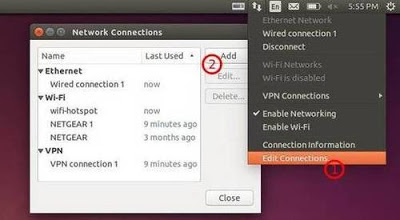
Step 1: Go to Network Icon on top panel -> Edit Connections …, and click  Add button in the pop-up window.

Create WiFi Hotspot in Ubuntu

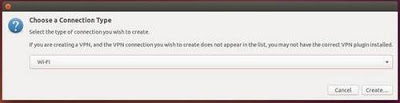
Step 2: Next Choose Wi-Fi when you’re asked to choose a connection type:

Create WiFi Hotspot in Ubuntu

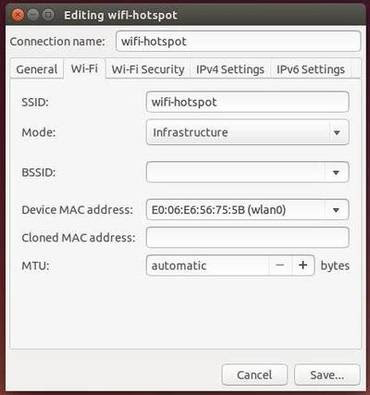
Step 3: In next window,:

  • Type in a connection name. The name will used later.
  • Type in a SSID
  • Select mode: Infrastructure
  • Device MAC address: select your wireless card from drop-down menu.
Create WiFi Hotspot in Ubuntu

Step 4: Go to Wi-Fi Security tab, select security type WPA & WPA2 Personal and set up a password.

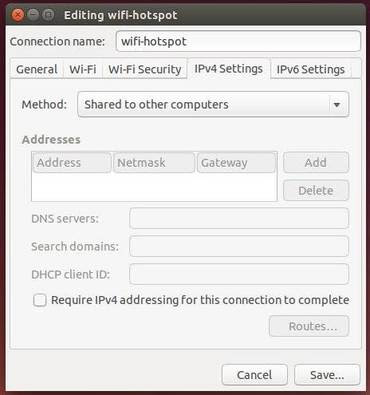
Step 5: Go to IPv4 Settings tab, from Method drop-down box select Shared to other computers. When finished, click save button.

Create WiFi Hotspot in Ubuntu

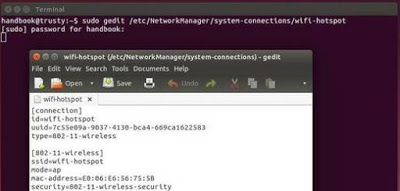
After these steps, a configuration fileis created under /etc/NetworkManager/system-connections directory. The file name is the connection name you careted in step 3.

Step 6: Next press Ctrl+Alt+T on keyboard to open terminal. When it opens, paste the commands below and hit enter to edit the configuration file: gksu gedit /etc/NetworkManager/system-connections/wifi-hotspot

Note : Change “wifi-hotspt” with the hotspot connection name you created in step 3.

Step 7: When the file opens, find out the line mode=infrastructure and change it to mode=ap. Finally save the file.

Create WiFi Hotspot in Ubuntu

Step 8: Finally, enable WIFI from Network Manager icon in the panel. You can check it WiFi section.

> Read Next: How To Find Passwords of All Connected Wi-Fi Networks using CMD

So, that’s all about How to Create WiFi Hotspot In Windows/Mac/Linux OS. Hope you found this article useful. Please let us know your thoughts in the comment section below,follow us on twitter and facebook for more news and updates.

neoAdviser

[td_block_11 category_id=”3″ limit=”1″ td_filter_default_txt=”” tdc_css=””][td_block_ad_box spot_id=”custom_ad_3″]
Find Your Windows 10 Product Key

How to Find Your Windows 10 Product Key (Using CMD & Windows Registry)

If you are searching for your Windows 10 product key, you can find it very easily by using a command in CMD (Command Prompt) or by using a Windows Registry Method. Finding you Windows 10 product key may be important for ex. when you are trying to reinstall your Windows 10 and you came to the point when you need your Windows product key. Below we are sharing an How To guide so make sure to read it!

[td_block_ad_box spot_id=”custom_ad_2″]

> Check Out: How To Activate GodMode On Windows 7, 8 and 10

Do you really need a product key?

Windows 10 is the very latest version of Microsoft that you should install nowdays on your devices. The major upgrade that come with it was the “Digital Licence”, which means that you don’t need any license for activating your Windows 10 when you reinstall it. Through your digital license linked to your Microsoft account, your Windows 10 will be activates automatically by itself.

Windows 10 Product Key

But still, for some other good reasons you may also need to extract your Windows 10 Product key form your Windows device.

How to Find Your Windows 10 Product Key (Using CMD & Windows Registry)

After installing your Windows OS on your device and activate it, Microsoft will save it at your Windows Registry, something that for general users is very hard to find it. By using the methods below, you can find easily your Windows OS Product key. These methods are really for every Windows users and can be also used on Windows 7 and Windows 10.

Method #1. Find Your Windows 10 Product Key Using the Command Prompt (CMD)

This is the most simple method to extract your Windows 10 product key all you need is to start your Command Prompt window with the administrator rights. To do so follow the steps below:

  • Step 1.  Type “CMD” on you windows search bar
  • Step 2. The Command Prompt will appear at your search results. “Right-click” on it and choose “Run As Administrator” from the window. If needed, enter the password of your Windows account.
  • Step 3. Once the CMD window is opened, “Copy & Paste” the code below and hit “Enter
wmic path softwarelicensingservice get OA3xOriginalProductKey
  • Step 4. After than, your 25-digit product key will be displayed as below example:

That’s all! This is one of the most simple and quick method to find you Windows 10 Product Key using a code, but a code than is not really that easy to remember it. Be advised that this method will also work for OEM and Retail licenses.

> Check Out: Top 5+ Best Free Screen Recorder For Windows 10 

Method #2. Find Your Windows 10 Product Key Using a Windows Registry Method

This is one other very simple method to find your Windows OS product key by using a VBScript-  that you may have seen it at Microsoft forums. This code simply translates the Registry values to readable format. So follow the simple guide below on how to find your Windows 10 Key using Windows Registry method.

  • Step 1. “Right-click” on the desktop to open Notepad, go to “New” than go to “Text-Document” form the window.

  • Step 2. Next “Copy & Paste” the below code in Notepad
Set WshShell = CreateObject("WScript.Shell")
MsgBox ConvertToKey(WshShell.RegRead("HKLM\SOFTWARE\Microsoft\Windows NT\CurrentVersion\DigitalProductId"))

Function ConvertToKey(Key)
Const KeyOffset = 52
i = 28
Chars = "BCDFGHJKMPQRTVWXY2346789"
Do
Cur = 0
x = 14
Do
Cur = Cur * 256
Cur = Key(x + KeyOffset) + Cur
Key(x + KeyOffset) = (Cur \ 24) And 255
Cur = Cur Mod 24
x = x -1
Loop While x >= 0
i = i -1
KeyOutput = Mid(Chars, Cur + 1, 1) & KeyOutput
If (((29 - i) Mod 6) = 0) And (i <> -1) Then
i = i -1
KeyOutput = "-" & KeyOutput
End If
Loop While i >= 0
ConvertToKey = KeyOutput
End Function
  • Step 3. In Notepad, click “File” and choose “Save As
  • Step 4. On the File Explorer, at the “Save As Type” choose “All Files” give your file a name and put .vbs next to the file name. Example: windowskey.vbs
  • Step 5. Next “Save” the file
  • Step 6. Finally to view your Windows 10 product key you simply click the file you have just created to open it.

> Check Next: Windows 10 Themes/Skins: Top 15+ Best Windows 10 Themes

That’s all! Knowing these two simple methods you can easily find your Windows 10 product key. The methods shared below works well also on Window 8 and Windows 7. Hope you found this article useful, please let us know in the comment section below, follow us on twitter and facebook for more news and updates.

neoAdviser

[td_block_11 category_id=”3″ limit=”1″ td_filter_default_txt=”” tdc_css=””][td_block_ad_box spot_id=”custom_ad_3″ tdc_css=””]
Clear your Search History on Facebook

How to Clear your Search History on Facebook (Mobile&Desktop)

The latest Facebook search feature helps you get back to the pages you’ve recently searched for or visited frequently. But on the other hand, it is a threat to privacy. If you leave the phone in the hands of a friend for a second, you won’t want to risk them seeing what you asked for and the first thing that comes to your mind is how to clear the history.

> Check Out: How To Accept All Friend Requests On Facebook At Once

Here’s how to clear your Facebook search history from a mobile device

  1. Open the Facebook app
  2. Click the search icon in the upper right corner
  3. Next to the “Recent Searches” option is the “Edit” button
  4. When the activity log opens, click on the “Clear Searches” option.

Here’s how to clear your Facebook search history on your desktop

  1. On the profile page in the upper right corner of the cover is the “Activity Log” button
  2. Click the “More” option under the comments in the left pane
  3. From the open menu, type “Search History
  4. At the top of the search page, type “Clear Searches
  5. Click “Clear Searches” to confirm

> Read Next: Here’s how to see what kind of information Facebook has about you and how to clear it!

Hope you found this article useful. Let us know your thoughts in the comment section below,follow us on twitter and facebook for more news and updates.

neoAdviser

Accept All Friend Requests On Facebook

How To Accept All Friend Requests On Facebook At Once – (2020)

Facebook with more than 6 billion users worldwide is absolutely the biggest social media platform. Facebook is the place to make new friends, chat with our friends join groups, post status or even pay games, promote our business and many many more. Users of the social media Facebook can reach many peoples through groups or they pages. We have already shared a guide on how to Invite All Friends To Like A Page On Facebook. We can also reach many peoples not only from groups or pages but even through our profile page. Now-days peoples, in a smart way, make females profile page and grow that profile by accepting friend requests of buy increasing they followers.

[td_block_ad_box spot_id=”custom_ad_2″ separator=””]

> Check Out: How to Change my Facebook Profile Name Before 60 Days Limit (2 METHODS)

How To Accept All Friend Requests On Facebook At Once – (2020)

Normally we can accept the friends on Facebook one by one, but the problem is when we get to many friend request and it is a consume time accepting then one by one. So, doing this by just a simple click it i really a great thing to save a lot of time. To now more about how to accept all friends requests on Facebook at once follow the article below.

Steps To Accept All Friend Requests On Facebook at Once.

  • First open the given link below in your browser or visit here
https://www.facebook.com/reqs.php
  • After opening the link all your Pending request will be visible there.
  • Next Click F12 to open console box or you open it by right click through Inspect Element.
  • Next copy the below given code and paste it in console box. Like shown in the image below.

javascript:for( i = 1;i<document.getElementsByName(“actions[accept]”).length;i++){document.getElementsByName(“actions[accept]”)[i].click();}void(0);

Accept All Friend Requests On Facebook
  • After pasting press Enter and wait for sometime until all pending request will get confirmed.
  • Scroll down to make sure all request are accepted. In case there is a See more option, click on it.

  • Run again the scrip to accept request of pending request.
  • Follow the same process until all the request will get accepted.
Accept All Friend Requests On Facebook At Once

WARRING: Don’t accept friends requests in excessive. Always try to accept up to 50 per hour. This will reduce the chances of getting block.

> Read Next: How To Make Single Name On Facebook Account

That’s all! hope you find this trick on how to accept all friend requests on Facebook at once useful. Please let us know your thoughts in the comment section below, follow us on twitter and facebook for more news and updates.

neoAdviser

[td_block_11 category_id=”3″ limit=”1″ td_filter_default_txt=”” tdc_css=””][td_block_ad_box spot_id=”custom_ad_3″]
Delete Gmail Adress

How to delete a Gmail address and Download the Data

If you’ve created a Gmail account you no longer want, you probably plan to delete it but you need the emails. When you delete a Gmail address, you do not delete your Google Account. But on the other hand, it means that you can neither send e-mails with that nor receive e-mails from others. So make sure before you make the decision to delete your Gmail account.

[td_block_ad_box spot_id=”custom_ad_2″ tdc_css=””]

> Check Out: How to Change my Facebook Profile Name Before 60 Days Limit (2 Methods)

How to delete a Gmail address and Download the Data

If you’re sure, then follow the steps below to delete a Gmail account.

Here’s how to delete your Gmail account: 

  • Open the Gmail account you want to delete
  • Click on the profile icon in the upper right corner
  • From the Account menu, click the “Google Account” option

  • In the left pane click on “Data & Personalization
  • Scroll to the bottom of the page and click “Delete a service

  • Click “Delete a service

  • Enter the password if prompted
  • On this page you can also choose to download all the data before deleting the account by clicking the “Download Data” button
  • Click on the trash icon
  • Set up an email where you can get confirmation

  • Open the email you provided and click the link sent inside it to complete the deletion process

> Read Next: How to find out if someone has opened the email you sent through Gmail

That’s all! You have now successfully deleted your Gmail account. Hope you found this article useful, follow us on twitter and facebook for more news and updates.

neoAdviser

[td_block_11 category_id=”3″ limit=”1″ td_filter_default_txt=”” tdc_css=””][td_block_ad_box spot_id=”custom_ad_3″ tdc_css=””]
Change my Facebook Profile Name Before 60 Days Limit

How to Change my Facebook Profile Name Before 60 Days Limit (2 METHODS)

So, what is this 60 Days Limit to change your facebook account name:

According to Facebook rules and regulations, one cannot change their facebook account name twice or thrice or even more in less than 60 days’ span, it is because Facebook requires everyone to provide the name they use in everyday life so that you always know who you’re connecting with.

There are two methods of changing your Facebook account name before 60 days limit

> Check Out: Convert a PDF File Into an Editable Text Document (How to)

[td_block_ad_box spot_id=”custom_ad_2″]

1)   Method 1:

This is illegal or not rightful method to change your facebook account name, as this might not harm anyone practically, you may consider this possibility of changing your facebook account name


2)   Method 2:

This is the method you might be looking for if you want to change your facebook account name completely to a different name as the first method doesn’t allow you to change to a new name for facebook account or facebook profile before 60 days’ limit.  This method has some limitations as well,  you can read it below.

How to Change Your Facebook Account Name Before 60 Days Limit – Method – I

By using this method, you cannot make a new account for your account instead you can revert to your old account name, which might be considered when you misspelt your name or your new name doesn’t suit you or you no longer use that name. So, you can shift to your old account name in less than 2 mins.

1)   Log in to your facebook account

2)   Go to this link: https://www.facebook.com/hacked

You might be wondering what  this link is actually, this is created by facebook in order to check the security settings and modifications happened in an account in case an account is hacked or any security issue occurs

How-To-change-your-Facebook-Profile-Name-Before-60-Days-Limit

3)   Click on “get Started” – let it complete checking your data and after it completes the process click “Continue”

4)   Now Change your facebook account password
5)   It asks you to check “what is your correct name” there select your old name and click next

6)   That’s it – Now Check your profile name, it will be changed to your old name

> Check Out: Invite All Friends To Like A Page On Facebook (2 Methods)

How to Change Your Facebook Account Name Before 60 Days Limit – Method – II

This is the legal and original process which is set up by facebook for people who want to change their name for real, not for fun. This method doesn’t go as smooth and as fast as the previous method, this takes time as facebook verifies your data.

All you need to do is send your details to facebook via link given out by facebook

1)   Go to this Link

2)   Fill out your details

Limitations of How to Change Your Facebook Account Name Before 60 Days Limit – Method – II

1)  You can only use your real name

2)  You can change your account name till next 2 months unless you use method -1

3)  Not as fast as method – I. This may take some time

source/ hackingdream.net

I Will Be Very Happy To Help You So For Queries or Any Problem Comment Below Or You Can Mail Me At [email protected]

neoAdviser

[td_block_11 category_id=”3″ limit=”1″ td_filter_default_txt=”” tdc_css=””][td_block_ad_box spot_id=”custom_ad_3″]
Complete Guide To Install Kodi on PS4 and PS3 (Working 2018)

Complete Guide To Install Kodi on PS4 and PS3 (2020)

Install Kodi on PS4 and PS3: PS4 and PS3 are great gaming consoles and many use they to play games.In this article we will go through the steps to install Kodi on PS4 and PS3.Yes this is possible!Kodi is a free open source software also Kodi on PS4 is the best medi streaming service available for you.So follow the steps below to install Kodi on PS4 and PS3!

[td_block_ad_box spot_id=”custom_ad_2″]

> Check OutSteps to Download PS4 Emulator for PC 

Complete Guide To Install Kodi on PS4 and PS3 (Working 2020)

Kodi On PS4 and PS3
Kodi On PS4 and PS3

Kodi is available for Android also iOS but not for PS4, for this reason you can’t install Kodi os PS4 and PS3 directly. But don’t worry we have on alternative for you by installing Plex app. Plex is the best alternative to Kodi on PS4 and PS3. Check the guide below on how to install this app.

Steps To Install Kodi on PS4 and PS3 (Working 2020)

Step 1: Launch the PlayStation Store.

Step 2: Go to the Home page.

Step 3: Then you can see the Apps option.

Step 4: Click on it.

Step 5: Select popular section.

Step 6: Scroll down till finding the Plex icon.

Step 7: Click on download and install it.

Step 8: Wait the installation process till is done.

Step 9: Tap to Start.

Step 10: Open Plex from TV and Video tab on your home screen.

Step 11: After, create one account for the Plex app.

Step 12: Sign in with that account on your PS4.

Step 13: After Logged in the app will show you code and link from your TV screen.

Step 14: Enter the code from your TV screen.

Step 15: Click on LINK.

Step 16: Now, go to Settings > System and then enable options like Advertise a server then Show camera roll media and Network discovery.

Step 17: Done.

Now you have successfully installed Kodi on ps4.

> Read NextSteps to Install Kodi 17.1 Ares Wizard, and Get Pin using http://bit.ly/build_pin

Hope you find useful this guide on how to install Kodi on PS4 and PS3, is you have any question please let us know in the comment section below,follow us on twitter and facebook for more news and updates.

neoAdviser 

[td_block_11 category_id=”3″ limit=”1″ td_filter_default_txt=””][td_block_ad_box spot_id=”custom_ad_3″]

How to find out if someone has opened the email you sent through Gmail

Unlike text messages, which come with notification when the message is read, knowing whether or not a person has read your email is tricky. For some, this may be important because if you know that the person has read your email but has not yet replied, then you can proceed to the next step. With Gmail, Google allows email tracking, but unfortunately the feature is only available to those under the G Suite program. So, if you have a G Suite account, then these are the steps you can follow to get the read message notification for your emails.

[td_block_ad_box spot_id=”custom_ad_2″]

How to find out if someone has opened the email you sent through Gmail

With Gmail, Google allows email tracking, but unfortunately the feature is only available to those under the G Suite program. This means if you have a Gmail account that is for personal use, you will not be able to use the tracker. However, if you have a G Suite account, then these are the steps you can follow to get the read message notification for your emails.

  • Write a new email in Gmail 
  • At the bottom of the Compose box click More> Request read receipt
  • Once you have finished writing your email, click on the ‘Send‘ option and you will be notified when your email is read.

> Read Next: Here’s how to save WhatsApp conversations to a new number and a new phone

Hope you found this article useful. Let us know your thoughts in the comment section below, follow us on twitter and facebook for more news and updates.

neoAdviser

[td_block_11 category_id=”3″ limit=”1″ td_filter_default_txt=”” tdc_css=””][td_block_ad_box spot_id=”custom_ad_3″ tdc_css=””]
Activate GodMode On Windows

How To Activate GodMode On Windows 7, 8 and 10

Do you find somewhat tedious going through different setting for reaching a feature? Do you like just to do one click on your computer to access all these features at one place? Well, all this is possible through Windows God Mode. With God Mode you will be able to access all settings, features at many more in one place, with just a simple click. The Windows God Mode is know, unfortunately, by a few users.

[td_block_ad_box spot_id=”custom_ad_2″]

> Check Out: Top 5+ Best Free Screen Recorder For Windows 10 (2020)

Activate GodMode On Windows 7, 8 and 10 (How To)

God Mode if really a great feature for these who don’t need to open to many windows or don’t like going through different features on Windows PC to find different settings. So, if you to menage all the different control panel settings and shortcuts in one single place, God Mode is here to manage everything a loot easier.

The God Mode works great on Window 7,8 and also on Windows 10. So, follow the guide below to find out how to active God Mode on Windows PC.

Steps to enable God Mode on Windows 7, 8 and 10.

  • Create a New Folder in your desktop.
  • Rename the New folder to “GodMode.{ED7BA470-8E54-465E-825C-99712043E01C}
  • Once done the step 2, the folder name will automatically change to GodMode.
Activate GodMode On Windows 7, 8 and 10 (How To)

At this time the icon will change with the control panel icon. So that’s all! GodMode with give to you more than 270 different settings and options and all in one place.

> Read Next: Windows 10 Themes/Skins: Top 15+ Best Windows 10 Themes (2020)

The GodMode feture will work on all versions of Windows 32 and 64 bit.This trick is very simple and it will sane to you a lot of time. So, that’s all about how to active GodMode on Windows. Hope you find this post useful! please let us know your thoughts in the comment section below,follow us on twitter and facebook for more news and updates.

neoAdviser

[td_block_11 category_id=”3″ limit=”1″ td_filter_default_txt=””][td_block_ad_box spot_id=”custom_ad_3″]

Incoming Keywords

  • godmode
  • godmode on windows
  • god mode windows 10
  • god mode windows 8
  • god mode windows 7
  • windows godmode
  • windows god mode