Here's how to stop automatic updates in Windows 10

Here’s how to stop automatic updates in Windows 10

Finally after much criticism of unsustainable updates, the company brought up a feature where users could temporarily stop updating.

[td_block_ad_box spot_id=”custom_ad_2″]

However, Microsoft can only do this for a month, and the feature is designed to help you avoid problematic updates.

In short, you need to be careful about how you use it.

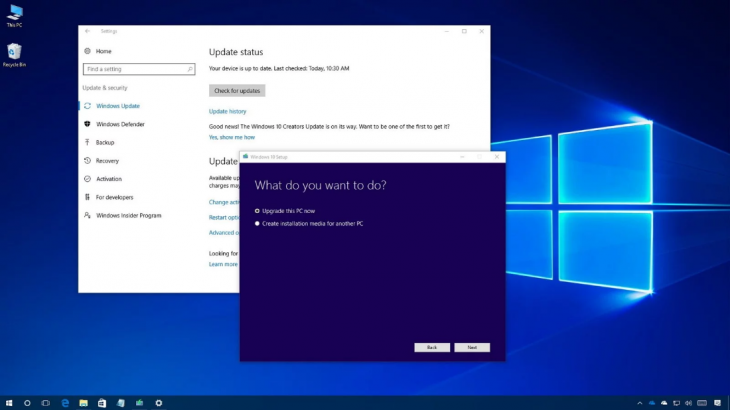
Here’s how to stop automatic updates on Windows 10

  1. Open Settings and navigate to Update and Security
  2. Click on Windows Update
  3. The first option you should search is Pause Updates for 7 Days
  4. If you want to stop the updates for more than that, click Advanced Options below the option.
  5. You will find another Pause Updates field that lets you choose which date you want to post updates in the next 35 days.

One of the reasons why Microsoft does not allow further stoppage of updates is because the company every month sends the security updates needed for the security of your Windows 10 computer.

> Read Next: Kuo: All 2020 iPhone models will have 5G network

So what do you think about this? Let us know your thoughts in the comments section below, follow us on twitter and facebook for more news and updates.

neOadviser – TECH

[td_block_11 category_id=”3″ limit=”1″ td_filter_default_txt=”” tdc_css=””][td_block_ad_box spot_id=”custom_ad_3″ tdc_css=””]
Steps to Download PS4 Emulator for PC (Working 2018)

Steps to Download PS4 Emulator for PC

Here we will go through steps to download PS4 Emulator for PC so you will play PS4 games on your PC, if you don’t have any PS4 gaming console.Many love to play PS4 Games, so use PS4 Emulator for Pc and after you can play all PS4 games on PC or Android.

neoAdviser's notice!

Please check out our latest updated article about the Top 3 Best PS4 Emulators for Windows PC in 2020. This emulator is also included along with the updated download link! Thanks.

[td_block_ad_box spot_id=”custom_ad_2″]

What is PS4 Emulator?

With PS4 Emulator you be able PS4 games on your Windows PC.PS4 Emulator listed below is the first Emulator which it can play Ps4 games on Windows.The best thing its free to download!

PS4 Emulator Features

#1. PS4 games variable frame rates on PC.

#2. No Ads.

#3. Also, support multiple gaming devices.

#4. PCSX4 run natively on windows.

#5. Available Free.

#6. Easy to Use.

Steps to Download PS4 Emulator for PC (Working 2019)

PS4-Emulator
PS4-Emulator

Requirements before you start installing PS4 emulator.You Need 64 bit OS of Windows 8/8.1/10 with .net framework 3.5 and VC++2015.Also your PC most have 4GB of RAM as minimum.

Step 1: First, Download PS4 Emulator on your computer.

Step 2: Go to download location.

Step 3: Now, you are Right click on the Downloaded file.

Step 4: Extract to your Folder.

Step 5: Open the extracted file and run the pscx4 app.

Step 6: You need to Configure the settings of PS4 emulator.

Step 7: Click on config >graphic.

Step 8: Select the recommendation of your PC.

Step 9: Now, you have PS4 emulator on your PC after you can open and run it.

Step 10: Open PS4 Emulator and click on “File> Iso file.

Step 11: Select the game you have saved or download your games.

Step 12: After, click on open.

Step 13: Nlick to Run> start game.

Step 14: Done.

> Read NextDownload Xbox 360 Emulator for PC & Android

However, following the above mentioned steps you ca easily Download PS4 Emulator for PC.If you have any question, please let us know in the comment section below,follow us on twitter and facebook for more news and updates.

neoAdviser

[td_block_11 category_id=”3″ limit=”1″ td_filter_default_txt=””][td_block_ad_box spot_id=”custom_ad_3″]
Download Paid Apps For Free On Android (How To) - 2018

Download Paid Apps For Free On Android (How To) – 2019

Today we will share an article that can help you to download paid apps for free on your android phone.They are many methods which may or may not work,but here will discuss only working methods to download paid apps for free.

Almost all categories include a paid of they app.Many apps have to many features, which are not an easy work for the developers, as for this reason they charge some money to earn and invest in they work.So all depends from the developer if they want to publish an android app as paid or free.

> Check Out: What to do when you lose your Android phone? Follow the tips below!

Download Paid Apps For Free On Android (How To) – 2019

But we know the Aptitude of human nature, we always dream of that which is difficult to achieve.Here we will post different solutions to download paid apps for free on android.We will discuss only  a few working methods that we will help you to download paid apps for free.

Methods To Download Paid Apps For Free On Android.

[td_block_ad_box spot_id=”custom_ad_2″]

Method #1 – Using AppValley

AppValley is one of the best online apps store application out there in the market. There are a lot of amazing cracked apps and games available in this app. The database is really cool with lots of modded and tweaked games and you will be able to download without any much hassle. Now a days people are looking out to download various apps and games apart from playstore and Appstore. AppValley is avaliable on both iOS and Android platforms. Get AppValley from here.

Method #2 – Using Blackmart Alpha.

For this you have to download an app name Blackmart Alpha, which it will help you to download paid apps for free. They have almost listed any paid apps which are working successfully.

  • Download BlackMart Alpha From Here.
  • Install it on your Android Phone. In case if above application is not working then google it “latest blackmart alpha.apk app” without quotes.
  • Open Blackmart and in the search box enter the name of your favorite app.
  • Download that particular app through BlackMart on your Android Device.
  • You may see your Paid Apps running successfully for free.
Blackmart Alpha
Blackmart Alpha

Method #3 – Searching For The .apk File Of Paid Apps.

With this method you will have to download apps from some famous websites which provides for .apk extension and then transfer them from PC to mobile.

Searching For .apk File

Below are few sites where you can find apk files of different applications and download paid apps for free.

  • 4shared.com
  • Mediafire.com
  • Apkfiles.com
  • Apkmaniafull.com
  • Apkpure.com
  • these are only few sites but you can search for many hosting sites for apk.
  • Now open these sites and search the exact name of the app you want do download. Or in the following format of Appsname.apk.
  • Download the app from that site and install them on android phone.
  • Install it on your phone and enjoy your new paid apps.
[td_block_ad_box spot_id=”custom_ad_5″ tdc_css=””]

> Check Out: How to Hide Data, Applications, Photos, and Documents on Android

Method #4 – Apps Offer By Popular Platforms.

There are some of the best 3rd party app stores which offer to download paid apps for free. You just have to complete some task or have to install their own service apps. They provide many apps for free or even provide a huge discounts on them which are not totally available for you free to download.

Amazon Underground Service.

Amazon underground app provide to you thousands of paid apps for free. So don’t forget to avail this amazing opportunity. All you have to do is install Amazon underground app.

Download amazon underground from here.

After that you have to choose tab of underground. Then choose any app you like.

Amazon Underground Service

Some Other Apps Who Provide Free Apps On Daily Based.

  1. AppGradis.
  2. Freeapps.

App Which Provide Huge Discount On Apps

  1. App of The Day.
  2. AppSales.

> Read Next: How to make your Android smartphone faster (5 Tips)

Above we have shared some working methods for you to use and easily download paid apps for free on your android phone.If you have any suggestion or we have missed something than let us know in the comment section below, follow us on twitter and facebook for more news and updates.

neOadviser – HOW TO

[td_block_11 category_id=”3″ limit=”1″ td_filter_default_txt=”” tdc_css=””][td_block_ad_box spot_id=”custom_ad_3″]
What to do when you lose your Android phone? Follow the tips Below!

What to do when you lose your Android phone? Follow the tips Below!

Losing a smartphone is something unpredictable and unmanageable. At least this has happened to all of us, so we understand the panic we hear when we lose it. This is because we have a lot of valuable information inside us, but what we forget is that these data are often very sensitive, and in the wrong hands can cause more problems.

But What to do when you lose your Android phone?

[td_block_ad_box spot_id=”custom_ad_2″]

At the moment of losing the phone as a logical solution, we think to find the lost phone instantly, but what we really need to do is not waste time and ask Google.

> Check Out: How to Hide Data, Applications, Photos, and Documents on Android

Here’s what to do instantly when you lose an Android smartphone:

Here's what to do instantly when you lose an Android smartphone:
Here’s what to do instantly when you lose an Android smartphone:
  • Type Find my phone on Google on any device that is connected to the Internet.
  • Sign in with your Google account. But be careful, you need to log in with the same account you were connected to on the missed smartphone.
  • Google will immediately show you the location of your smartphone.

After the Find my phone function, your Android smartphone is detected but needs to find its physical location, so click on the Play Sound function that will send the ringtone to your smartphone for 5 minutes without interruption even if you have it without voice.

But there are times that your phone may have fallen into the wrong hands, and maybe phone call may be not very smart solution. So if your phone is stolen, you should close the remote app without letting anyone enter your smartphone.

> Check Out: How to make your Android smartphone faster (5 Tips)

Here’s what steps you need to follow in order to lock your android phone remotely:

Here's what steps you need to follow in order to lock your android phone remotely:
Here’s what steps you need to follow in order to lock your android phone remotely:
  • Go to the website android.com/find and sign in to your Google account.
  • If you have more than one android device, click on the Lost Device function located up on the page.
  • If your lost device has more than one user profile, select the main profile to log in.
  • Sometimes your device can not be found immediately, but at least Google can tell you where your smartphone was last.
  • If you click the Enable lock & erase function, you can lock your phone remotely. With the enable lock feature, you can put a smartphone password or smartphone even if it does not have an existing one.
  • If you choose to click on the delete function, you will delete any information inside your phone without going back. Carefully, after you click this command, you can no longer use Find my device.

The Find My Phone function only works with active internet connections, and the smartphone must be turned on.

Here are some of the tips you can follow in order to be in control when it will happen to lose your phone:

  1. You must always be singed-in with your google account
  2. Your phone must have the internet or have the WiFi connection open
  3. You must be visible on Google Play
  4. Keep your location on
  5. Always keep the Find My Device turned on

> Read Next: Download Modded Games On Your Android Device (How To)

That’s all! Hope you find this tips on the steps you can follow when you lose your Android phone useful. Please let us know your thoughts in the comment section below, follow us on twitter and facebook for more news and updates.

neOadviser

[td_block_11 category_id=”3″ limit=”1″ td_filter_default_txt=”” tdc_css=””][td_block_ad_box spot_id=”custom_ad_3″ tdc_css=””]
How To Unlock Pattern Lock On Android Phone (3 Ways)

How To Unlock Pattern Lock On Android Phone (3 Ways)

We probably reset our phone to remove these pattern lock. But what about if we want to rather Unlock Pattern Lock On Android Without Losing Data? Don’t worry you are at a right place.

[td_block_ad_box spot_id=”custom_ad_2″]

Android smartphones are famous world wide for having various kind of useful applications and games. Since we download apps that we need like we use messengers, photo editors, calling apps, launchers and other security apps.

Android is a functional OS but not as secure as it should be. As we can easily download paid android apps for free, Which show that android is probably not secure. Normally we use pattern lock to protect phone for others or we even use some applications. It is a very easy and simple way to secure our personal mobile phone data with pattern lock. We have to just draw a pattern and that’s it. As we don’t have to bother about putting numbers or characters for password. Because we can easily forget numbers and characters as compare to pattern lock, it is a very rare case that you may forget your pattern lock.

As usual we use gmail account in play store it become easy to reset but if you don’t have an email address to reset it. So don’t worry, those who forgot their android pattern lock can easily unlock pattern lock without losing their personal data.As all these patterns can easily bypassed just by doing some effort.

We probably reset our phone to remove these pattern lock. But what about if we want to rather Unlock Pattern Lock On Android Without Losing Data? Don’t worry you are at a right place. Here we found some methods through which you can unlock pattern lock any of your android smartphone. We are going to explain different methods to unlock android smartphone pattern lock without losing data. So choose which you find out easy to do.

How To Unlock Pattern Lock On Android Phone.

Method 1:- Unlock Pattern Lock On Android Without Losing Data.

Required items.

  • Download Aroma File Manager.
  • A memory card for android device.
  • You android device either locked by pattern lock or password lock.

Step 1. After downloading Aroma File Manager, place it in your memory card (SD card). Then, insert the memory card into your locked android device.

Step 2. Open Stock Recovery Mode with reboot your android device and pressing Power Key and Volume up key simultaneously. Different phones may have different methods to open stock recovery mode so if you face any problem Google it.

Step 3. After entering into recovery mode use Volume+ and Volume- buttons to scroll up and down. For select use middle button.

Step 4. From there click on “Install Zip from SD Card” and give path to install “Aroma File Manager” from SD card.

Step 5. After installing, it will open in recovery mode.

Step 6. From the Aroma File Manager navigate to settings >> go to bottom and click on “Automount all devices on start” and then exit.

Step 7. Now again click on “Install Zip from SD Card” and give path to install “Aroma File Manager” from SD card.

Step 8. After this you will get “Aroma File Manager” opened again.

Step 9. Now navigate to Data Folder >> System Folder  and find >> “gesture.key” or “password.key” for pattern lock or password lock respectively.

Step 10. Delete that any one file and then exit aroma file manager and reboot your android device. After rebooting you will notice that password or pattern lock is not removed. But don’t worry draw any pattern and you will open your android device but remember or note that pattern because it will be saved.

Method 2nd:- Unlock Android Pattern Lock With SDK Tools.

1. First of all Download Android SDK and here we will show you How To download and install Android SDK Tools.

  • Download and install Android SDK Tools for run ADB commands. Open the given page and then select platform according to you download and install it.
  • After installing open it, unchecked the other packages and check Android SDK Platform-tools and then click on install packages according to the image given below.

2. So the other requirement is USB Debugging should be enabled before your android device was locked.
3. The process will probably not be helpful if you don’t have specific and compatible drivers for your phone. So you should be very careful While installing your device compatible drivers.

Steps To Unlock Android Pattern Lock.

Step 1. Connect your locked android phone with PC/Laptop via USB.
Step 2. Then, Open folder where you installed Android SDK Tools Users >> App Data >> Local >> Android >> Android-SDK >> Platform-Tools and then click on blank space hold shift and click right mouse button and select “open command window here”.

Step 3. It will open you command window. Then, you have to put some commands in the command window:-

For checking your device is connected or not put command:-

adb devices

Then, put these commands:-

adb shell
cd /data/data/com.android.providers.settings/databases
sqlite3 settings.db
update system set value=0 where name=’lock_pattern_autolock’;
update system set value=0 where name=’lockscreen.lockedoutpermanently’;
.quit

If above commands not working put:-

adb shell rm /data/system/gesture.key

Step 4. Once you done the above steps, you have to reboot your android device. Now its all done.
After rebooting your device you will see the pattern lock disabled.

So in this method USB Debugging should be enabled before lock because it is a must. If it is not enabled then you cannot proceed further steps.

Method 3rd:- Unlock Pattern With Factory Settings (Data Will Lost).

Since, in the above methods we have used PC/Laptop, we downloaded software and we usedsome commands. But if you do not have a PC/Laptop or your device did not have USB Debugging enable, then you can follow this method.

Note:- In this method your all data will be lost. So if you do not want to lose your data then don’t  follow this method.

Step 1. First of all, Switch off your Locked Android Device.
Step 2. Then, boot your Android device into “Recovery Mode” using specific keys by holding power key and volume up key simultaneously.
Step 3. After opening Recovery Mode

  • Select “Factory Data Reset” option and give “Yes“.
  • Select “Wipe Cache Partition” to wipe cache data.

Step 4. Then, Reboot your device.
Step 5. All Done ! hence, your device will start from the scratch.

> Read Next: How to Hide Data, Applications, Photos, and Documents on Android

In conclusion, we feel that you have learned some interesting facts about how to unlock pattern lock on android. But few people may use this to hack but you should rather use this in a right way to help someone, or yourself. If you have any question leave your comments below,follow us on twitter and facebook for more news and updates.

source/ safetricks.org

neOadviser – HOW TO

[td_block_11 category_id=”3″ limit=”1″ td_filter_default_txt=”” tdc_css=””][td_block_ad_box spot_id=”custom_ad_3″]
How to Schedule an message on Gmail to send it latter?

How to Schedule an message on Gmail to send it latter?

Google announced that Gmail would provide support for scheduling e-mail in April 2019, but the feature is only available today.

[td_block_ad_box spot_id=”custom_ad_2″]

Previously, you had to use third-party appendices to complete this process. Fortunately, the new Gmail function is very easy to use.

But How to Schedule an message on Gmail?

To schedule a message from Gmail on the desktop, follow these steps:

  • Create a new e-mail
  • Click the three-angular button next to the blue “Send” button
  • Choose a schedule you want
  • Click “Schedule send.”

The process is completely similar to Gmail on mobile platforms. But instead of clicking the “Send” button while writing an e-mail, you need to click the three vertical drops in the top right corner of the screen.

A new window will open right where you can set the time you want to send it. Finding scheduled e-mails and canceling them is easy. A new “Scheduled” fold will appear in destop and mobile.

Just click on a message in the relevant folder and click “Cancel send.”

> Read Next: How To Take Scrolling Screenshot Of A Website Using Firefox Quantum?

Hope you found this article useful. Please let us know your thoughts in the comment section below,follow us on twitter and facebook for more news and updates.

neOadviser – How To

[td_block_11 category_id=”3″ limit=”1″ td_filter_default_txt=”” tdc_css=””][td_block_ad_box spot_id=”custom_ad_3″ tdc_css=””]
How to Hide Data, Applications, Photos, and Documents on Android

How to Hide Data, Applications, Photos, and Documents on Android

If you want to have absolute control over everything that appears on your phone, you may need to use Root access, but if you do not want to go so far, this article will help you find valuable alternatives that you do not include the risks of “Root”. Android also has some embedded features to use, if you want to hide all of your intimate secrets.

[td_block_ad_box spot_id=”custom_ad_2″]

How to hide data and apps: Let’s start with the basics

To better provide your sensitive data, you can assign different names to folders that contain everything you want to hide. For example, if you want to hide files, open the manager file application, select the folder with files and images, and change the name. This way the footage of this folder will not be shown in the Gallery that collects all the photos.

> Check Out: How to make your Android smartphone faster (5 Tips)

Certainly this action does not hide the full security of the photographs. Those files will not automatically show up in your gallery, but if it loses the handset then this way it loses its efficiency.

Similarly, you can hide all those pre-installed, boring applications that you can not uninstall without using third-party apps. If you want to remove them, at least from the vision, go to Settings> App and select the app to hide. If you can not uninstall, then disable it. A wonderful, good, and right thing is to learn how to block applications that work in the background, or “working in background”.

How to hide Android data and folders: external help

If the above is not enough for you, you are probably thinking that to protect all your data you need something else. So an aid that exponentially increases the total protection of your privacy. There are some applications that are wonderful in this regard.

> Check Out: Android Vs. Android One Vs. Android Go

If you just want to hide your applications without blocking and encrypting their opening, one of the easiest things you should do is install a new “Launcher“. Like many of the available in the Play Store, we’ve chosen the “Nova Launcher“, currently the best in circulation.

Nova Launcher
Nova Launcher
Developer: Nova Launcher
Price: Free
  • Nova Launcher Screenshot
  • Nova Launcher Screenshot
  • Nova Launcher Screenshot
  • Nova Launcher Screenshot
  • Nova Launcher Screenshot
  • Nova Launcher Screenshot
  • Nova Launcher Screenshot
  • Nova Launcher Screenshot
  • Nova Launcher Screenshot
  • Nova Launcher Screenshot

Although the application hide option is provided in the free version of Nova Launcher, it would be even more fantastic if you buy the Prime version. Scroll to Nova Launcher> Nova Settings> App & Widget drawers and then select Drawer groups> Hide app.

Another popular launcher that will allow you to hide applications without having to spend a penny, is “Apex Launcher“.

Apex Launcher
Apex Launcher
Developer: Android Does Team
Price: Free
  • Apex Launcher Screenshot
  • Apex Launcher Screenshot
  • Apex Launcher Screenshot
  • Apex Launcher Screenshot
  • Apex Launcher Screenshot
  • Apex Launcher Screenshot
  • Apex Launcher Screenshot

Go to Settings> Drawer Settings> Hidden apps to check which applications will be visible and which will be hidden. Indeed a very necessary option for privacy.

How to hide data: Keep your applications in a safe place

If even hiding the applications and folders with the above methods is not enough, then guess the best security is in a code lock. There are some third-party apps that will help you in this effort: try and decide which one best suits your need.

> Check Out: Aptoide: How Was Born, How It Works And Is It Safe?

One of the most popular in the Play Store is “Smart AppLock“.

It is useful for both videos and photos. In addition to closing different types of folders, Smart AppLock allows you to prevent the app being uninstalled without your permission.

Another version of this app that is considered considered is “Applock Fingerprint

Schützen(Smart AppLock)
Developer: SpSoft
Price: Free
  • Schützen(Smart AppLock) Screenshot
  • Schützen(Smart AppLock) Screenshot
  • Schützen(Smart AppLock) Screenshot
  • Schützen(Smart AppLock) Screenshot
  • Schützen(Smart AppLock) Screenshot

This app provides other features such as the ability to capture instant selfies of anyone trying to enter your phone without permission, as well as the ability to lock the phone away. Both versions offer improvements through purchases of premium versions of the app.

As soon as these apps are installed, go to the page that contains the application list and select the ones you want to protect with the key. Every time you open the selected apps, you will be asked to enter the password or to use the fingerprint reader. To get rid of the annoying ads you will have to buy the premium version.

> Check Out: Download Modded Games On Your Android Device (How To)

In the end, we can talk about “App Hider

App Hider uses an icon that looks like an app that manages the handset’s audio so that when the app opens, it looks like it’s adjusting the sound. By holding down the application icon for a long time, you will be able to access the hidden section of the phone where you will find your secrets: files, apps, and everything you want to hide.

How to hide the data: Our Advice

To choose the right app from the ones above, you should first think which data you need to secure. If you just want to hide the folders, you can do it without having to install anything, knowing that you will not have full protection of your sensitive data.

There are many other applications in the Play Store that allow you to hide your data: Do you use one that is not included in this list? Share with us in a comment!

> Read Next: How to Scan a Document Using Your Phone or Tablet – The Best Way

So that’s all about hoe to hide your data on your Android Phone. Hope you found this article useful. Please let us know your thoughts in the comment section below, follow us on twitter and facebook for more news and updates.

neOadviser

[td_block_11 category_id=”3″ limit=”1″ td_filter_default_txt=”” tdc_css=””][td_block_ad_box spot_id=”custom_ad_3″ tdc_css=””]
How to make your Android smartphone faster (5 Tips)

How to make your Android smartphone faster (5 Tips)

In this article we will try to answer a frequently asked question: how to make the fastest smartphone? Note, this article only applies to Android-powered mobile phones! He always hides some surprises under the smartphone interface that is being used. Some features that can turn your smartphone into an even more powerful device.

[td_block_ad_box spot_id=”custom_ad_2″]

How to make your Android smartphone faster (5 Tips)

We’ll talk about the little and almost unrecognizable Android features and options for most users. These very effective tricks that will improve your smartphone in many ways: security, graphics, internet connectivity, and overall performance.

> Check Out: Android Vs. Android One Vs. Android Go

#1. How to make your Android smartphone faster: Improve graphics quality

The technical features of smartphones continue to grow. We have 64-bit multi-core processors, high-end integrated graphics cards, abundant RAM and high resolution displays. Therefore, it is normal to have PlayStore games with graphics that are comparable to those offered by console games (PS4, XBox etc) and, in some cases, titles that are not able to use 100% hardware of our device.

Among the hidden features of Android you will find one named MSAA 4x that will allow you to improve the graphics quality of the games. The MSAA 4x option is nothing but an anti-aliasing filter, a process that improves imaging quality by “smoothing” contours. This option does not work in all Android games, but only in those that use the OpenGL ES 2.0 API.

To enable this option, you must first activate “Developer Options,” by typing “Build Number” repeatedly in Settings. After you enable it, you must go to Settings> Info> Active / Force MSAA 4x located in the Accelerated Hardware Rendering section. Given extra anti-aliasing processing efforts, the impact on performance will be greater: if your device is not powerful enough or the application is not optimally optimized, it’s best to disable this feature.

#2. How to make your Android smartphone faster: Give the android system more fluency

Android is a system full of animations that make it easier to navigate from one application to another, the menu view and navigation in the broadest sense. But the speed of the animations can greatly affect our experience of using the software.

Two smartphones with the same performance may look slower depending on the speed at which animations are performed: Android also thought about this, allowing us to change the speed of animations with a hidden feature included in the options developers.

Once “Developer Options” are enabled, you need to modify the three dedicated animation options: Resize / Scale animation window, setting the scale to 0.5x. In this way, the speed of the animations will be doubled and everything will be more fluid and faster, regardless of the performance of your device. You can also choose to disable the animations completely, but this move would turn the use of the software into something extremely ugly.

> Check Out: Aptoide: How Was Born, How It Works And Is It Safe?

#3. How to make your Android smartphone faster: Keep your personal data and private life safe

Smartphones are the real safe deposit of personal information. Apart from photos, videos, and recordings, they also contain all of our bank accounts or PayPal.

If someone were able to strengthen the security of our smartphone, they would have easy access to the sensitive data we store there. The unlocking code is certainly a first obstacle to overcome, but it is not enough to keep away the bad people.

Solution? Android offers the ability to encrypt all Android memory, so without the “password” of any data stored on the smartphone it will be impossible for hacking even for the most experienced users. To activate the option, go to Settings> Security and follow the procedure that was followed in Device Encryption. Unfortunately, not all devices have this feature. Before you enable this feature, make sure you have the Android smartphone charger on your hand, because you will need to upload it to perform the procedure

#4. How to make your Android smartphone faster: Improve Internet navigation

Google Chrome is almost certainly your trusted browser. Probably because it is ready for use right from the start of use. Fortunately, Chrome is one of the most up-to-date browsers with many features, some of which are hidden very well. Thanks to an option, accessible only by entering Chrome: // flags in the search box, you will be able to speed up your browser and gain a few seconds whenever you search for content on the web. Second, at the end of the day, taking into account the many uses of the internet in the smartphone, it can turn clockwise.

As soon as the Chrome ://flags page is open, you should search the Fast tab/Windows close:Enable article. Restart the browser as needed and continue browsing, you will notice a greater fluency in Internet experience. This feature allows Chrome to close windows that are not linked to Java scripts that run in the background, speeding up the browser.

#5. How to make your Android smartphone faster: Best apps, fastest smartphone

The first thing you need to do to improve the system response to application functionality is to use those that are easier and more suitable for your device’s performance. We know that this is not a hidden feature within your Android and that you install a Nova Launcher launcher, but this move will greatly enhance the speed effect of using the device.

> Read Next: Cellphone Battery – that’s what you need to know (8 Tips)

So, that’s all about how to make your Android smartphone faster. Hope you found this article useful. Please let us know your thoughts in the comment section below, follow us on twitter and facebook for more news and updates.

neOadviser

[td_block_11 category_id=”3″ limit=”1″ td_filter_default_txt=”” tdc_css=””][td_block_ad_box spot_id=”custom_ad_3″ tdc_css=””]
Take Scrolling Screenshot Of A Website Using Firefox Quantum?

How To Take Scrolling Screenshot Of A Website Using Firefox Quantum?

Have you try Firefox Quantum a revamped Mozila Firefox version? What if you may know now that Firefox 57 has a arrived with an amazing tool with which you will be able to take scrolling screenshots or a full page screenshot from a website.

[td_block_ad_box spot_id=”custom_ad_2″]

If you use the latest Firefox browser (Firefox 57 and Up), making full page screenshot or scrolling screenshot is just a few click task. The best thing is that it is not needed to take multiple images screenshots.

> Check Out: How To Change Your Outlook.com Account Password (2019)

How to take scrolling screenshot using Firefox Quantum?

The Mozilla Firefox tool is available for all the platforms, like Apple MacOS, Microsoft Windows and Linux.

Follow theses steps to make scrolling screenshot:

  1. Open the website in Firefox browser.
  2. Next in the right-hand side, click the Page Actions (three dots) button.
  3. Click “Take a Screenshot” in the drop-down menu.

    take scrolling screenshot using Firefox Quantum
    take scrolling screenshot using Firefox Quantum

4. Next, for the full page screenshot of the site, click “Save full page option” in the top-right corner.

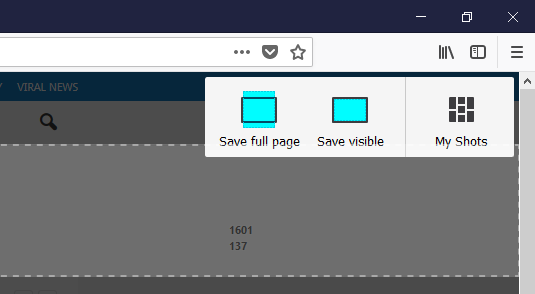
To capture the part showed and the screen choose “Save visible”. You can also choose also to select any particular area of the page using the mouse. The tool will help you to capture only what’s required.

5. For saving the scrolling screenshots, you can choose to download it on your device clicking on download button, or you can choose to upload it to Mozilla’s cloud storage (It’ll expire in 14 days).

> Read Next: How to make bootable usb flash drive

So, that’s how you can capture long screenshots easily by using Firefox Quantum. The uploaded screenshots can be accessed in My Shots, where you can share, download or delete then.There are some others Firefox add-ons to help you capture full page screenshots like Easy Screenshot, Nimbus Screen Capture, etc. Hope you found this article useful. Please let us know your thoughts in the comment section below,follow us on twitter and facebook for more news and updates.

neOadviser – How To

[td_block_11 category_id=”3″ limit=”1″ td_filter_default_txt=”” tdc_css=””][td_block_ad_box spot_id=”custom_ad_3″]
Add all friends to facebook group By Single Click

Add all friends to Facebook group By Single Click (How To)

Facebook groups are really a great place to discuss your unique topic with your friends and other members of that group. Group differs from Facebook Pages cos members outside the group can not interfere without the Admin permission. There are different types of groups like public, close, or secret. A great thing for Facebook Groups will be to add all members to the group just by a single click and not one by one to save some time. In a recent post, we have already shared tow methods on how to Invite All Friends To Like A Page On FacebookThe process shared there is only to use for Facebook Pages.

[td_block_ad_box spot_id=”custom_ad_2″ separator=””]

> Check out: How To Merge Facebook Pages: All You Need To Know

Steps To Add All Friends To Facebook Group At Once. (Two Methods)

So, today, in the article below we are going to share tow simple tricks on How To Add All Friends To Facebook Group At Once in a single click. So imagine if you have an account Profile with more than 5000 friends, adding than one by one to the group manually will be really time-consuming. But don’t wary! We got this. So make sure to follow the methods shared below to add all friends to Facebook groups with a single click.

Method #1. –  Add all friends to Facebook group Using Browser Script

  • Log to the Facebook account whose friends you want to invite.
  • Open the Facebook Group in which you want to add friends.
  • Next Click F12 button to open debugger, next select console box.
  • Copy the script from the below given button.
  •  Copy the whole provided code and then paste it into console box.
Add all friends to Facebook group Using Browser Script
  • Press enter and a process will start to send invitation.

Method #2. – Add all friends to Facebook group Using Chrome Extension.

In case the script above doesn’t work then another great way is by installing Google Chrome extension.

  • First, go and download the below-given extension on your chrome browser.

  • Once downloading and installing, open your Facebook group where you want to add friends.
  • Simply click on the visible icon on the top right corner of the browser to perform this task.
  • In a few min the process of adding friends will begin.

Note: – The script is totally safe so don’t worry about it. It will not compromise the security or mess with your account. But in case you have many friends, due to Facebook policy, your account may get blocked or you may be blocked of using groups for some time.

> Read Next: How To Accept All Friend Requests On Facebook At Once 

So, that all about How To add all friends to Facebook group By Single Click. Hope you found this article useful. Please let us know your thoughts in the comment section below, follow us on Twitter and Facebook for more news and updates.

neoAdviser

[td_block_11 category_id=”3″ limit=”1″ td_filter_default_txt=”” tdc_css=””][td_block_ad_box spot_id=”custom_ad_3″ separator=””]