
Do you have a computer or laptop that you use to make calls on Skype but don’t have a quality webcam to use?
If you have an Android smartphone then you are lucky because you can use it as a webcam for your PC. All you need is an Android app, a program in Windows, and a few clicks. In this guide, we show you what steps you need to follow to transform your smartphone into a camera for a Windows computer.
If you are in the middle of a meeting doing a presentation, and at that time, you may need to share your screen but don’t have a webcam on your desktop or laptop, then you may use your Android phone as a webcam by following the steps below. It is better to use a phone as a webcam for your PC instead of buying a webcam.
> Check Out: How To Partition A Hard Disk Without Formatting (Three Methods)
How to use your Android smartphone as a webcam for your PC
So if you are interested to turn your Android smartphone into a webcam for your Windows PC, follow the steps below on how to do so. Before going through the steps below, make sure first that your phone and Windows PC are connected at the same WIFI network.
Step 1: Download DroidCam Wireless Webcam on your smartphone
You must first download and install DroidCam Wireless Webcam on Android (you should have Android 5.0 or above). Just search the Play Store or click this link: DroidCam Wireless Webcam. On the Play Store page, click Install. Once the application is installed, switch to the Windows computer for the next step.
Step 2: Download DroidCam Client to Windows
On your Windows computer, open your favorite browser and visit this website: DroidCam Windows Client (You may download also on Linux, but not on macOS). Once opened you should see a large DroidCam Client v6.0 button. Click to download.
You will download a 1,525KB file in .exe format. A double-click will open a window with instructions for installing DroidCam Client on Windows. It’s simple and all you have to do with this guide is click Next. When the installation is complete, open the software in Windows.
Step 3: Connect DroidCam Wireless Android Webcam with Windows DroidCam Client
- Go to your Android smartphone and open the DroidCam Wireless Webcam app.
- Click the “Next” button at the bottom of the screen.
The application will ask you for permission to use the camera and the application microphone. Normally you need them and you need to approve them. Now the app will open a new screen that shows the Wi-Fi network where you are connected and the IP address of the smartphone and the application gateway.

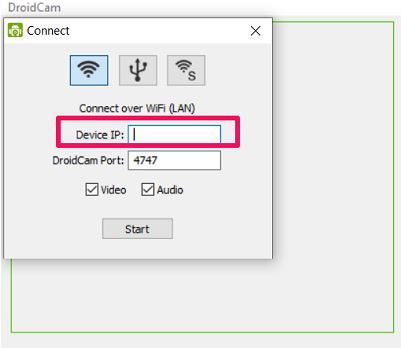
- In this case, the IP is 192.168.50.4 and the gateway is 4747.
- Go to the Windows computer and open the program.
- In the IP Device set the smartphone IP which in our case is 192.168.50.4 and gate 4747.
- Make sure you have checked the video option below and press Start.
- And with that, your smartphone will behave like a webcam you can use in your Skype or Zoom calls.
Note: To choose between the front or the back camera, you must go to the Droidcam app then click the three-dot icon, then Settings > Camera and select it. We advise using the rear camera for better video quality.
If you followed the steps carefully, then start the video conference and choose Droidcam as your camera. The DroidCam client is only available for Windows and Linux and you cannot use it on macOS.
> Check Next: Google Chrome’s new Tab Groups: Here’s how to enable and use it!
That’s all! Hope you found this article useful on how to use your Android phone as a webcam for your Windows PC. Let us know your thoughts in the comments section below, follow us on Twitter and Facebook for more news and updates.