Windows 10 New Start Menu-min

Windows 10 new Start Menu is absolutely stunning

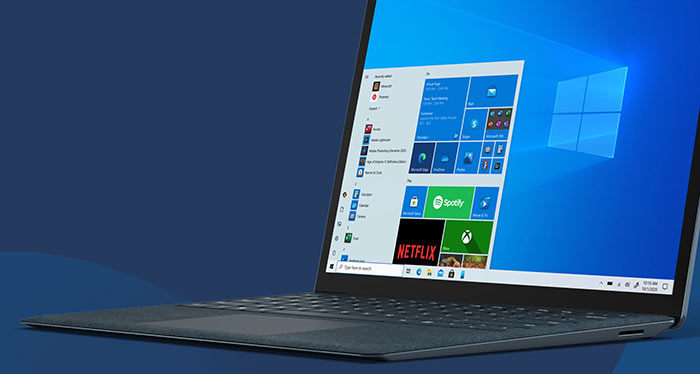
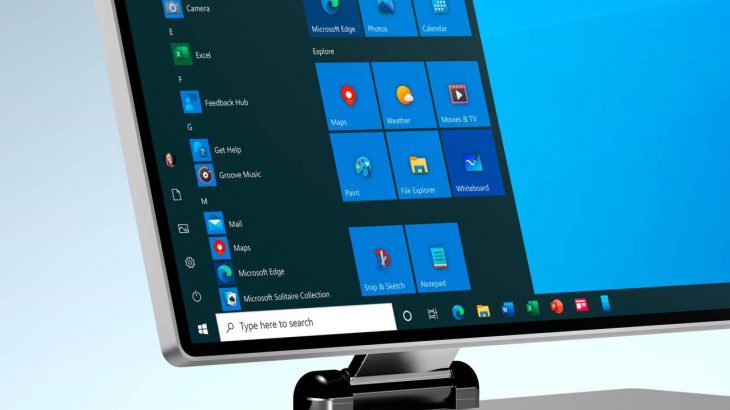
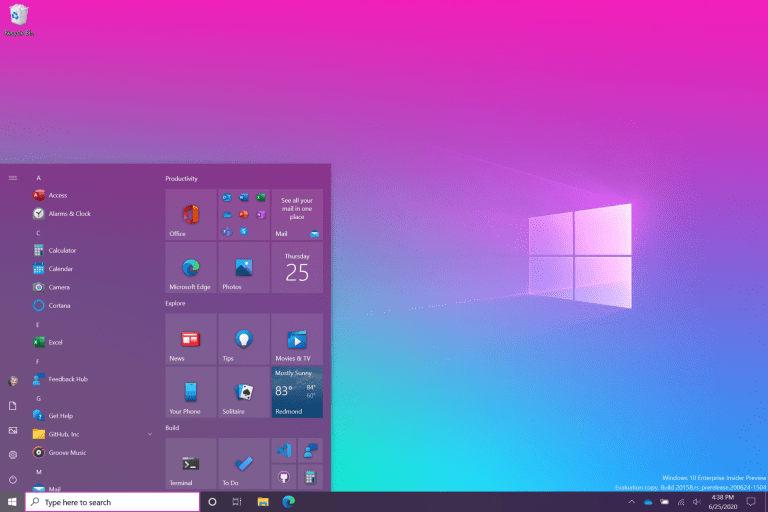
Microsoft has unveiled a new Start Menu design that will come in a future version of Windows 10 operating system

After a long wait, Microsoft is ready to bring the new Start menu design to Windows 10, drawing attention to live icons otherwise known as “Live Tiles.” In a blog post, Microsoft says: We are updating the Start menu with a simpler design that removes the solid color backgrounds behind logos in the application list. You can see it before and after in the animation below:

[td_block_ad_box spot_id=”custom_ad_2″]
Windows 10 New Start Menu

The software giant hinted that a new change was coming earlier this year and is now available for Windows 10 experimental versions. Essentially reducing the colors on the Start menu icons will simplify it and make it look less chaotic.

Microsoft also comes up with a new menu, when Windows is activated in dark mode.

Along with the Start menu change, the latest build of Windows 10 has some changes to Alt-Tab. All open tabs in Microsoft Edge will appear in Alt-Tab. A confusing change for Microsoft veterans, the company aims to apply it to every app. Some other changes are elements like X in the right corner for the notification panel to delete all of them automatically. Microsoft has also improved the Windows Settings app. The links that sent you to older Windows systems already lead you to the “About” space in Settings.

> Check next: Galaxy Note 20 Ultra Official Images Accidentally Leaked

So what do you think about this? Let us know your thoughts in the comments section below, follow us on Twitter and Facebook for more news and updates.

neoAdviser

[td_block_11 category_id=”3″ limit=”1″ td_filter_default_txt=”” tdc_css=””][td_block_ad_box spot_id=”custom_ad_3″ tdc_css=””]

Microsoft is releasing the first May 2020 major update to Windows 10

Known as Windows 10 Version 2004, this update brings some new features to Microsoft’s desktop operating system

After almost a year and a half of testing, Windows 10’s May 2020 update is available for download. Coded Windows 10 Version 2004, this update brings some new features to Microsoft’s desktop operating system.

[td_block_ad_box spot_id=”custom_ad_2″]

Most notable is a new File Explorer, but it can’t be left without mentioning the improved search functionality, support for passwordless connection, and a new Cortana experience.

But the most important at least in our eyes is the Cloud Download option. This option makes Windows 10 reset much easier to a previous configuration. Virtual desktops and DirectX 12 Ultimate have been improved.

To download the new update you need to check if it has been made available to you in Windows Update. Visit Windows Settings> Update & Security> Windows Update> Check for Updates. If it is ready for download you will notice a message “Feature update to Windows 10, version 2004” to appear in the optional updates. Just click “Download and install now” to proceed with its installation.

It will not be available to everyone at the same time and may arrive in a few weeks. Using the Update Assistant you can force the installation of the update before it appears in Windows Update.

We advise you to avoid updating as Windows 10 updates in recent months have had problems that have cost users dearly. Microsoft uses the update phase to address the issues that appear in the first users, thus avoiding a catastrophe for the entire Windows 10 user base that exceeds 900 million.

The next major update to Windows 10 will come in the second half of 2020 and will focus on security updates and minor adjustments instead of new features.

> Check next: Here’s what to expect from Android 11

So what do you think about this? Let us know your thoughts in the comments section below, follow us on Twitter and Facebook for more news and updates.

neoAdviser

[td_block_11 category_id=”3″ limit=”1″ td_filter_default_txt=”” tdc_css=””][td_block_ad_box spot_id=”custom_ad_3″ tdc_css=””]

May 2020 Update: Everything you need to know about the next version of Windows 10

The update will start rolling out from May 28th

Microsoft will launch a new update to Windows 10, also known as the May 2020 Update, which will include, among other things, new productivity, security, and speed options. The update will start arriving on users from May 28th. Windows 10 is currently installed on more than 1 billion devices worldwide according to Microsoft statistics for March.

Now that support for Windows 7 updates is ended, Microsoft is encouraging users to switch computers to Windows 10 or buy a new one with this operating system. Major updates with new Windows 10 options are sent every 6 months and the most recent was in November 2019. The new update takes between 7 to 17 minutes to install.

[td_block_ad_box spot_id=”custom_ad_2″]

> Check Out: Windows 10 Tips & Tricks: Top Best Most Useful Features in Windows 10 (2020)

When will be available the May 2020 Update?

For those on the Windows Insider program, the May update is available in the form of an experimental version of almost a year.

The final version is expected to reach developers on May 12 and mass users on May 28. If you want to have premature access, you can join the experimental versions in the Windows Insider Slow Ring program by keeping the Stop Getting Preview Builds option turned on.

What are the new features of May 2020 update we can expect?

The next update to Windows 10 will have a number of changes for users where according to Microsoft are:

#1. Cortana

Microsoft says the Cortana virtual assistant will evolve into a personal productivity assistant that helps you with Microsoft 365 applications. Cortana will be removed from the permanent location on the taskbar so you can move it wherever you want like any other application. Already with Cortana you can create e-mails by saying command in English as “Send an email to” or “Show with emails from.”

Cortana May 2020 Update

#2. Search Home

Users will have access to four quick searches from the Search Home option for access to weather forecasting, headlines, a few stories, and new movies.

#3. Kaomoji

Microsoft has added kaomoji, – like. \ _ ((ツ) _ / ¯ -, to the keyboard.

Kaomoji May 2020 Update

#4. Virtual Desktops

You can change the name of virtual desktops instead of being labeled as Desktop 1, Desktop 2, etc.

Virtual Desktops Change Default Names

#5. Automatic opening the application

Through this option you can determine that after restarting the device you can automatically open the applications of the Universal Windows Platform.

#6. Bluetooth pairing

The connection of the two Bluetooth devices will be done through notifications so that you do not need to go to the Settings app to complete it as a process.

Bluetooth Pairing May 2020 Update

#7. New tablet and hybrid 2n1 experience

Available to users of experimental versions, when the keyboard is disconnected from a 2n1 device, the continuity of your applications and work will be maintained until that moment without interruption.

Will the old versions of Windows 10 continue to be functional?

Microsoft will end support for Windows 10 1809 for Home, Pro, Pro Education editions. While the Pro Education and Pro Workstation versions in November of this year. This update was first launched in October 2018. Enterprise and Education versions will receive support until May 2021.

You can continue to use this version of Windows 10, but losing support from Microsoft means there are no more security updates.

Will we be forced to switch to the May 2020 version?

No. Microsoft recommends this update but it is not mandatory only if you reach the end of the support like Windows 10 1809. Even then you can choose for yourself whether to stay or not. To see what version you have installed you need to go to Settings> System> About and check in Windows Specifications where you find the edition and version number.

If you have the 1903 version launched in May 2019 and want to keep it, you can do so until December 2020 when support ends. And if you have the 1909 version launched in November 2019 then you have until May 2021 to use it safely.

More on Windows 10

In a blog post, Panos Panay, chief executive of the Windows and Devices division, spoke about Windows 10X. The operating system introduced at the end of 2019 is designed to work with devices with two screens like Surface Neo which are not yet available.

However, based on the trends that are being applied today, Microsoft decided to backoff from the initiative by staying with laptops and regular 2n1 devices. Panay said Microsoft will focus on implementing Windows 10X for single-screen devices.

Check NextWindows 10 Themes/Skins: Top 15+ Best Windows 10 Themes

So what do you think about this? Let us know your thoughts in the comments section below, follow us on Twitter and Facebook for more news and updates.

neoAdviser

[td_block_11 category_id=”3″ limit=”1″ td_filter_default_txt=””][td_block_ad_box spot_id=”custom_ad_3″]

How to Turn Your Windows 10 PC into a WiFi Hotspot

If you have upgraded recently to Windows 10 and want to share your internet connection with other devices, you can do it easily through the “Mobile Hotspot” Setting app in Windows 10. Just like on your Android and iPhone device, you can share your internet connection in Windows 10. You can broadcast your WiFi, Ethernet, or cellular data connection as a Wi-Fi hotspot. By doing that, you will allow other devices to connect to it. If your Windows 10 PC has cellular data connection and you want to share it, it will use the data form your mobile data plan.

[td_block_ad_box spot_id=”custom_ad_2″ tdc_css=””]

> Check Out: Windows 10 Tips & Tricks: Top Best Most Useful Features in Windows 10 

How to Turn Your Windows 10 PC into a WiFi Hotspot

There may be multiple reasons on why you may need turn your Windows 10 PC into a WiFi Hotspot, like when you need to connect to multiple devices but you are connected in a network with limited access. Some Wi-Fi in Hotels will allow only one device to be connected, so for this or many other reasons, is very important to know how to create and share your internet connection as a hotspot in Windows 10 by turning it into a Wireless hotspot (wireless access point).

Steps to turn your Widows 10 PC to a WiFi Hotspot

Windows 10 as made is really easy to create a WiFi hotspot (wireless access point) by using its own built-in hotspot software. So follow the steps below to turn you Windows 10 device into a WiFi hotspot:

  • Step 1: Click to the “Start” button and then the “Setting” gear in the left-side of the menu. You can do the same by pressing “Windows + I” keyboard shortcut.
  • Step 2: Next go to “Network and Internet“. If your PC has a WLAN or Bluetooth adapter than you can share your internet connection.
  • Step 3: Form the left panel window, click on “Mobile hotspot”
Windows 10 WiFi Hotspot: Mobile hotspot interface
  • Step 4: Under “Share my Internet connection from” select the connection which you want to share
Windows 10 WiFi Hotspot: Choose Internet
  • Step 5: Click the “Edit” button to change the hotspot’s name and password and next click “Save
Windows 10 WiFi Hotspot: Edit Name Password
  • Step 6. Finally “toggle on” the Mobile hotspot. Other devices now will be available to see your WiFi hotspot with the name you just created and connect to it.
Windows 10 WiFi Hotspot: Turn On Mobile Hotspot

> Check Next: How to use your Android smartphone as a webcam for your PC

Windows 10 will show the connected devices to the hotspot directly below along with they name. You can use Bluetooth for the same, by if you want a fasted internet connection speed, then WiFi if a better choice.

So below we cover everything you need to know about how to share your Windows 10 PC’s internet connection with other devices. Hope you found this article useful. If you have any thoughts, please let us know than in the comments section below, follow us on twitter and facebook for more news and updates.

neoAdviser

[td_block_11 category_id=”3″ limit=”1″ td_filter_default_txt=””][td_block_ad_box spot_id=”custom_ad_3″]

Windows 10 Tips & Tricks: Top Best Most Useful Features in Windows 10 (2020)

While Windows 10 may be the most convoluted operating system Microsoft has ever created it does include many handy features that are quite useful. So coming up i’ll show you more than 10+ tips, tricks and features that will help you get the most out of using Windows 10. Because there are many of you interested in this, we are going to include a mix of the newer features and some of the older classics that are still available for use with Windows 10. These top best 2020 Windows 10 tips and tricks will make your life a lot easier. I’m pretty sure you’re going to find something new here ’cause some of these are what I consider hidden features in Windows 10 and I have no clue about them for the longest time, but they made a big difference for me once i found out about them and started using.

> Check Out: How to Find Your Windows 10 Product Key (Using CMD & Windows Registry)

Windows 10 Tips & Tricks: Top Best Most Useful Features in Windows 10 (2020)

So, without going through to much talk, i will save your time and go right to it! So let’s get started with my tips for Windows 10 in 2020.

Tip #1. Clipboard History: Enjoy next level pasting with clipboard history

Windows 10 version 1809 has announced for the first time the new clipboard experience, so in order to use the new Clipboard History feature you will need to have Windows 10 version 1809 or greater. Although it came up with a new interface and some new features, its not really an complicated experience to use.

How to use Clipboard History feature on Windows 10

The new clipboard features uses the old experience that you already use. But instead of using CTRL + C to copy and CTRL + V shortcut to paste, now you will use the same CTRL + C shortcut to copy text multiple time and next you will use now Windows key + V shortcut to bring the new clipboard history. In this new interface you will find the lists of your copied items. So follow the steps below on how to do so:

  • Use CTRL + C shortcut several times to copy different text form your application
  • Open the document you want to paste it and this time click Windows key + V shortcut to open the clipboard history
  • In the new interface you will find the list of the above copied content
  • Select the content you want to paste

Isn’t that great? No more flipping back and forth between applications to copy and paste each bit separately and no more accidentally losing some copied text because you forgot to paste and copy something new over it. You can copy text, HTML and bitmaps up to four megabytes per item. You may have to activate clipboard history in the settings first, so here’s how to do so!

1. Enabling clipboard using a shortcut

The fasted way to activate clipboard history feature is by using a keyboard feature, so follow the steps:

  • Tap Windows key + V on keyboard
  • Click the Turn on button
Activate Clipboard History Feature using shortcut

2. Enabling clipboard using Settings

To do so, in the Setting app, use the following steps:

  • Go to Settings.
  • Then click on System.
  • Next click on Clipboard.
  • Turn on the Clipboard history toggle switch.

From here you can tun ON or OFF the Clipboard History feature at any time.

Enable clipboard history using Settings

How to sync clipboard history on Windows 10

The other setting here, sync across devices allows you to share copied text across any of your windows devices as long as you’re signed in to the same Microsoft account. Anyway, for privacy reasons, this feature most be enabled and configured manually, here how to’s:

    • Go to Settings.
    • Next click on System.
    • Go to Clipboard.
    • Under “Sync across devices,” turn on the toggle switch.

Finally, select the automatic syncing option that you want:

  • Automatically sync text that I copy: Your clipboard history will sync to the cloud and across your devices.
  • Never automatically sync text that I copy: You must manually open the clipboard history and select the content you want to make available across devices.
Sync Clipboard history Windows 10

How to pin items in the clipboard history

One more great feature: Let’s say you have some items on your clipboard that you use frequently and you’d like to be able to reuse these even after rebooting your computer. No problem for clipboard history, you can pin these items. Here’s how to:

On the Clipboard History Interface:

  • Click the “ellipsis” next to the item
  • Next select pin.

They’ll still be there the next time you log in. The unpinned items on your clipboard history are cleared every time you restart your PC. Only those items you pinned are going to remain on the clipboard.

How to clear clipboard history on Windows 10

Latest, if you no longer need to use the Clipboard History feature, or is something does not work as expected, you can reset the history to see if the problem may be fixed, so here’s is how to:

  1. Click Settings.
  2. Go to System.
  3. next click on Clipboard.
  4. Under “Clear clipboard data,” click “Clear” button.
clear clipboard history

Once done, the clipboard content will be deleted form your device and Microsoft account, but Pinned item will still remain till you remove then manually. If you wish to just delete only one or two items, you can do it so by opening the Windows key + V interface and simply click the button on each of the content you want do delete. You can choose also Clear all button on the history interface to delete the list.

> Check Out: Top 5+ Best Free Screen Recorder For Windows 10

Tip #2. Sandbox: Stay safe by using Windows Sandbox feature

Sandbox is another exciting new feature that was introduced with the Windows 10 May 2019 Update (version 1903). It offers a separate testing environment to try out software or download apps from websites that you’re not so sure about. Sandbox is part of the Pro and Enterprise edition of Windows 10 so unfortunately it’s not available in Windows 10 Home. Also your processor and motherboard need to support virtualization. If the virtualization is supported but not enabled, check your motherboard manufacturer to find it out how to enable it. 

Sandbox is like a virtual PC that’s built right into your Operating System. This way you can run programs or access websites in a safe zone without affecting your system. Although you may be able to create virtual machines to reach the same experience, Windows Sandbox has some key benefits. By using it eliminates the steeps on downloading and creating virtual machines. Every time you run the Sandbox features, it will immediately create a new clean Windows 10 installation. Once the Windows Sandbox gets closed every thing gets wiped out automatically. Also an important thing is that everything happens inside the environment while being isolated from your main installation to offer maximum security.

Windows Sandbox system requirements

Before going through the steps on how to enable Windows Sandbox feature, make sure your device meet these minimum software and hardware requirements:

  • Windows 10 Pro (or Enterprise).
  • Hardware virtualization.
  • AMD64 architecture.
  • 2 processor cores minimum (4 cores with hyperthreading is recommended).
  • 4GB of RAM (8GB is recommended).
  • 1GB of HDD space (SSD is recommended)

How to check if virtualization is enabled

Hardware virtualization most be enabled in the BIOS of your system. Depending of your motherboard you may need to check if it supports it and how to enable.

To check is its enabled follow the steps below:

  • In the search bar type “CMD” end pres enter
  • Next in the CMD window type the following commandsysteminfo.exe
  • Check under the “Hyper-V Requirements” section, if “Virtualization Enabled In Firmware” reads Yes, then you can use Windows Sandbox.
check if virtualization is enabled

How to enable Windows Sandbox feature on Windows 10

Sandbox isn’t turned on by default, so you have to activate it first. Here’s how to:

  • On the windows search bar type “Turn Windows features on or off” and pres “Enter
  • In the pop-up window search for “Windows Sandbox” option
  • Check the “Windows Sandbox” and then click “OK” button
  • Click the Restart now button
enable Windows Sandbox

After completing above steps, you can start now using the new virtualization layer to install and test untrusted applications temporarily.

How to use Windows Sandbox feature on Windows 10

To start using the Windows Sandbox feature you have just activated is really easy, just follow the steps below:

  • In the windows search bar type “Windows Sandbox
  • In the search results at the top, right-click to “Windows Sandbox” and select “Run as administrator”
  • This will open the Sandbox window
  • Now at you main device, copy the app that you want to test it and than past it inside the Windows Sandbox experience
  • Click on the installer (.exe, .msi, etc) to execute the installation

You can safely now open it and check if everything is okay or use edge to check out some dodgy website you’re not sure about, to make sure it’s safe. When you’re done just close Sandbox an the X button and all the content there is going to be wiped out. So even if the Sandbox is compromised next time you start it up again, it’s going to give you a brand new box to play with, but be aware that Sandbox only gives you an Operating System with a browser, none of the other third party applications are going to be available in Sandbox.

So you can’t copy an office attachments that you received into the Sandbox and open it there because you won’t have Office in the Sandbox. You can install apps, but you’re going to have to install them again next time you open up a new Sandbox. Also keep note that you can’t drag and drop files form your Windows main installation to the Windows Sandbox interface.

So keep that in mind!

> Check Out: How To Partition A Hard Disk Without Formatting (Three Methods)

Tip #3. Virtual Desktop: Split your world using virtual desktop

So let’s say you’re working on a project and you have several apps open, then an appointment pops up reminding you that you need to join a video conference to present a status update. When you share your screen, you don’t want everyone to see all the other files you’re working on. And you don’t want to close them either because it’s going to take some time to get it all set up again, once you’re done with your phone call. The solution is to switch to another clean temporary workspace, which is also called a Virtual Desktop.

Virtual Desktop Interface (Windows 10)

How to create a new virtual desktop in Windows 10

Windows 10 has made it really easy to use and setup virtual desktops. This is really a great and very useful feature to keep your unrelated and ongoing project organized or hide then from your boss quickly. So let find out how to use multiple desktops in Windows 10.

For creating a new virtual desktop you are just a few click away, or you can use simply a keyboard shortcut: Here’s how to:

  • Click “Task View” icon at your taskbar
  • Next, click “New Desktop” at the top-left corner of your screen.

That’s all! You can use also Ctrl + Windows key + D on your keyboard that it will create a new virtual desktop immediately.

How to switch between virtual desktops in Windows 10

You can use different ways to do so:

  • Click “Task View” on your taskbar icon
  • Click “Desktop 2″ or the other virtual desktops you have created

There is also Ctrl + Windows key + Left and right arrow keyboard shortcut to switch between virtual desktops. If you use a device with touchpad you can do four-finger swipe left or right to switch between virtual desktops.

You can also do things like moving windows between virtual desktops by click and dragging then, duplicate virtual desktops by right-clicking on the active window and choose “Show this window on all desktops” to duplicate a single window, or select “Show windows from this app on all desktops” to duplicate all windows from one app.

Once you are done, you can close your virtual desktop by clicking “X” icon in the top-right corner, or simply use “Ctrl + Windows key + F4″ shortcut to close the virtual desktop you are currently viewing.

Tip #4. Quick Assist: Get remote Access using Quick Assist

Windows 10 Quick Assist feature is really useful when you need to help someone that has a PC problem. Windows 10 Quick Assist allows you to remotely access other Windows 10 PC form your own PC. It will give you full control so you can quickly help your friends, parents by doing your magic.

Quick Assist interface: Windows 10

Things to know before allowing access:

This feature will give full control to other person’s PC, so you should use it with someone you trust. if you are the one giving assistance, you will need to use an Microsoft account to sign in. If you are the one receiving help, you don’t need to sign in to Microsoft account. Here’s how to use Windows 10 Quick Assist feature:

How to set up Windows 10 Quick Assist

If you are assisting someone:

  • At the “Search Bar“, type Quick Assist and hit Enter
  • Click Give assistance
  • Sign in to your Microsoft account by filling your email and password
  • Next you will get a “six-digit code” that you most give to the person you are helping out

If you’re getting help

Here’s how to get help form the other person:

  • At the search bar type “Quick Assist” and press “Enter”
  • Click “Get assistance” and type “six-digit code” you received for the person that is helping you
  • Click “Submit” and then click “Allow

Following the steps above, the person who is giving assistance to you will now have full access at your desktop.

> Check Out: How To Create WiFi Hotspot In Windows/Mac/Linux OS

Tip #5. Aero Shake: Minimize quickly using Aero Shake

With is another great Windows 10 tip that i use daily and for sure will help you saving a lot of time. Aero Shake is a fun little feature to quickly minimize opened windows. Just grab the window you want to keep by holding its title bar and starts shaking it a little bit. It’s going to minimize all other open windows. This way you can fully focus on the one open window.

Aero Shake: Windows 10

If you did the shaking by mistake, just shake it again and they’re all going to come back. If you’re like me and always have countless windows open, this is much faster than minimizing each window one by one.

If you’re not a shaker and you like to use shortcuts, you can also use the shortcut
Windows + Home key. It will do the same thing.

> Check Out: Top 3 Best PS4 Emulators for Windows PC (2020 Edition)

Tip #6. Snip & Sketch: Capture your screen using Snip & Sketch

Another great Windows 10 tip you’re probably familiar with, but it’s just so useful that it has to be on this list .Snip & Sketch it’s a super handy screen capture tool. Sniffing sketch is the best screen capture tool ever to be included in any Microsoft operating system.

Snip & Sketch Windows 10 feature is the successor of the old Windows Snipping Tool. After the 1809 Windows 10 update, Snip & Sketch has updated with other features like copy a rectangle, a free-form area, or even the entire screen to the Clipboard and then save to reuse then.

How to Take a Screenshot Using Snip & Sketch Windows 10 Feature

Using Snip and Sketch feature to take a screenshot its pretty fast and easy. The fasted way to screenshot Windows 10 is by pressing Windows Key + Shift + S keyboard shortcut. After the Snipping Bar interface opens, just select a mode and snip it without opening Snip & Sketch Windows app.

Here’s how to open Snip & Sketch, take a screenshot, manage and edit it:

  • In Windows search bar type “Snip & Sketch” and press “Enter
  • From the pop-up window click “New” and choose from “Snip now” , “Snip in 3 seconds” or “Snip in 10 seconds” according to your need, after clicking the snipping bar will appear
  • Next select a mode between Window Snip, Fullscreen Snip, Rectangular Snip or Freeform Snip. 
  • Your snip it will appear at the Snip & Sketch window.
Snip & Sketch Interface

From this window you will have some features like Copy, to make a copy of the just created snip, Share, to share it with other others and also you can edit it through the different tools like a Pen, a Highlighter, and an Eraser provided on the app.

Tip #7. Split Screen: Look at multiple windows using split screen

If you often need to look at several windows on the same screen at the same time you can easily do that using Snap Assists. This feature works for any application.

Snap Assists Windows 10

How to Split Your Screen in Windows 10 With Snap Assist

There are different ways to do so but the most easiest is using Snap Assist. This feature should be enabled by default but if not enable it in Start > Settings > System > Multitasking > Snap Windows

With Snap Assist you can drag the windows to a side or corner of you screen and “snap” it there and this will make room for other app to be snapped in the empty screen space. Follow the steps to split you screen with Snap Assist:

  • Open two on more windows/apps
  • Grab one of the windows and drag it all the way over to the left side of the screen
  • Now let the mouse off and the windows will be snipped to the half of the left screen living half room to the right for your other programs/windows
  • Select now one other window/program to snap it to the right side
  • Now that you have two screen at the same window, you can drag the dividing line to resize then both simultaneously.
  • You can do the same to slip the screen on up to 4 windows by opening 4 different apps/windows and drag fist one of then at the top-right corner

You can do the same using by clicking on that windows with your mouse and use Win + left/right keyboard shortcut to decide the side of each window. Then use the arrow keys to move between other windows to choose the other one and press Enter.

Tip #8. Dictation: Use speech-to-text feature in Windows 10

Dictation has been around for a while in Windows and has improved quite a bit in any text field. This feature is available on Windows 10 Fall or greater. Using this feature, you can simply talk to your Windows OS to get it respond to your commands.

Here’s how to use Windows Dictation feature: 

  • Open the app on which you want to dictate text like Notepad, WordPad, Microsoft Word or your email software and type Windows + H keyboard shortcut to trigger the dictation.
Trigger Dictation: How to use dictation in Windows
  • If the speech services is not enabled, a pop-up windows will appear, click on it and go to Settings > Privacy > Speech, inking & typing. Once there click “Turn on speech services and typing suggestions.”
Enable Speech Services (How To use dictation in Windows)
  • With the speech services On, press again Windows + H on your keyboard and the e dictation window will pop-up and its now ready to listen.
Trigger the Dictation Feature

Now you can give your fingers a rest and use your voice to start dictating.

> Check Out: Windows 10 Themes/Skins: Top 15+ Best Windows 10 Themes

Tip #9. Pause Updates: Pause Windows 10 Automatic Updates to Avoid Critical Bugs

Microsoft says that updates are important four security patches, bug fixes and latest features. But there may be times you’re not ready to update, or you may have heard about issues with the latest updates causing problems for others, that of course would never happen with Windows 10. Thankfully, Windows 10 Home, Pro and Enterprise allows to pause updates for a specific time.

Here’s how to pause updates for a period (up to 35 days on Windows Professional) using Windows Update settings, or disable automatic updates permanently using Windows 10 Group Policy method.

Method 1: Pause updates via Windows 10 Settings

On all Windows 10 versions you can pause updates by using Windows Update settings. At Windows 10 Home you can pause updates for up to 7 days, while on Windows 10 Professional for up to 35 days.

So, follow the steps to pause updates on Windows 10:

  • On the start button click “Settings
  • Next click “Update & Security
  • There choose “Advanced Options
  • At the ‘Pause updates‘ section, form the drop-down menu select a date that you wish to pause the updates. After you reach your pause limit you’ll have to get a new update before being allowed to pause again.

Till the period is reached, Windows will no longer check for new updates.

Pause updates on Windows 10

Method 2: Pause updates permanently via Windows 10 Group Policy

Windows 10 Pro, unlike Windows 10 Home has a Group Policy editor that you may use to permanently disable automatic auto clicker updates. Here’s how to use the Group Policy editor to pause Windows Updates:

  • In the search bar type “gpedit.msc” and press “Enter
  • At the “Group Policy Editor” window navigate to this path: Computer Configuration\Administrative Templates\Windows Components\Windows Update
  • Under “Windows Update” section double click on “Configure Automatic Updates
Group Policy editor: Disable Windows Update
  • Set this policy to ‘Disabled‘, to disable automatic updates in Windows 10 at an unlimited period.
  • When done, click “Apply” and then “OK” to save the policy.
Policy interface

Windows 10 will no longer install updates automatically, but you can still use Windows Update to manually check for updates and install then. To enable the automatic updates, just set the policy to ‘Not Configured‘ again.

Tip #10. Slide To Shutdown: Enable Slide to Shutdown

Here’s a cool trick that uses a full-screen slide down to power off your computer. Here’s how you set it up on your desktop:

  • Right-click on the desktop and do the following New > Shortcut
  • In the pop up windows, paste the following code:
%windir%\System32\SlideToShutDown.exe
  • Click “Next“, then “Finish“. This will create a clickable icon which you may rename it.
  • To shut down you PC via slide-down, double-click at the icon to prompt a pull-down shade and then use your mouse to drag it to the bottom. Note that this is a shutdown, not a sleep.
SlideToShutDown Windows Feature

Tip #11. Nearby Sharing: Transfer files between PCs by using Nearby Sharing

If you’re familiar with Apple’s airdrop, Microsoft now has a similar feature called “nearby sharing” that will let you share content with other Windows 10 computers connected to your network or Bluetooth. This feature was first introduced with the Windows 10 April 2018 Update (version 1803) and you can use it to quickly send a  a document, photo, video, or presentation to other PCs in your room.

Nearby Sharing

How to enable Nearby Sharing on Windows 10

Nearby sharing, Windows 10 feature should be enable by default after you have installed April 2018 Update. Anyway, to make sure this is enabled (or to disable it), you can do it in the Settings app. Here’s how to:

  • Open “Settings” and click on “System
  • Next click on “Shared experiences” and there turn on the “Nearby sharing” toggle switch
Enable Nearby sharing on Windows 10

From here you can “Enable” or “Disable” Nearby sharing feature on Windows 10. You can do the same using Action Center, (Ctrl + A) quick keyboard shortcut. If Nearby sharing button isn’t available there, you can add it quickly form the following: Settings > System > Notifications & actions, under “Quick actions,” click the Add or remove quick actions link, and then enable the button.

Now when you select share in Microsoft Word, and many other programs including photos, you should see nearby computers. The file you send (or receive) by default will be stored in the “Downloads” folder, but you may change this in the “Shared experiences” settings. Here’s how to:

Changing default transfer folder location

Follow the steps to easily specify another folder or any other drive for your transfer files:

  • On “Settings” click “System
  • Click “Shared experiences” and under “Nearby sharing,” using Save files I receive to option, click the “Change” button.
Nearby sharing: Change transfer folder location

Select your new location. Once done, the files will be saved to the new location.

I am text block. Click edit button to change this text. Lorem ipsum dolor sit amet, consectetur adipiscing elit. Ut elit tellus, luctus nec ullamcorper mattis, pulvinar dapibus leo.

> Check Out: How To Find Passwords of All Connected Wi-Fi Networks using CMD

Tip #12. Game Bar: Enable and open the Xbox Game Bar in Windows 10

For gamers, the Xbox Game bar on Windows 10 is one of the great features. It will give access to so-called Xbox DVR, which in other words it will let you record the screen or take screenshots of your games while playing. Here’s how to enable and use it:

How to enable the Xbox Game bar Feature in Windows 10

Windows 10 Game bar was introduced first with the Windows 10 Creators Update and was updated with the Windows 10 November 2019 Update with some new features. Xbox Game bar should be enabled by default, but if its not here’s how to:

  • In the “Start” menu click “Settings
  • Then go to “Gaming
  • At the left side of your screen, click “Game bar“, then enable the Record game clips, screenshots, and broadcast using Game bar switch.

From here you can also change the default Xbox Game bar keyboard shortcuts according to your needs.

Now to bring the Xbox Game bar in Windows 10 by default just type Win + G keyboard shortcut. If you are using an Xbox controller, push the Xbox button on it. You can launch the Xbox Game bar at anytime during gameplay. This is an interface on how it looks:

Xbox Game Bar Windows 10 Interface

Xbox Game bar widgets on Windows 10

This are some generous useful widgets you can expect form Xbox Game bar in Windows 10.

  • The main widget: Its located at the top by default. You can see here the time, enable or disable other widgets that are available, and also access the settings of the Game bar.
  • The Capture widget: It will give you the tools for recording and capturing screenshots of your gaming sessions.
  • The Audio widget: You can control different audio channels without leaving the game
  • The Performance widget: It shows information about the utilization of your resources like (CPU), graphics card (GPU), RAM (memory), and number of FPS (frames per second).
  • Xbox Social widget: Will let you to connect and chat with your friends, as long as they’re also on Windows 10 or Xbox.
  • Xbox Achievements: It will display your achievements as Xbox records them.
  • Looking for group widget: Will show other connected players to Microsoft’s Xbox service that are looking to join a gamers’ group.
  • Spotify widget: It will let you play your favorite music form the Spotify app without having to leave you game.

Tip #13. Ransomware Protection: Enable Ransomware Protection in Windows 10

Ransomware is a nasty malware that encrypts your data holding it hostage unless you pay a ransom. To help protect your computer, ransomware protection is now included with Windows Defender. Windows 10’s Ransomware Protection feature is composed of two components: Controlled Folder Access and Ransomware Data Recovery.

  • Controlled Folder Access: This will monitor the folders that you specify and block any changes to the files in that folder. This will block all programs, expect the ones you allow, for making any modifications to the files of the monitored folders and will protect that folders form being encrypted by ransomware.
  • Ransomware Data Recovery: It will sync automatically all you common data folders with your Microsoft OneDrive account to make a backup of your files. If you may ever become a Ransomware victim, you can use OneDrive to recover your files.

How to enable Ransomware Protection in Windows 10

In Windows 10 version 1903, Windows Defender’s Ransomware Protection by default is disabled, so you will need to enable it to be protected form ransomware attacks. Note that is you use a third-party antivirus software and Windows Defender’s real-time protection is disabled the Ransomware Protection features screen and the Controlled Folder Access feature won’t be accessible. Also to enable full Ransomware Protection on your Windows 10 PC both Controlled Folder Access and login to Microsoft OneDrive should be configured: Here’s how to:

  • On the search bar type “Windows Security” and press “Enter” (You may do the same by following Settings> Update & Security> Windows Security.)
  • On this window click “Virus & Threat Protection
  • Scroll down to “Ransomware Protection” and click “Manage ransomware protection
  • Toggle the “Controlled folder access” to enable it, and next login to OneDrive so that both features will be enabled as seen below.

Now you can configure Controlled Folder Access to choose which folder you want to monitor by choosing the “Protected folders” option and block malicious programs form accessing then. Clicking “Protected folders” will show you a list of folders currently being protected. You can choose to add additional folders by selecting the “+”, then “next” to add a protected folder and browse your computer for that folder.

Tip #14. God Mode: Enter to God Mode in Windows 10

If you’re a power user that has recently made the switch from an older Windows operating system, you might be happy to know that the easter-egg, known as “God Mode” is still available in Windows 10. It’s great for those people that want a massive amount of settings all within a single user interface. Here’s how to enable it:

How to enable God Mode on Windows 10

  • Create a New Folder in your desktop.
  • Rename the New folder to “GodMode.{ED7BA470-8E54-465E-825C-99712043E01C}
  • Once done the step 2, the folder name will automatically change to GodMode.
Enable God Mode aon Windows 10

If done correctly this folder will become an icon and when you open it you’ll now have the ultimate control, with more settings that you would probably ever need.

> Check Next: Create A Bootable Windows 10 USB Flash drive (Step By Step Guide)

That’s all for our top best Windows 10 Tips and Tricks. We will keep to update this article as soon as new cool features will be released. If you have a tip or trick for using Windows 10 you’d like to share, than let us know about it in the comments, follow us on twitter and facebook for more news and updates.

neoAdviser

2 strong reasons why the next Windows 10 update will be great

Windows 10 users may have many different preferences but one thing they have in common: irritation with bad Windows 10 updates. But Microsoft has found a way to get back to you and your confidence despite doing so much to hate.

[td_block_ad_box spot_id=”custom_ad_2″ tdc_css=””]

#1. Stable driver updates

Driver updates are definitely one of Windows 10’s most frightening problems but that will change very quickly. Microsoft is quietly working to change the way Windows 10 drivers are updated. The company will apply a different process by selecting the most active devices from which it receives diagnostic information if things are going well.

Sending updates to this category of devices and users will take up to 8 days and during this period will be monitored and if they are functioning properly they will be sent to users and other devices over the next 30 days. While Microsoft has already applied a gradual update, this method is more intelligent because Microsoft tests then with a precise audience that delivers useful information rather than a wide range of devices.

#2. Windows 10 with a new look

To celebrate the achievement of the major goal of 1 billion users, Microsoft will bring a new view of the operating system that Windows and Devices division chief Panos Panay shared on Instagram. In short, the redesign brings smoother new colors, elimination of the “Live Tiles” icons and the new look of Windows File Explorer based on the Fluent design language.

In other words, we are dealing with the first major update in 5 years since the debut of the operating system. Finally, as Microsoft continues to offer Windows 10 for free silently, the user base will only grow while those 1 billion active users will be happier after the news.

> Red Next: 2020 MacBook Air with new Processor and Keyboard but More Cheaper Announced

So what do you think about this? Let us know your thoughts in the comments section below, follow us on twitter and facebook for more news and updates.

neoAdviser

[td_block_11 category_id=”3″ limit=”1″ td_filter_default_txt=”” tdc_css=””][td_block_ad_box spot_id=”custom_ad_3″ tdc_css=””]

Windows 10 Themes/Skins: Top 15+ Best Windows 10 Themes (2020)

The Window 10 default theme is really great and it is getting better on every Windows 10 update, but if you are looking to give it an completely new look to your Windows 10 PC, there are some good looking and very attractive windows 10 themes/skins. Here in this article we will be talking about some of the Best 15+ Windows Themes. So if you want to change the look of your Windows go through the article below to find the Best Windows 10 Themes for your needs. If you use a Windows OS than you are familiar with the term “Windows Theme“, referred sometimes as “Windows Skin“. There is a slight difference so if it is a third-party software, than it is referred as “Skin”.

[td_block_ad_box spot_id=”custom_ad_2″]

> Check Out: SSD, that’s why it turns an old and sluggish PC into life

Windows 10 Themes/Skins: Top 15+ Best Windows 10 Themes (2020)

You have to know that a windows theme is a group of modifications that it can change the visual appearance of Windows for example: the desktop background, mouse cursor, and some other standard desktop icons. Each windows theme is  unique, below we will show you the top 15+ best Windows 10 Themes of 2020.

Below, we will bring to you top 15+ cool windows 10 themes/skins for your laptop or desktop pc with they download link, to choose according to your needs.

Top 15+ Best Windows 10 Themes of 2020

So, if you are nostalgic and looking for some themes that takes you back to the fledgling years of Windows, or you need some more elegant end stylish one, below are some best suggestions for you.

#1. Mac OS X El Capitan

If you love Mac, you can create a MAC OS experience on your Windows computer. That’s why this theme is created to do. Mac OS EI Capitan theme turns Windows 10 into a Mac computer, so for the Mac lovers this is the Best Windows 10 Themes for you to download.

Mac OS X El Capitan – Windows 10 Theme

> Check Out: How To Find Passwords of All Connected Wi-Fi Networks using CMD

#2. Silk

Silk theme is the best windows 10 Theme and the most beautiful one. It can turn your computer into an artistic piece of electronic device. You have the ability to customize some features like colors and the appearance of icons. Also the ability to also rearrange the folders so that they appear like a stack of cards its a great option that makes this theme one of the Best Windows 10 Themes. Silk will change your Windows OS look into a Notebook one and its really and beautiful theme to try it out.

Silk – Windows 10 Theme

#3. Ubuntu Skin Pack

As the title says, if you love Ubuntu interface, this will be best theme for you. Ubuntu Skin Pack turns your Windows OS to the Ubuntu interface and also you can customize some aspects such as color and icons. For then Ubuntu fans, this will be your best windows 10 full HD theme to install.

Ubuntu Skin Pack – Windows 10 Theme

#4. Diversityx VS

Diversityx VS is very stylish, it gives a dark classy appearance. It features some degree of transparency to balance the dark effect make it more appealing to the eyes. This is one of the best windows 10 themes and you will like the skins interface when you use your computer at night or in a dark ambient. You most definitely try Diversityx Vs!

Diversityx VS – Windows 10 Theme

> Check out: Top 15 Best Android Emulators: Experience Android On PC (2020)

#5. Vanilla

If you are looking for a simple and clear theme, than Vanilla is the best windows 10 theme for you. You should for sure consider it if you are into cloud computing. It shares the same look as an online cloud service and the theme is borderless. It will change and enhance the look of your windows 10 OS and its worth to give it a try for sure.

Vanilla – Windows 10 Theme

#6. Flattastic

If you are just looking for a simple theme, Flattastic may be that one that you should consider. It is available in 16 variants, 8 versions of Flattastic Light theme for the day and another 8 Flattastic Dark themes for the night. It looks really awesome and comes with an minimalist look.

Flattastic – Windows 10 Theme

#7. Aero Glass

Consider getting this Aero Glass skin If you are tired with an opaque and dull interface. It has a transparent interface and features an Aero glass style. Aero Glass is very attractive to the eyes. The theme looks really cool and it will give a great look to your Windows 10 Os that you may not expect.

Aero Glass – Windows 10 Theme

> Check out: Create A Bootable Windows 10 USB Flash drive (Step By Step Guide)

#8. Windows XP

Its not really bed to go back and remind ourselves about how it all started. Windows XP theme does a great job for all the fans of old style, why be your best windows 10 theme. Also on this theme you can customize a number of features. The theme brings the old look and classic Windows XP experience to your Windows 10.

Windows XP – Windows 10 Theme

#9. Simplify 10

Simplify 10 is simple but classy, as the name suggests. It comes in different color patterns (grey and white) and makes the UI appear plain. Also it does a good job minimizing the sizes of the buttons. If you like minimal UI, that this is the best windows 10 theme for you! If blue is your favorite color then Simplify 10 could be the great choice for you.

Simplify 10 – Windows 10 Theme

#10. FootPaths

Do you love nature, than consider this theme, it is the best windows 10 theme for you. FootPaths theme features 11 HD wallpapers and each depicting different elements of nature that will change your Windows 10 experience.

FootPaths – Windows 10 Theme

> Check out: Can i leave my laptop always charged? Will it damage the battery?

#11. Arc

Arc is a variation of a main black and a white theme. To take the maximum form this windows 10 theme you may need to install Arc icon pack within the theme, from DeviantArt.

Arc – Windows 10 Theme

#12. Anthem Two

Anthem Two adds a huge black on the top of all the windows 10 themes. It make the viewing a little easy to the eyes but it does not reduces the contrast. It also has many solid color backgrounds that makes it an highly customizable theme for your Windows 10 OS.

Anthem Two – Windows 10 Theme

#13. cakeOS

Yet another interesting skin for Windows 10 OS which will make your OS colorful and will offer an complete new look. It has vibrant buttons and icons, packs a loot of wallpapers and has also an dedicated dark mode. cakeOS is an highly customizable Windows 10 Theme and its worth trying.

cakeOS – Windows 10 Theme

> Check Out: How To Export WhatsApp Chat as PDF using WPS Office

#14. Desktop by Jonatica-andl

The name doesn’t say to much, but looking at Jonatica-andl’s mesmerizing theme you will find an good looking and beautiful theme with centralized taskbar icons and an Mac-style dock above to make things more elegant and simple. At top-centre and the top-left are displayed and stylish date and hardware vital information like CPU, memory, hard drive usage and as well the internet speed. The google search bar also looks cool!

Desktop by Jonatica-andl-min – Windows 10 Theme

#15. Penumbra

If you are a fan of dark themes, this theme will be best for you. Penumbra is build to use neutral dark colors and you will not find any irritating colors on your screen anymore. This theme is developed by third parties and you will need to apply manually some patches and put the theme’s files in the right folder. One done, you will have now an beautiful, stylish dark theme that you will love it while using at nights.

Penumbra – Windows 10 Theme

#16. Hover Dark

Yet another great dark theme for your Windows 10 OS that you can use is Hover Dark. It uses more blacks and fewer greys. The theme comes with over six different versions of icon packs and skins which they provide an different looks and icons. Hover Dark is compatible for both X64 & x86 bit system and it an best 2020 Windows 10 Theme you should check. Before installing it make sure to install UXThemePatcher For Windows 10 and you are good to go.

Hover Dark – Windows 10 Theme

> Check Out: Top 5 Best Explainer Video Creator Software

#17. FFox Theme

FFox Theme is an really awesome and stylish theme to give an new look to your Windows 10. Comes with an black an orange color combination that makes it simply looks fantastic.

FFox – Windows 10 Theme

> Read Next: Top 10+ Best WiFi File Transfer Apps For Android (2020)

So above in this article we have shared the best windows 10 themes of 2020. Feel free to tray any of the above to find your preferred one. If you have your one favorite Windows 10 Theme/Skin, please let us know in the comment section below, follow us on twitter and facebook for more news and updates.

neoAdviser

[td_block_11 category_id=”3″ limit=”1″ td_filter_default_txt=””][td_block_ad_box spot_id=”custom_ad_3″]

Windows 10 gets the second major update for 2019

Microsoft has begun sending out the November 2019 Update for all Windows 10 devices. Usually major updates bring new features but the latter is more of a “Service Pack”.

[td_block_ad_box spot_id=”custom_ad_2″]

This means that most of the changes are in the background and an ordinary user will not notice because they are destined for increased stability, performance and much more.

But this does mean that nothing has changed. The biggest differences are in the notification experience in Windows. The November update has an Action Center notification management button that sends you to a space where you can customize the notifications. It’s also enough to place the cursor over a notification and click Settings to permanently silence certain types of notifications from a particular application.

Changes have also been applied to the Start Menu and the Taskbar. You can now hold the cursor over the Start Menu without having to click it and from Taskbar you can add events to the calendar.

Microsoft has improved File Explorer search functionality and uses the same Start Menu engine where you can find files on PCs even on OneDrive.

The November 2019 update has started rolling out but you can get it right away by going to Settings> Update & Security> Windows Update.

> Read Next: Microsoft releases the first trailer of Age of Empires 4

So what do you think about this? Let us know your thoughts in the comments section below, follow us on twitter and facebook for more news and updates.

neOadviser – TECH

[td_block_11 category_id=”3″ limit=”1″ td_filter_default_txt=”” tdc_css=””][td_block_ad_box spot_id=”custom_ad_3″ tdc_css=””]

The Windows 10 November Update is now available for download

The company has previously stated that it is dealing with an old update that focuses on improving performance and quality.

[td_block_ad_box spot_id=”custom_ad_2″ tdc_css=””]

Very little is said about the new features. The November update will bring features like File Explorer search now searching even in OneDrive online folders and virtual assistants other than Cortana can work with the lock screen on Windows 10.

Also with this version users can create calendar notes from taskbar as well as Microsoft will bring new notification management options. Fortunately this update doesn’t have to be painful to install as Microsoft says it uses technology similar to that of the monthly updates.

This is good news especially after the problems that the October 2018 Update caused after deleting many files from users’ computers. It took two months for the October Update to be reposted and republished. To install this version of Windows 10 you need to register as a Windows Insider.

> Read Next: OnePlus 7T Pro, 7T Pro McLaren Edition Unveiled: Price, Specs and other Details!

So what do you think about this? Let us know your thoughts in the comments section below, follow us on twitter and facebook for more news and updates.

neOadviser – TECH

[td_block_11 category_id=”3″ limit=”1″ td_filter_default_txt=”” tdc_css=””][td_block_ad_box spot_id=”custom_ad_3″ tdc_css=””]

Windows 10 brings Android phone calls to computer

The phone calls feature in Your Phone app on Windows 10 has arrived. Microsoft has released a version of Windows 10 for beta testers in “Fast Ring” which through Your Phone application makes it possible to make computer calls.

[td_block_ad_box spot_id=”custom_ad_2″ tdc_css=””]

All you need is a phone with Android 7.0 Nougat or more, Your Phone app as well as Bluetooth on your computer.

You can make calls through your contacts or phonebook. If you do not want to receive a call you can reply by text or send a voice message to the caller.

But you have to be ready for anything that doesn’t go into this experimental version of software. Microsoft has warned that older versions of some “anti-cheat” software for games could produce Windows failures.

> Read Next: These $7,000 iPhone 11 Pro have parts from the Titanic ship

So what do you think about this? Let us know your thoughts in the comments section below, follow us on twitter and facebook for more news and updates.

neOadviser – TECH

[td_block_11 category_id=”3″ limit=”1″ td_filter_default_txt=”” tdc_css=””][td_block_ad_box spot_id=”custom_ad_3″ tdc_css=””]