Bootable USB flash drive using Rufus

How to make a Bootable USB flash drive using Rufus

To make a Bootable USB flash drive we will use a tool called Rufus. You can find other tools online but today, in the article below, we are going to use this tool to make a bootable USB flash drive. In these days the use of old media like DVDs, CD, etc. are not used anymore cos of the invention of removable disks like pendrives, memory cards. The main reason is the quality and efficiency of these new media. Using DVDs and CDs to make bootable media prevent that to reuse for other purposes, but with the new media like SD Cards or PenDrives this problem is solved. So, read the article below to know how to create bootable media using your USB.

[td_block_ad_box spot_id=”custom_ad_2″]

> Check Out: How to make “Flip Clock” as a Screensaver (Windows and MAC)

Steps to Create a Bootable USB Flash Drive using Rufus 

To make a Bootable USB flash drive we will use a tool called Rufus. You can find other tools online but today, in the article below, we are going to use this tool to make a bootable USB flash drive.

  • How to Create a Bootable USB using Rufus
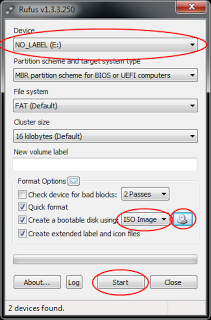
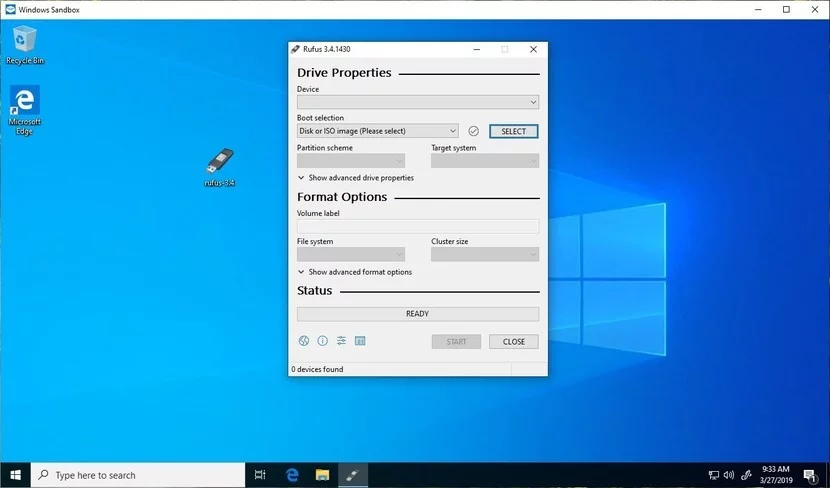
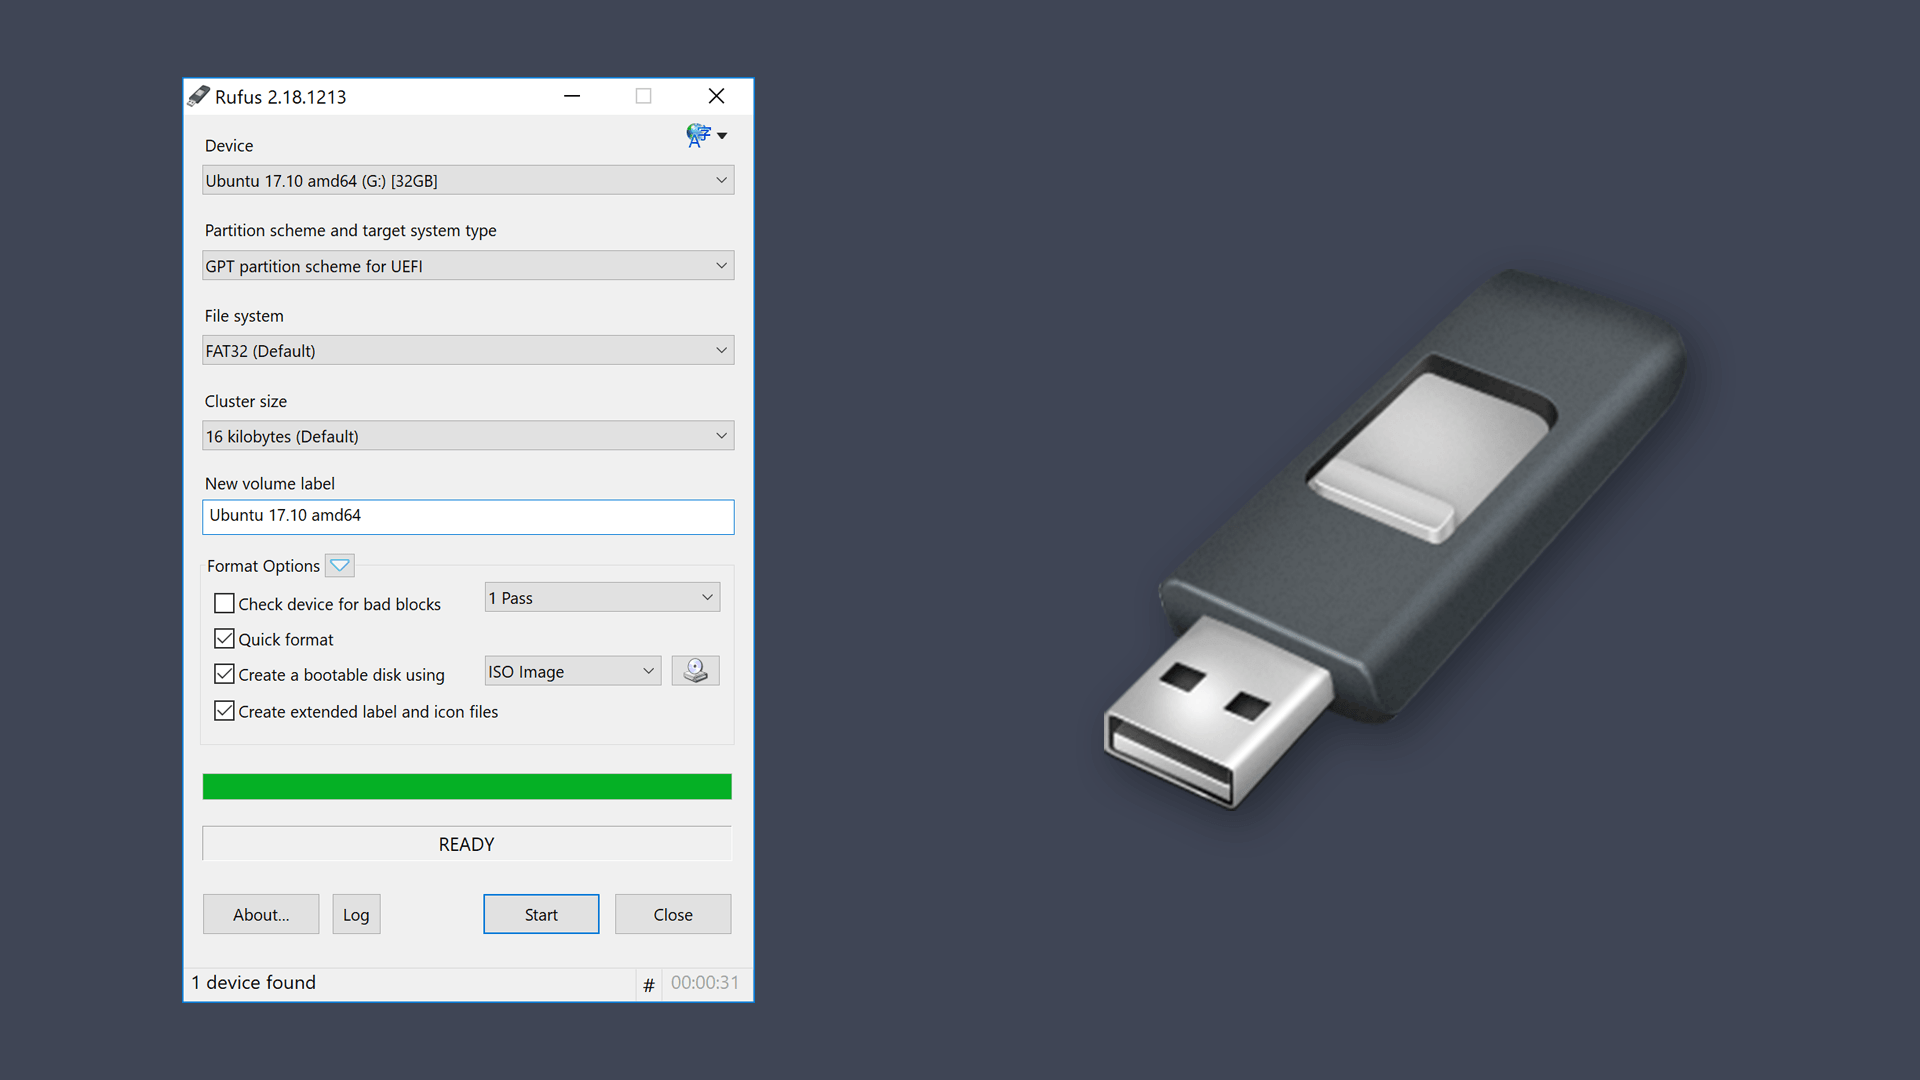
    How to Create a Bootable USB using Rufus

    Download Rufus software: click here

  • Format the USB flash drive
  • Open Rufus software, select your removable disk(it will automatically detect)
  • Find the ISO image you want to make and select it
  • Finally, press ‘start’ to burn the ISO in your USB and make it bootable

> Read Next: How to Turn Your Windows 10 PC into a WiFi Hotspot

So that’s all about how to make a bootable UBS flash drive. Hope you found this article useful. Please let us know your thoughts in the comment section below, follow us on Twitter and Facebook for more news and updates.

neoAdviser

[td_block_11 category_id=”3″ limit=”1″ td_filter_default_txt=””][td_block_ad_box spot_id=”custom_ad_3″]

How Will Cybersecurity Be Automated in 2021?

How Will Cybersecurity Be Automated in 2021?

One of the biggest trends that is anticipated to affect cybersecurity this year is automation. When it comes to solutions for better network management and automation, it will be imperative for organizations and government entities to follow these trends. Otherwise, they’re left vulnerable to a staggering increase in cybersecurity attacks and incidents.

There was reportedly a webinar for U.S. federal agents in August of 2020. The webinar was for agents who are experts in cybersecurity and from cybersecurity directors from organizations like NASA.

The takeaway was that we’re moving away from the notion that you can account for each alert. Instead, there needs to be a significant reliance on artificial intelligence, machine learning, and automation in general.

Based on information from an IBM report, organizations that have invested in automation have average data breaches of around $2.45 million compared to $6 million for the organizations that haven’t made a similar investment.

The following are some of the key things to know about the automation of cybersecurity in 2021 and what trends are likely to be most relevant.

What is Cybersecurity Automation?

Cybersecurity automation broadly refers to products meant to automate specific tasks that fall within the parameters of security. Most organizations probably already have some level of automation as part of their cybersecurity arsenal.

An example of common automation in cybersecurity is the use of products that manage vulnerabilities.

Beyond the simplest and most prevalent types of automation, there are more specific types of security automation.

For example, there is security automation and orchestration or SOAR. There’s also custom software and code used to automate analysis and processes.

As organizations are emphasizing their digital transformation priorities, the complexities of their IT environments are increasing. That ups the risk of cybersecurity threats, alongside with the fact that it’s difficult to source security talent.

Why Automation?

Automation in cybersecurity isn’t just something for large enterprises. It can and should be used by small organizations too.

When you automate cybersecurity, then your team can focus on the more complex challenges.

This is especially important right now. The COVID-19 pandemic shifted work to a remote environment at a rapid pace, meaning many companies were left facing extensive threats and vulnerabilities. Being able to target their focus is helping businesses and their security professionals tackle the most pressing issues, while automation handles the rest.

Data Correlation

One way that automation is becoming more relevant in cybersecurity is for the correlation of data. Most vendors of security solutions gather large amounts of data related to threats. Unfortunately, that data isn’t often put to good use.

For data to be useful, it needs to be turned into action.

When data is not just gathered but appropriately analyzed and used,  it becomes easier to predict what an attacker might do next. You’re several steps ahead rather than behind.

Plus, just like automation is improving cybersecurity, it’s also making it easier for attackers. They are able to have more large-scale attacks that are similarly automated, so you need to be able to fight fire with fire in these instances.

Rapid Protection

Another key area of focus in cybersecurity automation will be making sure that after a threat is identified, then protections can be put into place faster than the attack can move throughout a network. Again, this wouldn’t be possible without the help of automation.

Automation can help preserve resources while simultaneously keeping up with an attack before it leads to downtime.

Automated

Robotic Process Automation

Robotic process automation is a phrase you’re likely to hear quite a bit in the coming years.

Robotic process automation means the use of robots, which can include virtual software bots, to automate repetitive security tasks. What this would mean is that a robot would handle tasks like scanning and monitoring, as well as basic threat detection.

Then, cybersecurity as a whole in an organization becomes more efficient. It removes the need for the human security team to have to manually do these repetitive tasks.

It also cuts out human error, which remains one of the biggest cybersecurity threats any organization faces.

Robotic process automation can help improve response time and alert notifications and can help identify attack surfaces. It can also help with automated patching and updates, and it fills the talent shortage that is inevitably going to be felt in a big way this year as far as security experts.

If you haven’t already done so, now is the time to start planning for the automation of all aspects of network management as well as your cybersecurity.

Check this post —> https://www.neoadviser.com/paypal-makes-a-sudden-move-in-the-cryptocurrency-industry/

Android smartphone as a webcam for your PC

How to use your Android smartphone as a webcam for your PC

Do you have a computer or laptop that you use to make calls on Skype but don’t have a quality webcam to use?

If you have an Android smartphone then you are lucky because you can use it as a webcam for your PC. All you need is an Android app, a program in Windows, and a few clicks. In this guide, we show you what steps you need to follow to transform your smartphone into a camera for a Windows computer.

If you are in the middle of a meeting doing a presentation, and at that time, you may need to share your screen but don’t have a webcam on your desktop or laptop, then you may use your Android phone as a webcam by following the steps below. It is better to use a phone as a webcam for your PC instead of buying a webcam.

[td_block_ad_box spot_id=”custom_ad_2″]

> Check Out: How To Partition A Hard Disk Without Formatting (Three Methods)

How to use your Android smartphone as a webcam for your PC

So if you are interested to turn your Android smartphone into a webcam for your Windows PC, follow the steps below on how to do so. Before going through the steps below, make sure first that your phone and Windows PC are connected at the same WIFI network.

Step 1: Download DroidCam Wireless Webcam on your smartphone

You must first download and install DroidCam Wireless Webcam on Android (you should have Android 5.0 or above). Just search the Play Store or click this link: DroidCam Wireless Webcam. On the Play Store page, click Install. Once the application is installed, switch to the Windows computer for the next step.

Step 2: Download DroidCam Client to Windows

On your Windows computer, open your favorite browser and visit this website: DroidCam Windows Client (You may download also on Linux, but not on macOS). Once opened you should see a large DroidCam Client v6.0 button. Click to download.

You will download a 1,525KB file in .exe format. A double-click will open a window with instructions for installing DroidCam Client on Windows. It’s simple and all you have to do with this guide is click Next. When the installation is complete, open the software in Windows.

Droidcam PC Interface

Step 3: Connect DroidCam Wireless Android Webcam with Windows DroidCam Client

  • Go to your Android smartphone and open the DroidCam Wireless Webcam app.
  • Click the “Next” button at the bottom of the screen.

The application will ask you for permission to use the camera and the application microphone. Normally you need them and you need to approve them. Now the app will open a new screen that shows the Wi-Fi network where you are connected and the IP address of the smartphone and the application gateway.

  • In this case, the IP is 192.168.50.4 and the gateway is 4747.
  • Go to the Windows computer and open the program.
  • In the IP Device set the smartphone IP which in our case is 192.168.50.4 and gate 4747.
  • Make sure you have checked the video option below and press Start.
  • And with that, your smartphone will behave like a webcam you can use in your Skype or Zoom calls.

Note: To choose between the front or the back camera, you must go to the Droidcam app then click the three-dot icon, then Settings > Camera and select it. We advise using the rear camera for better video quality.

If you followed the steps carefully, then start the video conference and choose Droidcam as your camera. The DroidCam client is only available for Windows and Linux and you cannot use it on macOS.

> Check Next: Google Chrome’s new Tab Groups: Here’s how to enable and use it!

That’s all! Hope you found this article useful on how to use your Android phone as a webcam for your Windows PC. Let us know your thoughts in the comments section below, follow us on Twitter and Facebook for more news and updates.

neoAdviser

[td_block_11 category_id=”3″ limit=”1″ td_filter_default_txt=””][td_block_ad_box spot_id=”custom_ad_3″]
Bulk Delete Facebook posts

How to bulk delete your old Facebook posts

The social network Facebook has become a daily part of many people for some time now and most likely most of them have so far made “tons” of posts. For those who find the old posts inappropriate now, they may delete them one by one and this process can be very lengthy and tedious. Fortunately, Facebook now lets you delete or archive than in bulk. Facebook seems to have realized that most people want to bulk delete old posts and has recently launched a new feature that allows its users to delete multiple posts in bulk. Here’s the how-to guide to delete a piece of Facebook history in bulk through a very simple process.

[td_block_ad_box spot_id=”custom_ad_2″]

> Check out: The best way to post panoramic photos on Instagram

How to delete your old Facebook posts in bulk

Before starting, keep in mind that the bulk delete/archive feature at the time writing the article is only available on Facebook’s mobile apps (Android, iOS, and Lite). So make sure you are following this guide through the Facebook mobile app.

  • Log in to the Facebook app on your phone;
  • Go to profile and click the three dots to enter the menu;
  • Click on Activity Log> Manage Activity> Select “Your Posts”;
Activity Log Facebook
  • Click the small box next to your posts to archive or delete posts;
  • Click the “Trash” or “Archive” accordingly.
Archive/Delete Bulk Posts Facebook

Facebook saves the deleted posts in the recycle bin for 30 days before they are permanently deleted in case a post is deleted by mistake. The archived/deleted posts will show up at Your Posts section.

> Check next: How to automatically delete your location, search and web history from Google

So, that’s all about how to bulk delete your old posts on Facebook. It’s a bit disappointing that the bulk delete post option is not available on the Facebook desktop site. Hope you found this article useful. Feel free to comment your opinions down in the comments section belowfollow us on Twitter and Facebook for more news and updates.

neoAdviser

PUBG Mobile on PC

How to play PUBG Mobile on your PC

If you do not have a smartphone with the right settings to play PUBG Mobile, a PC can help you

You may not have a smartphone on which you can play games like PUBG Mobile as this game requires a smartphone with high specs. If you have a PC that can hold an emulator then you can play PUBG Mobile directly on your PC.

[td_block_ad_box spot_id=”custom_ad_2″]

> Check out: Top 15 Best Android Emulators: Experience Android On PC

These are the specs you will need to open the emulator on your PC:

  • OS: Windows 7/ 8.1/10
  • CPU: AMD/Intel CPU 4 core @ 2.5ghz
  • RAM: 4/8 GB
  • HDD: 5 GB (may be larger depending on the software/games you use)
  • GPU: AMD/Intel/Nvidia 1 GB dedicated

You must also enable Virtualization. To enable Virtualization follow this tutorial.

The Android Emulator that can give you the best performance, in this case, is Bluestacks which you can download here.

  • Once you have downloaded and installed Bluestacks, open it and wait for it to launch.
  • Then open Google Play and log in with your Google Account.
  • Once you have logged in to Google Play download PUBG Mobile.
  • While PUBG Mobile is downloading, go to settings, and set them according to the images below.
PUBG Mobile Bluestacks Settings
  • If you have 8GB of RAM, you can change the Memory from 2048 MB to 3072 MB
  • Once PUBG Mobile is downloaded and installed, log in and go to settings and set settings according to the image below.

Once you have done all this you can play PUBG Mobile on your PC and smoothly. It should also be noted that by playing PUBG Mobile on PC, you will be accessing emulator servers and most of the time you will be playing against other people who are using an emulator.

> Check next: Top 3 Best PS4 Emulators for Windows PC (2020 Edition)

So here’s how to play PUBG Mobile on your PC. Hope you found this article useful! Please let us know in the comment section below, follow us on Twitter and Facebook for more news and updates.

neoAdviser

[td_block_11 category_id=”3″ limit=”1″ td_filter_default_txt=”” tdc_css=””][td_block_ad_box spot_id=”custom_ad_3″ tdc_css=””]
Search for a specific words in a YouTube video

How to search for specific words in a YouTube video

In this article we show you how to search for specific words in a YouTube video

If you’ve found yourself going through a YouTube video to find a certain piece you want to watch or listen to, then this article is for you. It is a phenomenon that consumes time and nerves for users to find a specific moment in a YouTube video. But you don’t have to.

In this article, we will show you how to search for specific words in a YouTube video.

[td_block_ad_box spot_id=”custom_ad_2″ tdc_css=””]

> Check out: How to block YouTube ads quite simply

Here’s how to search for specific words in a YouTube video

  • Navigate to the YouTube video you want to search for
  • Click on the three horizontal dots below it
  • Click Open Transcript
  • Press Ctrl + F to open the browser search function. Enter the word you are looking for and if it is in the transcript it will be marked
  • Then click the line where it is located to go directly to the part of the video you are looking for

Remember that it all depends on the accuracy and spelling of the subtitles. It is never guaranteed that the subtitles are proper especially if they are generated automatically.

Here’s how to search for words on many YouTube videos

  • Go to YouGlish
  • Put the word or expression you want to search for and press Say it
  • Use the controls below the video to play and skip to the part where the word or expression appears
  • Press Ctrl + Right Arrow to switch to the next video

YouGlish does not work with automatically generated subtitles but only with manual ones.

> Check next: How To Convert Text Into Audio Using Notepad

So, that’s all about how to search for specific words in a YouTube video by using this simple trick. Hope you found this article useful. Feel free to comment your opinions down in the comments section belowfollow us on Twitter and Facebook for more news and updates.

neoAdviser

[td_block_11 category_id=”3″ limit=”1″ td_filter_default_txt=”” tdc_css=””][td_block_ad_box spot_id=”custom_ad_3″ tdc_css=””]
block YouTube ads

How to block YouTube ads quite simply

A Redditor under sub/ in / r /webdev has posted a very simple trick to block YT ads

And who would have thought that a simple website where you could upload videos would one day turn into a source of income and even a career for some others? YouTube and its monetization process can sometimes become annoying from multiple ads, both as a pop-up and even worse when they interrupt the video in the middle just like on TV.

[td_block_ad_box spot_id=”custom_ad_2″]

A Redditor under sub / in / r/webdev has posted a very simple trick to block YT ads. This trick does not require you to be a master in coding or web development. Just add a “.” in the video URL its enough. Once you have opened the video, in the box above the page where the video address is written, after “.com” add a “.” and most or all of the ads will be blocked.

  • So instead of: “https://www.youtube.com/watch?v=”
  • Add: “https://www.youtube.com./watch?v=”

These changes to the URL can be made through the computer, for the smartphone, you will need to open the video in a browser, not from the application. The point is that there is no combination with the host and as a result, the video is transmitted but other contents such as ads fail to connect. And not only blocks ads, but also other things like cookies.

But before you go and watch videos without ads, remember that many of your favorite creators work and benefit from watching those ads. If you continue to watch videos from your favorite YouTube, such support is key.

> Check next: How To Convert Text Into Audio Using Notepad

So, that’s all about how to block YouTube ads by using this simple trick. Hope you found this article useful. Feel free to comment your opinions down in the comments section belowfollow us on Twitter and Facebook for more news and updates.

neoAdviser

[td_block_11 category_id=”3″ limit=”1″ td_filter_default_txt=”” tdc_css=””][td_block_ad_box spot_id=”custom_ad_3″ tdc_css=””]
Convert Facebook Profile To Page

How To Change/Convert Facebook Profile To Page

Facebook is rather a great place to connect with people around the world. Facebook developers are providing new features after a short period of time. As normally we have joined some groups, events and also like pages. All these features are the best way to establish a relation between people. Some of us are using Facebook for enjoyment and others are doing business on Facebook. Pages are more likely preferred by small businesses, celebrities, etc to target more audiences. But it’s not easy for everyone to grow their Facebook page. We all have to implement some strategies like to convert Facebook profile to page which are helpful to increase likes effectively.

But there is rather a difference in targeting and reach between normal profile and page. Profiles are limited having less reach as compared to a page. We can only add up to 5000 friends and then others can only follow. We can send more messages. We can boost posts on profile. These just a few issues which are normally faced by users are using a profile for business. In that case, the best possible solution is to convert Facebook profile into a page. That means we can easily migrate Facebook profile to page.

[td_block_ad_box spot_id=”custom_ad_2″]

> Check out: How To Merge Facebook Pages: All You Need To Know 

How To Convert Facebook Profile To Page.

  • First of all login your account which you want to convert into a page. Then change the name of the account to desire name. The Page will become for the name which you used on the account.
  • Then you need to proceed with migration form. Which will convert the profile to a page. You can search it on the Facebook help center. Even you can directly access from below button.
  • In the help center, everything about migration is explained and understanding you can proceed with migration through the link provided there. If you are not able to find then,


  • Visit here

  • Now Click on Get Started to proceed for migration from profile to page.
  • Then select your page category like business, brand, or community, etc. After selecting the category they get required your password as you won’t convert or not.

Sometimes it also shows this error that logs in into your account from the previous device you used for login. So don’t worry it take 24-48 hours because of account security after this time period you will be able to migrate.

After complete conversion, your page is ready to use. you can also enjoy your page from the existing account of also you can make your other account as admin by email adding at the admin panel.

Changes After Conversation To Page.

When you convert your Facebook profile to a Page, there are certain changes made to it. We feel to make you aware of those changes so you can manage your new page better. Keep them in mind before converting your profile into page as you will loose a lot of information.
These changes are :

  1. All your friends will become followers of your new page. IE. All friends will become users who have liked the page.
  2. The links to your Facebook profile will change to the links to your Facebook page. Anyone clicking on your name anywhere will now be directed to your Facebook page.
  3. Your Facebook page will have the same Name and profile picture of your Facebook profile.
  4. You will loose all the updates and photos that you uploaded from your profile. So make sure you have a backup.
  5. You will loose all your messages and conversations. Your inbox will now become page’s inbox.
  6. You will not be a member of groups that you once were.

How To Revert Back Page Into Profile?

Yes, It is possible to revert the page back into the profile. But only once, So if you migrate Facebook profile to page accidentally. Facebook provides a form to appeal to the reverse page back into the account. This form requires ID proof. Whose Name and D.O.B should match with profile which get converted. So if you are able to provide then you can appeal  here.
After appealing, if application get approved then your page will become normal profile automatically.

> Read Next: Add all friends to Facebook group By Single Click (How To)

In conclusion, we hope you guys learned something new and understand the concept to convert Facebook profile to page. If you have any doubt please let us know in comments, follow us on Twitter and Facebook for more news and updates.

source/ safetricks.com

neoAdviser

[td_block_11 category_id=”3″ limit=”1″ td_filter_default_txt=”” tdc_css=””][td_block_ad_box spot_id=”custom_ad_3″ tdc_css=””]
Convert Text Into Audio

How To Convert Text Into Audio Using Notepad

Everyone loves to hear what is written in a paragraph or in a document. This is the reason why audiobooks are getting popular nowadays. In this article, i will show how you can convert text into audio using the Notepad.

[td_block_ad_box spot_id=”custom_ad_2″ separator=””]

> Check out: How to Scan a Document Using Your Phone or Tablet – The Best way

Why Use Notepad?

Because it is the most commonly used text editor everyone uses. That’s the reason.

How To Convert Text Into Audio Using Notepad

  • STEP 1: Open Notepad. You can do this by searching for “Notepad” in the windows search Or Press “Win+R” and type “Notepad” and press “Enter”.
  • STEP 2: Now, copy the following program and paste it in Notepad–
Dim message, sapi
message=InputBox("Enter your text for conversion | #LLSINFO","Sound Testing #llsinfo")
Set sapi=CreateObject("sapi.spvoice")
sapi.Speak message
Notepad: Paste The Code
  • STEP 3: Now save the code that you have entered above. The code has to be saved in .vbs format. Example sound test.vbs or any other name that you desire and save it.
Save The File as .vbs
  • STEP 4: Now navigate yourself to the location where the code is stored. in my case it was stored on the desktop so i will just go to the desktop and check for it. You can see that the file we saved was in the Visual Studio Script (.vbs) format.
  • STEP 5: Now just “double click” on the saved file and “Enter the text” you want to hear in the text box. The moment you click “OK“. You can hear the text you entered as Audio.

> Check next: Convert a PDF File Into an Editable Text Document (How to)

So, that’s all about how to convert a Text into Audio simply by using Notepad. Hope you found this article useful. Feel free to comment your opinions down in the comments section below, follow us on Twitter and Facebook for more news and updates.

neoAdviser

[td_block_11 category_id=”3″ limit=”1″ td_filter_default_txt=””][td_block_ad_box spot_id=”custom_ad_3″ separator=””]
Windows 10 Tips & Tricks: Top Best Most Useful Features in Windows 10 (2020)

Windows 10 Tips & Tricks: Top Best Most Useful Features in Windows 10 (2020)

While Windows 10 may be the most convoluted operating system Microsoft has ever created it does include many handy features that are quite useful. So coming up i’ll show you more than 10+ tips, tricks and features that will help you get the most out of using Windows 10. Because there are many of you interested in this, we are going to include a mix of the newer features and some of the older classics that are still available for use with Windows 10. These top best 2020 Windows 10 tips and tricks will make your life a lot easier. I’m pretty sure you’re going to find something new here ’cause some of these are what I consider hidden features in Windows 10 and I have no clue about them for the longest time, but they made a big difference for me once i found out about them and started using.

> Check Out: How to Find Your Windows 10 Product Key (Using CMD & Windows Registry)

Windows 10 Tips & Tricks: Top Best Most Useful Features in Windows 10 (2020)

So, without going through to much talk, i will save your time and go right to it! So let’s get started with my tips for Windows 10 in 2020.

Tip #1. Clipboard History: Enjoy next level pasting with clipboard history

Windows 10 version 1809 has announced for the first time the new clipboard experience, so in order to use the new Clipboard History feature you will need to have Windows 10 version 1809 or greater. Although it came up with a new interface and some new features, its not really an complicated experience to use.

How to use Clipboard History feature on Windows 10

The new clipboard features uses the old experience that you already use. But instead of using CTRL + C to copy and CTRL + V shortcut to paste, now you will use the same CTRL + C shortcut to copy text multiple time and next you will use now Windows key + V shortcut to bring the new clipboard history. In this new interface you will find the lists of your copied items. So follow the steps below on how to do so:

  • Use CTRL + C shortcut several times to copy different text form your application
  • Open the document you want to paste it and this time click Windows key + V shortcut to open the clipboard history
  • In the new interface you will find the list of the above copied content
  • Select the content you want to paste

Isn’t that great? No more flipping back and forth between applications to copy and paste each bit separately and no more accidentally losing some copied text because you forgot to paste and copy something new over it. You can copy text, HTML and bitmaps up to four megabytes per item. You may have to activate clipboard history in the settings first, so here’s how to do so!

1. Enabling clipboard using a shortcut

The fasted way to activate clipboard history feature is by using a keyboard feature, so follow the steps:

  • Tap Windows key + V on keyboard
  • Click the Turn on button
Activate Clipboard History Feature
Activate Clipboard History Feature using shortcut

2. Enabling clipboard using Settings

To do so, in the Setting app, use the following steps:

  • Go to Settings.
  • Then click on System.
  • Next click on Clipboard.
  • Turn on the Clipboard history toggle switch.

From here you can tun ON or OFF the Clipboard History feature at any time.

Enable clipboard history using Settings

How to sync clipboard history on Windows 10

The other setting here, sync across devices allows you to share copied text across any of your windows devices as long as you’re signed in to the same Microsoft account. Anyway, for privacy reasons, this feature most be enabled and configured manually, here how to’s:

    • Go to Settings.
    • Next click on System.
    • Go to Clipboard.
    • Under “Sync across devices,” turn on the toggle switch.

Finally, select the automatic syncing option that you want:

  • Automatically sync text that I copy: Your clipboard history will sync to the cloud and across your devices.
  • Never automatically sync text that I copy: You must manually open the clipboard history and select the content you want to make available across devices.
Sync Clipboard history Windows 10

How to pin items in the clipboard history

One more great feature: Let’s say you have some items on your clipboard that you use frequently and you’d like to be able to reuse these even after rebooting your computer. No problem for clipboard history, you can pin these items. Here’s how to:

On the Clipboard History Interface:

  • Click the “ellipsis” next to the item
  • Next select pin.

They’ll still be there the next time you log in. The unpinned items on your clipboard history are cleared every time you restart your PC. Only those items you pinned are going to remain on the clipboard.

How to clear clipboard history on Windows 10

Latest, if you no longer need to use the Clipboard History feature, or is something does not work as expected, you can reset the history to see if the problem may be fixed, so here’s is how to:

  1. Click Settings.
  2. Go to System.
  3. next click on Clipboard.
  4. Under “Clear clipboard data,” click “Clear” button.
clear clipboard history

Once done, the clipboard content will be deleted form your device and Microsoft account, but Pinned item will still remain till you remove then manually. If you wish to just delete only one or two items, you can do it so by opening the Windows key + V interface and simply click the button on each of the content you want do delete. You can choose also Clear all button on the history interface to delete the list.

> Check Out: Top 5+ Best Free Screen Recorder For Windows 10

Tip #2. Sandbox: Stay safe by using Windows Sandbox feature

Sandbox is another exciting new feature that was introduced with the Windows 10 May 2019 Update (version 1903). It offers a separate testing environment to try out software or download apps from websites that you’re not so sure about. Sandbox is part of the Pro and Enterprise edition of Windows 10 so unfortunately it’s not available in Windows 10 Home. Also your processor and motherboard need to support virtualization. If the virtualization is supported but not enabled, check your motherboard manufacturer to find it out how to enable it. 

Sandbox is like a virtual PC that’s built right into your Operating System. This way you can run programs or access websites in a safe zone without affecting your system. Although you may be able to create virtual machines to reach the same experience, Windows Sandbox has some key benefits. By using it eliminates the steeps on downloading and creating virtual machines. Every time you run the Sandbox features, it will immediately create a new clean Windows 10 installation. Once the Windows Sandbox gets closed every thing gets wiped out automatically. Also an important thing is that everything happens inside the environment while being isolated from your main installation to offer maximum security.

Windows Sandbox system requirements

Before going through the steps on how to enable Windows Sandbox feature, make sure your device meet these minimum software and hardware requirements:

  • Windows 10 Pro (or Enterprise).
  • Hardware virtualization.
  • AMD64 architecture.
  • 2 processor cores minimum (4 cores with hyperthreading is recommended).
  • 4GB of RAM (8GB is recommended).
  • 1GB of HDD space (SSD is recommended)

How to check if virtualization is enabled

Hardware virtualization most be enabled in the BIOS of your system. Depending of your motherboard you may need to check if it supports it and how to enable.

To check is its enabled follow the steps below:

  • In the search bar type “CMD” end pres enter
  • Next in the CMD window type the following commandsysteminfo.exe
  • Check under the “Hyper-V Requirements” section, if “Virtualization Enabled In Firmware” reads Yes, then you can use Windows Sandbox.
check if virtualization is enabled

How to enable Windows Sandbox feature on Windows 10

Sandbox isn’t turned on by default, so you have to activate it first. Here’s how to:

  • On the windows search bar type “Turn Windows features on or off” and pres “Enter
  • In the pop-up window search for “Windows Sandbox” option
  • Check the “Windows Sandbox” and then click “OK” button
  • Click the Restart now button
enable Windows Sandbox

After completing above steps, you can start now using the new virtualization layer to install and test untrusted applications temporarily.

How to use Windows Sandbox feature on Windows 10

To start using the Windows Sandbox feature you have just activated is really easy, just follow the steps below:

  • In the windows search bar type “Windows Sandbox
  • In the search results at the top, right-click to “Windows Sandbox” and select “Run as administrator”
  • This will open the Sandbox window
  • Now at you main device, copy the app that you want to test it and than past it inside the Windows Sandbox experience
  • Click on the installer (.exe, .msi, etc) to execute the installation

You can safely now open it and check if everything is okay or use edge to check out some dodgy website you’re not sure about, to make sure it’s safe. When you’re done just close Sandbox an the X button and all the content there is going to be wiped out. So even if the Sandbox is compromised next time you start it up again, it’s going to give you a brand new box to play with, but be aware that Sandbox only gives you an Operating System with a browser, none of the other third party applications are going to be available in Sandbox.

So you can’t copy an office attachments that you received into the Sandbox and open it there because you won’t have Office in the Sandbox. You can install apps, but you’re going to have to install them again next time you open up a new Sandbox. Also keep note that you can’t drag and drop files form your Windows main installation to the Windows Sandbox interface.

So keep that in mind!

> Check Out: How To Partition A Hard Disk Without Formatting (Three Methods)

Tip #3. Virtual Desktop: Split your world using virtual desktop

So let’s say you’re working on a project and you have several apps open, then an appointment pops up reminding you that you need to join a video conference to present a status update. When you share your screen, you don’t want everyone to see all the other files you’re working on. And you don’t want to close them either because it’s going to take some time to get it all set up again, once you’re done with your phone call. The solution is to switch to another clean temporary workspace, which is also called a Virtual Desktop.

Virtual Desktop
Virtual Desktop Interface (Windows 10)

How to create a new virtual desktop in Windows 10

Windows 10 has made it really easy to use and setup virtual desktops. This is really a great and very useful feature to keep your unrelated and ongoing project organized or hide then from your boss quickly. So let find out how to use multiple desktops in Windows 10.

For creating a new virtual desktop you are just a few click away, or you can use simply a keyboard shortcut: Here’s how to:

  • Click “Task View” icon at your taskbar
  • Next, click “New Desktop” at the top-left corner of your screen.

Create a new virtual desktop Windows 10

That’s all! You can use also Ctrl + Windows key + D on your keyboard that it will create a new virtual desktop immediately.

How to switch between virtual desktops in Windows 10

You can use different ways to do so:

  • Click “Task View” on your taskbar icon
  • Click “Desktop 2″ or the other virtual desktops you have created

Switch between virtual desktops in Windows 10

There is also Ctrl + Windows key + Left and right arrow keyboard shortcut to switch between virtual desktops. If you use a device with touchpad you can do four-finger swipe left or right to switch between virtual desktops.

You can also do things like moving windows between virtual desktops by click and dragging then, duplicate virtual desktops by right-clicking on the active window and choose “Show this window on all desktops” to duplicate a single window, or select “Show windows from this app on all desktops” to duplicate all windows from one app.

Once you are done, you can close your virtual desktop by clicking “X” icon in the top-right corner, or simply use “Ctrl + Windows key + F4″ shortcut to close the virtual desktop you are currently viewing.

Tip #4. Quick Assist: Get remote Access using Quick Assist

Windows 10 Quick Assist feature is really useful when you need to help someone that has a PC problem. Windows 10 Quick Assist allows you to remotely access other Windows 10 PC form your own PC. It will give you full control so you can quickly help your friends, parents by doing your magic.

Quick Assist interface
Quick Assist interface: Windows 10

Things to know before allowing access:

This feature will give full control to other person’s PC, so you should use it with someone you trust. if you are the one giving assistance, you will need to use an Microsoft account to sign in. If you are the one receiving help, you don’t need to sign in to Microsoft account. Here’s how to use Windows 10 Quick Assist feature:

How to set up Windows 10 Quick Assist

If you are assisting someone:

  • At the “Search Bar“, type Quick Assist and hit Enter
  • Click Give assistance
  • Sign in to your Microsoft account by filling your email and password
  • Next you will get a “six-digit code” that you most give to the person you are helping out

If you’re getting help

Here’s how to get help form the other person:

  • At the search bar type “Quick Assist” and press “Enter”
  • Click “Get assistance” and type “six-digit code” you received for the person that is helping you
  • Click “Submit” and then click “Allow

Following the steps above, the person who is giving assistance to you will now have full access at your desktop.

> Check Out: How To Create WiFi Hotspot In Windows/Mac/Linux OS

Tip #5. Aero Shake: Minimize quickly using Aero Shake

With is another great Windows 10 tip that i use daily and for sure will help you saving a lot of time. Aero Shake is a fun little feature to quickly minimize opened windows. Just grab the window you want to keep by holding its title bar and starts shaking it a little bit. It’s going to minimize all other open windows. This way you can fully focus on the one open window.

Aero Shake
Aero Shake: Windows 10

If you did the shaking by mistake, just shake it again and they’re all going to come back. If you’re like me and always have countless windows open, this is much faster than minimizing each window one by one.

If you’re not a shaker and you like to use shortcuts, you can also use the shortcut
Windows + Home key. It will do the same thing.

> Check Out: Top 3 Best PS4 Emulators for Windows PC (2020 Edition)

Tip #6. Snip & Sketch: Capture your screen using Snip & Sketch

Another great Windows 10 tip you’re probably familiar with, but it’s just so useful that it has to be on this list .Snip & Sketch it’s a super handy screen capture tool. Sniffing sketch is the best screen capture tool ever to be included in any Microsoft operating system.

Snip & Sketch Windows 10 feature is the successor of the old Windows Snipping Tool. After the 1809 Windows 10 update, Snip & Sketch has updated with other features like copy a rectangle, a free-form area, or even the entire screen to the Clipboard and then save to reuse then.

How to Take a Screenshot Using Snip & Sketch Windows 10 Feature

Using Snip and Sketch feature to take a screenshot its pretty fast and easy. The fasted way to screenshot Windows 10 is by pressing Windows Key + Shift + S keyboard shortcut. After the Snipping Bar interface opens, just select a mode and snip it without opening Snip & Sketch Windows app.

Here’s how to open Snip & Sketch, take a screenshot, manage and edit it:

  • In Windows search bar type “Snip & Sketch” and press “Enter
  • From the pop-up window click “New” and choose from “Snip now” , “Snip in 3 seconds” or “Snip in 10 seconds” according to your need, after clicking the snipping bar will appear
  • Next select a mode between Window Snip, Fullscreen Snip, Rectangular Snip or Freeform Snip. 
  • Your snip it will appear at the Snip & Sketch window.
Snip & Sketch Interface

From this window you will have some features like Copy, to make a copy of the just created snip, Share, to share it with other others and also you can edit it through the different tools like a Pen, a Highlighter, and an Eraser provided on the app.

Tip #7. Split Screen: Look at multiple windows using split screen

If you often need to look at several windows on the same screen at the same time you can easily do that using Snap Assists. This feature works for any application.

Snap Assists Windows 10

How to Split Your Screen in Windows 10 With Snap Assist

There are different ways to do so but the most easiest is using Snap Assist. This feature should be enabled by default but if not enable it in Start > Settings > System > Multitasking > Snap Windows

With Snap Assist you can drag the windows to a side or corner of you screen and “snap” it there and this will make room for other app to be snapped in the empty screen space. Follow the steps to split you screen with Snap Assist:

  • Open two on more windows/apps
  • Grab one of the windows and drag it all the way over to the left side of the screen
  • Now let the mouse off and the windows will be snipped to the half of the left screen living half room to the right for your other programs/windows
  • Select now one other window/program to snap it to the right side
  • Now that you have two screen at the same window, you can drag the dividing line to resize then both simultaneously.
  • You can do the same to slip the screen on up to 4 windows by opening 4 different apps/windows and drag fist one of then at the top-right corner

You can do the same using by clicking on that windows with your mouse and use Win + left/right keyboard shortcut to decide the side of each window. Then use the arrow keys to move between other windows to choose the other one and press Enter.

Tip #8. Dictation: Use speech-to-text feature in Windows 10

Dictation has been around for a while in Windows and has improved quite a bit in any text field. This feature is available on Windows 10 Fall or greater. Using this feature, you can simply talk to your Windows OS to get it respond to your commands.

Here’s how to use Windows Dictation feature: 

  • Open the app on which you want to dictate text like Notepad, WordPad, Microsoft Word or your email software and type Windows + H keyboard shortcut to trigger the dictation.
Trigger Dictation
Trigger Dictation: How to use dictation in Windows
  • If the speech services is not enabled, a pop-up windows will appear, click on it and go to Settings > Privacy > Speech, inking & typing. Once there click “Turn on speech services and typing suggestions.”
Enable Speech Services
Enable Speech Services (How To use dictation in Windows)
  • With the speech services On, press again Windows + H on your keyboard and the e dictation window will pop-up and its now ready to listen.
Trigger the Dictation Feature

Now you can give your fingers a rest and use your voice to start dictating.

> Check Out: Windows 10 Themes/Skins: Top 15+ Best Windows 10 Themes

Tip #9. Pause Updates: Pause Windows 10 Automatic Updates to Avoid Critical Bugs

Microsoft says that updates are important four security patches, bug fixes and latest features. But there may be times you’re not ready to update, or you may have heard about issues with the latest updates causing problems for others, that of course would never happen with Windows 10. Thankfully, Windows 10 Home, Pro and Enterprise allows to pause updates for a specific time.

Here’s how to pause updates for a period (up to 35 days on Windows Professional) using Windows Update settings, or disable automatic updates permanently using Windows 10 Group Policy method.

Method 1: Pause updates via Windows 10 Settings

On all Windows 10 versions you can pause updates by using Windows Update settings. At Windows 10 Home you can pause updates for up to 7 days, while on Windows 10 Professional for up to 35 days.

So, follow the steps to pause updates on Windows 10:

  • On the start button click “Settings
  • Next click “Update & Security
  • There choose “Advanced Options
  • At the ‘Pause updates‘ section, form the drop-down menu select a date that you wish to pause the updates. After you reach your pause limit you’ll have to get a new update before being allowed to pause again.

Till the period is reached, Windows will no longer check for new updates.

Pause updates on Windows 10

Method 2: Pause updates permanently via Windows 10 Group Policy

Windows 10 Pro, unlike Windows 10 Home has a Group Policy editor that you may use to permanently disable automatic auto clicker updates. Here’s how to use the Group Policy editor to pause Windows Updates:

  • In the search bar type “gpedit.msc” and press “Enter
  • At the “Group Policy Editor” window navigate to this path: Computer Configuration\Administrative Templates\Windows Components\Windows Update
  • Under “Windows Update” section double click on “Configure Automatic Updates
Group Policy editor
Group Policy editor: Disable Windows Update
  • Set this policy to ‘Disabled‘, to disable automatic updates in Windows 10 at an unlimited period.
  • When done, click “Apply” and then “OK” to save the policy.
Policy interface
Policy interface

Windows 10 will no longer install updates automatically, but you can still use Windows Update to manually check for updates and install then. To enable the automatic updates, just set the policy to ‘Not Configured‘ again.

Tip #10. Slide To Shutdown: Enable Slide to Shutdown

Here’s a cool trick that uses a full-screen slide down to power off your computer. Here’s how you set it up on your desktop:

  • Right-click on the desktop and do the following New > Shortcut
  • In the pop up windows, paste the following code:
%windir%\System32\SlideToShutDown.exe
  • Click “Next“, then “Finish“. This will create a clickable icon which you may rename it.
  • To shut down you PC via slide-down, double-click at the icon to prompt a pull-down shade and then use your mouse to drag it to the bottom. Note that this is a shutdown, not a sleep.
SlideToShutDown Windows Feature

Tip #11. Nearby Sharing: Transfer files between PCs by using Nearby Sharing

If you’re familiar with Apple’s airdrop, Microsoft now has a similar feature called “nearby sharing” that will let you share content with other Windows 10 computers connected to your network or Bluetooth. This feature was first introduced with the Windows 10 April 2018 Update (version 1803) and you can use it to quickly send a  a document, photo, video, or presentation to other PCs in your room.

Nearby Sharing
Nearby Sharing

How to enable Nearby Sharing on Windows 10

Nearby sharing, Windows 10 feature should be enable by default after you have installed April 2018 Update. Anyway, to make sure this is enabled (or to disable it), you can do it in the Settings app. Here’s how to:

  • Open “Settings” and click on “System
  • Next click on “Shared experiences” and there turn on the “Nearby sharing” toggle switch
Enable Nearby sharing on Windows 10

From here you can “Enable” or “Disable” Nearby sharing feature on Windows 10. You can do the same using Action Center, (Ctrl + A) quick keyboard shortcut. If Nearby sharing button isn’t available there, you can add it quickly form the following: Settings > System > Notifications & actions, under “Quick actions,” click the Add or remove quick actions link, and then enable the button.

Now when you select share in Microsoft Word, and many other programs including photos, you should see nearby computers. The file you send (or receive) by default will be stored in the “Downloads” folder, but you may change this in the “Shared experiences” settings. Here’s how to:

Changing default transfer folder location

Follow the steps to easily specify another folder or any other drive for your transfer files:

  • On “Settings” click “System
  • Click “Shared experiences” and under “Nearby sharing,” using Save files I receive to option, click the “Change” button.
Nearby sharing: Change transfer folder location

Select your new location. Once done, the files will be saved to the new location.

I am text block. Click edit button to change this text. Lorem ipsum dolor sit amet, consectetur adipiscing elit. Ut elit tellus, luctus nec ullamcorper mattis, pulvinar dapibus leo.

> Check Out: How To Find Passwords of All Connected Wi-Fi Networks using CMD

Tip #12. Game Bar: Enable and open the Xbox Game Bar in Windows 10

For gamers, the Xbox Game bar on Windows 10 is one of the great features. It will give access to so-called Xbox DVR, which in other words it will let you record the screen or take screenshots of your games while playing. Here’s how to enable and use it:

How to enable the Xbox Game bar Feature in Windows 10

Windows 10 Game bar was introduced first with the Windows 10 Creators Update and was updated with the Windows 10 November 2019 Update with some new features. Xbox Game bar should be enabled by default, but if its not here’s how to:

  • In the “Start” menu click “Settings
  • Then go to “Gaming
  • At the left side of your screen, click “Game bar“, then enable the Record game clips, screenshots, and broadcast using Game bar switch.

From here you can also change the default Xbox Game bar keyboard shortcuts according to your needs.

Now to bring the Xbox Game bar in Windows 10 by default just type Win + G keyboard shortcut. If you are using an Xbox controller, push the Xbox button on it. You can launch the Xbox Game bar at anytime during gameplay. This is an interface on how it looks:

Xbox Game Bar Windows 10 Interface

Xbox Game bar widgets on Windows 10

This are some generous useful widgets you can expect form Xbox Game bar in Windows 10.

  • The main widget: Its located at the top by default. You can see here the time, enable or disable other widgets that are available, and also access the settings of the Game bar.
  • The Capture widget: It will give you the tools for recording and capturing screenshots of your gaming sessions.
  • The Audio widget: You can control different audio channels without leaving the game
  • The Performance widget: It shows information about the utilization of your resources like (CPU), graphics card (GPU), RAM (memory), and number of FPS (frames per second).
  • Xbox Social widget: Will let you to connect and chat with your friends, as long as they’re also on Windows 10 or Xbox.
  • Xbox Achievements: It will display your achievements as Xbox records them.
  • Looking for group widget: Will show other connected players to Microsoft’s Xbox service that are looking to join a gamers’ group.
  • Spotify widget: It will let you play your favorite music form the Spotify app without having to leave you game.

Tip #13. Ransomware Protection: Enable Ransomware Protection in Windows 10

Ransomware is a nasty malware that encrypts your data holding it hostage unless you pay a ransom. To help protect your computer, ransomware protection is now included with Windows Defender. Windows 10’s Ransomware Protection feature is composed of two components: Controlled Folder Access and Ransomware Data Recovery.

  • Controlled Folder Access: This will monitor the folders that you specify and block any changes to the files in that folder. This will block all programs, expect the ones you allow, for making any modifications to the files of the monitored folders and will protect that folders form being encrypted by ransomware.
  • Ransomware Data Recovery: It will sync automatically all you common data folders with your Microsoft OneDrive account to make a backup of your files. If you may ever become a Ransomware victim, you can use OneDrive to recover your files.

How to enable Ransomware Protection in Windows 10

In Windows 10 version 1903, Windows Defender’s Ransomware Protection by default is disabled, so you will need to enable it to be protected form ransomware attacks. Note that is you use a third-party antivirus software and Windows Defender’s real-time protection is disabled the Ransomware Protection features screen and the Controlled Folder Access feature won’t be accessible. Also to enable full Ransomware Protection on your Windows 10 PC both Controlled Folder Access and login to Microsoft OneDrive should be configured: Here’s how to:

  • On the search bar type “Windows Security” and press “Enter” (You may do the same by following Settings> Update & Security> Windows Security.)
  • On this window click “Virus & Threat Protection
  • Scroll down to “Ransomware Protection” and click “Manage ransomware protection
  • Toggle the “Controlled folder access” to enable it, and next login to OneDrive so that both features will be enabled as seen below.

Now you can configure Controlled Folder Access to choose which folder you want to monitor by choosing the “Protected folders” option and block malicious programs form accessing then. Clicking “Protected folders” will show you a list of folders currently being protected. You can choose to add additional folders by selecting the “+”, then “next” to add a protected folder and browse your computer for that folder.

Tip #14. God Mode: Enter to God Mode in Windows 10

If you’re a power user that has recently made the switch from an older Windows operating system, you might be happy to know that the easter-egg, known as “God Mode” is still available in Windows 10. It’s great for those people that want a massive amount of settings all within a single user interface. Here’s how to enable it:

How to enable God Mode on Windows 10

  • Create a New Folder in your desktop.
  • Rename the New folder to “GodMode.{ED7BA470-8E54-465E-825C-99712043E01C}
  • Once done the step 2, the folder name will automatically change to GodMode.
Enable God Mode aon Windows 10

If done correctly this folder will become an icon and when you open it you’ll now have the ultimate control, with more settings that you would probably ever need.

> Check Next: Create A Bootable Windows 10 USB Flash drive (Step By Step Guide)

That’s all for our top best Windows 10 Tips and Tricks. We will keep to update this article as soon as new cool features will be released. If you have a tip or trick for using Windows 10 you’d like to share, than let us know about it in the comments, follow us on twitter and facebook for more news and updates.

neoAdviser