How to Fix https://vshare.eu/pair Error on Kodi (3 Working Methods)

How to Fix https://vshare.eu/pair Error on Kodi (3 Working Methods)

VShare eu pair: in this article we will share all methods to fix vshare.eu pair error.Vshare.eu/pair is a very popular server.You can add this server on Your Kodi addons than you can watch any videos on Kodi without any issue using vshare.eu server.

Check out all 3 working methods to fix “vShare eu pair” error shared below.

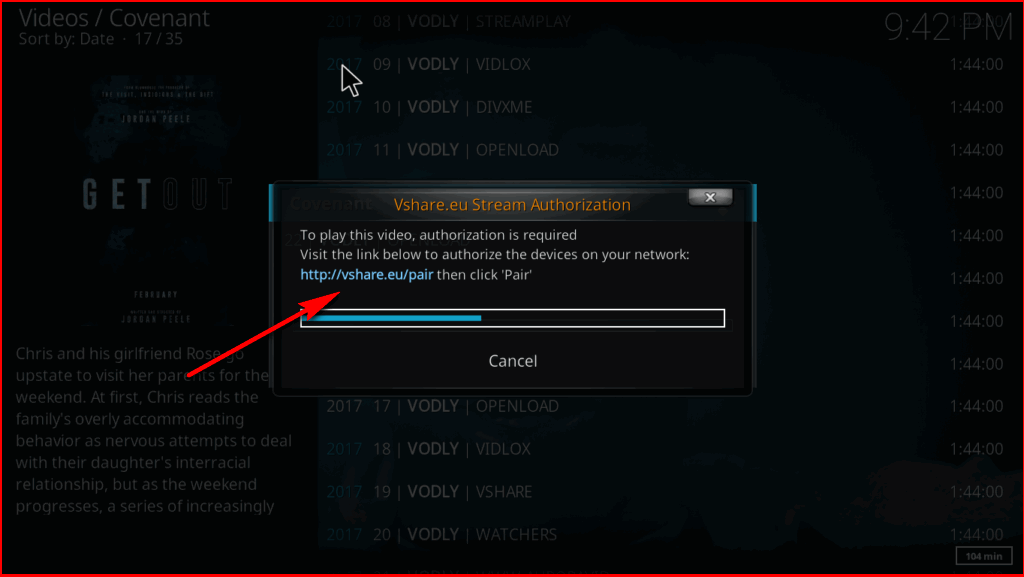
But What is https://vshare.eu/pair stream authorization?

vsahre.eu pair is a very popular video server with hundreds of movies and TV shows available.Also vsahre.eu is a cross-platform video sharing website which allow to users to upload videos and share it online.Developers started asking to pair your device with http://vshare.eu/pair to access the contents that are the best for you.

Many Kodi Addons like Exodus and Neptune Rising are using vshare.eu servers using Python and other scripting language codes.But when you click on streaming link offered by this server you will be asked to pair your IP address and you will see a message like http://vshare.eu/pair stream authorization.

> RelatedSteps to Install Kodi 17.1 Ares Wizard, and Get Pin using http://bit.ly/build_pin

Methods to fix vshare.eu/pair Error on Kodi

Below we are sharing 3 methods to solve vShare eu pair error on Kodi.You need to follow these methods to get rid of vshare.eu pair error. Follow steps by steps 3 methods listed below.

fix vshare.eu/pair Error on Kodi

Method #1: Fix Vshare.eu/pair Using Direct Authorization

Step 1: Open your Kodi Software.

Step 2: Tap on the video addon.

Step 3: Then, you watch movies and videos.

Step 4: If you get any kind of servers List like olpair and vShare eu pair.

Step 5: Select VShare eu/pair.

Step 6: After, will ask you or send the notification to play video stream authorization need.

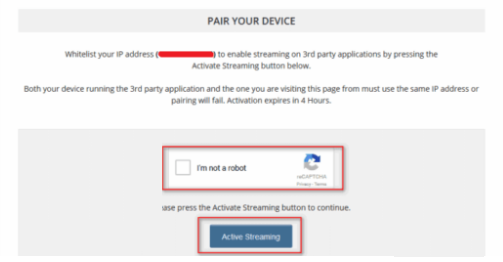
Step 7: Type URL https://vshare.eu/pair on the web.

Step 8: Then, Tap on Active streaming option.

So, the first method to fix vShare eu pair error after you watches your favorite videos up to 4 hours and after four hours you get new IP address and connect to vShare eu pair.

Method #2: Disable VShare eu Pair with Disabling Hosters with Captchas

Disable VShare eu Pair with Disabling Hosters with Captchas


Step 1: Open Kodi.

Step 2: After then you can see your favorite addon.

Step 3: Right click on it.

Step 4: Choose Settings.

Step 5: Select the Playback option.

Step 6: After, see Hosters with Captchas option to check whether it is disabled or not.

Step 7: After, disabled you must Disable the Hosters with Captchas option.

Step 8: Done.

Method #3: Disable VShare eu Pair Popup

Step 1: Start Kodi.

Step 2: Click on settings.

Step 3: After, Click on it.

Step 4: Convert the Settings Mode into Expert Mode.

Step 5: After, manage dependencies option (under Addons option).

Step 6: After, select the URL resolver.

Step 7: Then, select Configure.

Step 8: After, Different Hosters will appear on the screen.

Step 9: Then, select VShare eu and Disable it.

Step 10: Done.

> Read NextTinklepad Alternatives: Top Best Sites Like Tinklepad

Hope you will find helpful the above shared methods to fix https://vshare.eu/pair.If you have any question let us know in the comment section below,follow us on twitter and facebook for more news and updates.

neOadviser – HOW TO

Bootable USB flash drive using Rufus

How to make a Bootable USB flash drive using Rufus

To make a Bootable USB flash drive we will use a tool called Rufus. You can find other tools online but today, in the article below, we are going to use this tool to make a bootable USB flash drive. In these days the use of old media like DVDs, CD, etc. are not used anymore cos of the invention of removable disks like pendrives, memory cards. The main reason is the quality and efficiency of these new media. Using DVDs and CDs to make bootable media prevent that to reuse for other purposes, but with the new media like SD Cards or PenDrives this problem is solved. So, read the article below to know how to create bootable media using your USB.

[td_block_ad_box spot_id=”custom_ad_2″]

> Check Out: How to make “Flip Clock” as a Screensaver (Windows and MAC)

Steps to Create a Bootable USB Flash Drive using Rufus 

To make a Bootable USB flash drive we will use a tool called Rufus. You can find other tools online but today, in the article below, we are going to use this tool to make a bootable USB flash drive.

  • How to Create a Bootable USB using Rufus
    How to Create a Bootable USB using Rufus

    Download Rufus software: click here

  • Format the USB flash drive
  • Open Rufus software, select your removable disk(it will automatically detect)
  • Find the ISO image you want to make and select it
  • Finally, press ‘start’ to burn the ISO in your USB and make it bootable

> Read Next: How to Turn Your Windows 10 PC into a WiFi Hotspot

So that’s all about how to make a bootable UBS flash drive. Hope you found this article useful. Please let us know your thoughts in the comment section below, follow us on Twitter and Facebook for more news and updates.

neoAdviser

[td_block_11 category_id=”3″ limit=”1″ td_filter_default_txt=””][td_block_ad_box spot_id=”custom_ad_3″]
document

Build A Successful Business With These 7 Tricks

Build A Successful Business With These 7 Tricks


When it comes to starting your own business, you want to get off on the right foot so that your business can be a long term success. For many prospective entrepreneurs, they don’t lay down the right foundational parts of their business plan in the beginning, and then their business can face a lot of uphill challenges, and some never get past this and fail.


Therefore it’s important if you are a prospective entrepreneur or even a current entrepreneur that you follow some key tricks that could lead to a prosperous and effective business. So here are seven tricks needed to build a successful business.

1) Analyze the Competition


A lot of people like to start a business, not knowing the type of competition and the geographical spacing of competition, leading to an unexpected revenue below projections. It’s important when you do your preliminary research, that you understand who your competitors are in the industry, and space yourself in a way that you have not oversaturated an area. Look into how they do business, and figure out if there is a different way to do yours that might reduce your operational costs, or if there’s a sales tactic that might entice customers to try your business out.

Understand the Rewards and the Risks


Many people who go into business jump into the deep end per se with very little knowledge of how to swim in the business world. The reality is that the lifecycle of being an entrepreneur starts with a lot of work and not a lot of reward. The costs of a start-up are heavy, and you will likely have to burn the midnight oil until you can grow your brand enough that you can hire staff and you can reap the rewards of owning a business.


It’s important early on you are immaculate towards your customers, so that they will come back to you for future business as well as word of mouth to new clients.

3) Organization

It’s a concept that seems so simple, and yet so many entrepreneurs fail to hone in on the basic concept of organization. Have a clear business plan in place and identify clearly how much your business’s expenses will be and what your project revenue will be. Consistently creating task lists on a daily basis is imperative for effective workforce management. Make sure you utilize software programs for finances and orders as much as possible so offices are not full of paper. These are little things that make a business feel and appear professional.

4) Seek Out Opportunities to Distinguish Yourself


The last thing you want to do when you enter into a competitive business world is striving for normalcy. If you open a shop where you know you have competitors, trying to be like them will not pan out. Even if you deliver the same level of service, customers are not going to jump ship just because you are the new person in town. Find ways to offer discounts that don’t eat intensely into your profit margin.


Work on your people skills so people can build trust in you. Trying to do things differently makes you stand out and will bring in more clients than trying to mimic what someone else is doing.

5) Make a Habit of Strong Record Keeping


While it may seem like standard bureaucratic policy, strong record-keeping is crucial to surviving long term in the business industry. It’s important that you keep records of all activities in case of a lawsuit against an unruly client, or a potential audit for tax reasons. More importantly, if you had a client a few years ago and they come back to you for more business, it’s good to have a documented history so you can be informed on what you did for them and how to serve them even better this time.

6) Maintain a Consistent Business Model


While it’s important to adapt to any changes in culture or consumer behaviours, it’s really important that you find a business model that works for you and stick to it. Don’t try to change pricing too much unless market forces on supplies force you to. Don’t be trying to constantly lure clients in with sales and discount service, because all it might do is eat into profits and show a lack of stability in your business.


Ultimately being fair against the competition and putting out the best level of service you can is what will keep clients happy and loyal to your business.


7) Staying Focused


Perhaps the most important secret to being successful is to stay focused. The day to day of ownership can erode your passion and creativity and desire, so it’s critical you treat each day as a new opportunity and try to engage your staff as much as possible. This business is like your child, so give it the attention it needs so you can love it and cherish it as it blooms into a success.

Also check : https://www.neoadviser.com/how-to-run-a-successful-subscription-based-business/

Android smartphone as a webcam for your PC

How to use your Android smartphone as a webcam for your PC

Do you have a computer or laptop that you use to make calls on Skype but don’t have a quality webcam to use?

If you have an Android smartphone then you are lucky because you can use it as a webcam for your PC. All you need is an Android app, a program in Windows, and a few clicks. In this guide, we show you what steps you need to follow to transform your smartphone into a camera for a Windows computer.

If you are in the middle of a meeting doing a presentation, and at that time, you may need to share your screen but don’t have a webcam on your desktop or laptop, then you may use your Android phone as a webcam by following the steps below. It is better to use a phone as a webcam for your PC instead of buying a webcam.

[td_block_ad_box spot_id=”custom_ad_2″]

> Check Out: How To Partition A Hard Disk Without Formatting (Three Methods)

How to use your Android smartphone as a webcam for your PC

So if you are interested to turn your Android smartphone into a webcam for your Windows PC, follow the steps below on how to do so. Before going through the steps below, make sure first that your phone and Windows PC are connected at the same WIFI network.

Step 1: Download DroidCam Wireless Webcam on your smartphone

You must first download and install DroidCam Wireless Webcam on Android (you should have Android 5.0 or above). Just search the Play Store or click this link: DroidCam Wireless Webcam. On the Play Store page, click Install. Once the application is installed, switch to the Windows computer for the next step.

Step 2: Download DroidCam Client to Windows

On your Windows computer, open your favorite browser and visit this website: DroidCam Windows Client (You may download also on Linux, but not on macOS). Once opened you should see a large DroidCam Client v6.0 button. Click to download.

You will download a 1,525KB file in .exe format. A double-click will open a window with instructions for installing DroidCam Client on Windows. It’s simple and all you have to do with this guide is click Next. When the installation is complete, open the software in Windows.

Droidcam PC Interface

Step 3: Connect DroidCam Wireless Android Webcam with Windows DroidCam Client

  • Go to your Android smartphone and open the DroidCam Wireless Webcam app.
  • Click the “Next” button at the bottom of the screen.

The application will ask you for permission to use the camera and the application microphone. Normally you need them and you need to approve them. Now the app will open a new screen that shows the Wi-Fi network where you are connected and the IP address of the smartphone and the application gateway.

  • In this case, the IP is 192.168.50.4 and the gateway is 4747.
  • Go to the Windows computer and open the program.
  • In the IP Device set the smartphone IP which in our case is 192.168.50.4 and gate 4747.
  • Make sure you have checked the video option below and press Start.
  • And with that, your smartphone will behave like a webcam you can use in your Skype or Zoom calls.

Note: To choose between the front or the back camera, you must go to the Droidcam app then click the three-dot icon, then Settings > Camera and select it. We advise using the rear camera for better video quality.

If you followed the steps carefully, then start the video conference and choose Droidcam as your camera. The DroidCam client is only available for Windows and Linux and you cannot use it on macOS.

> Check Next: Google Chrome’s new Tab Groups: Here’s how to enable and use it!

That’s all! Hope you found this article useful on how to use your Android phone as a webcam for your Windows PC. Let us know your thoughts in the comments section below, follow us on Twitter and Facebook for more news and updates.

neoAdviser

[td_block_11 category_id=”3″ limit=”1″ td_filter_default_txt=””][td_block_ad_box spot_id=”custom_ad_3″]
Recognize an SMS Fraud

How to Recognize an SMS Fraud

As new communication technology constantly evolves, cases of fraud are also increasing. Many businesses use mobile phones to connect with customers and facilitate a variety of transactions. When a customer chooses to pay online or use a credit card, they receive a text message to authorize the payment. On the other hand, a business owner will also get a payment confirmation via an SMS message on their phone. However, the challenge is that fraudsters can tamper with this system and create fake SMSes confirming non-existing payments. The good news is that with the right application, it is possible to recognize such cases. As such, read on to learn how to recognize an SMS fraud.

[td_block_ad_box spot_id=”custom_ad_2″ tdc_css=””]

Type of Phone Number

You can check the number of digits on the phone number that sends you suspicious texts to verify if they are scams. Legitimate phone numbers usually have 10 digits or less while marketing messages usually consist of a shortcode with six digits. You should be concerned if you receive a text from a number with more than 10 digits. Apart from that, you need to check if the message is relevant to you.  

Choose a Reliable App

Smart technology also comes with new apps that consist of advanced security features. You can integrate text phone verification service in your business with a special app that can help you verify the authenticity of the SMSes that you receive from different clients. This type of app helps to notify customers, confirm transactions, while at the same time preventing fraud. You can also use the app to send SMS pin codes as well as a one-time pin (OTP) to verify phone numbers. It also helps confirm account logins to keep scammers at bay. This app can only be accessed by the authorized account holder which makes it difficult for scammers to steal from your account using text scams. 

Request for Information About Your Account

Scammers use many tricks such as sending fake messages about your bank account. For instance, they can send you a text message saying they have observed something fishy on your account or notify you that your account has a problem. You can also receive a text with a fake invoice and once you respond, they steal your information. No bank will ever send this kind of text, so you should be wary about any suspicious messages. Scammers will ask you to provide personal details to claim a gift and they will only steal this information before vanishing into thin air. 

Scammers can also trick you into providing personal information by promising gift cards, coupons as well as free prizes. They can also promise to give you a low-interest credit card then, later on, ask you to provide your account number or password. Once you provide the information, they can use it to access your bank account or email. They can also sell your details to other scammers. Therefore, you should be wary of people who offer you generous deals that are too good to believe. 

Text Refund

The other trick comes as a text refund informing you that you have been overcharged after buying something. Many people can be easily tempted to respond but this will be a big scam. If you send bank details in the hopes that the scammers will deposit the refund, then you would have sold out important information. You should never send your banking details to anyone via a text message.

Family Issues

Other scammers will use the trick of sending messages to unsuspecting people informing them about family problems. If you are the recipient, you are likely to fall for the trick thinking that your loved one is in danger, therefore, you send money as requested. You need to verify the authenticity of the text before sending any money since this can be a fraud. If the text mentions the name of someone you might know, try to reach out to the person directly before you send money. It is a good idea to contact the authorities before you send cash to unknown people. 

With new information and communication technology, the chances of potential scams are also on the rise. Spam texts are a new form of fraud that some people easily fall for. The goal of these scam texts is to steal your personal information, or even money. However, there are certain measures that you can take to recognize SMS fraud. Generous deals offered through text messages are suspicious and you should not easily fall for them. You should also make it a policy to avoid any text that calls you to action; texts that ask you for personal information such as banking details should always be discarded. If you are operating a business, you can use an app that can help you verify phone numbers to avoid falling victim to these frauds. 

[td_block_ad_box spot_id=”custom_ad_3″ tdc_css=””][td_block_11 category_id=”3″ limit=”1″ td_filter_default_txt=”” tdc_css=””]
equip emotes in COD Mobile-

How to equip emotes in COD Mobile?

There has been a significant increase in the number of COD Mobile players after the Season 9 update, as the developers have completely redesigned the game, bringing many new features to it. Call of Duty is a well-known gaming series, while has also its mobile version, COD Mobile, which has become quite popular among gaming fans and features to modes, Multiplayer and battle royale.

[td_block_ad_box spot_id=”custom_ad_2″]

Emotes are prevalent in many games and COD Mobile is not an exception. The game has a variety of emotes, which players can get from the store through crates or events within the game. From exclusive bundles, skins even emotes can also be obtained in COD Mobile. The game includes a variety of emotes that can be used in both Multiplayer and battle royale mode and usually are used by players to show their dominance over other opponents. Anyway, for those who do not know how to equip these emotes, you have come to the right article.

HOW TO EQUIP EMOTES IN COD MOBILE?

Follow the steps below to create equip emotes in COD Mobile:

  • Step1: Open COD Mobile and click at the ‘Loadout‘ icon at the bottom of the main menu.
  • Step 2: Once you open Loadout, click the ‘Customization’ button.
  • Step 3: After that the emotes you have available will appear on the screen.
  • Step 4: Click the Equip button, once you have selected the emote you want.
Loadout Customization interface in Call of Duty Mobile

How to use emotes in COD Mobile?

To use emotes in COD Mobile, follow the steps given below:

  • Step 1: While in the game, click the ‘Thumbs-up’ icon present beside the settings button.
  • Step 2: When the emote loadout opens up, click the desired emote
  • Step 3: Now the character will perform the emote

> Check next: How to get god mode in GTA 5?

So simple. Keep in mind that this article, while it may seem unnecessary to a part that often plays the game, is aimed at beginners. We can all get confused sometimes. So what do you think about this? Let us know your thoughts in the comments section below, follow us on Twitter and Facebook for more news and updates.

neoAdviser

[td_block_ad_box spot_id=”custom_ad_3″ tdc_css=””][td_block_11 category_id=”3″ limit=”1″ td_filter_default_txt=”” tdc_css=””]
Bulk Delete Facebook posts

How to bulk delete your old Facebook posts

The social network Facebook has become a daily part of many people for some time now and most likely most of them have so far made “tons” of posts. For those who find the old posts inappropriate now, they may delete them one by one and this process can be very lengthy and tedious. Fortunately, Facebook now lets you delete or archive than in bulk. Facebook seems to have realized that most people want to bulk delete old posts and has recently launched a new feature that allows its users to delete multiple posts in bulk. Here’s the how-to guide to delete a piece of Facebook history in bulk through a very simple process.

[td_block_ad_box spot_id=”custom_ad_2″]

> Check out: The best way to post panoramic photos on Instagram

How to delete your old Facebook posts in bulk

Before starting, keep in mind that the bulk delete/archive feature at the time writing the article is only available on Facebook’s mobile apps (Android, iOS, and Lite). So make sure you are following this guide through the Facebook mobile app.

  • Log in to the Facebook app on your phone;
  • Go to profile and click the three dots to enter the menu;
  • Click on Activity Log> Manage Activity> Select “Your Posts”;
Activity Log Facebook
  • Click the small box next to your posts to archive or delete posts;
  • Click the “Trash” or “Archive” accordingly.
Archive/Delete Bulk Posts Facebook

Facebook saves the deleted posts in the recycle bin for 30 days before they are permanently deleted in case a post is deleted by mistake. The archived/deleted posts will show up at Your Posts section.

> Check next: How to automatically delete your location, search and web history from Google

So, that’s all about how to bulk delete your old posts on Facebook. It’s a bit disappointing that the bulk delete post option is not available on the Facebook desktop site. Hope you found this article useful. Feel free to comment your opinions down in the comments section belowfollow us on Twitter and Facebook for more news and updates.

neoAdviser

god mode GTA V

How to get god mode in GTA 5?

How to access God Mode?

The GTA franchise has had a long history with cheat codes and a tradition that Rockstar still upholds in its games. Not many games as big as GTA today allow players to have cheat codes in order to make the game easier, or just more interesting. Players have used game hacks and cheat codes in GTA games since the beginning, even GTA V has some fun cheat codes.

> Check next: Top 3 Best Offline Games Like GTA

Access God Mode on GTA 5

God Mode, as it has become known, is a cheat code available at all games, including the GTA franchise. However, the game allows God Mode to be activated for only 5 minutes.

  • Xbox 360 / Xbox One: Right, A, Right, Left, Right, RB, Right, Left, A, Y.
  • PS3 / PS4: Right, X, Right, Left, Right, R1, Right, Left, X, Triangle.
  • PC: PAINKILLER.
  • Cell Phone: 1-999-724-654-5537.

This cheat code allows the player to make their character unbreakable and reduce damage in GTA V. However, it can only be activated for 5 minutes, and players must re-code for this cheat after a while. When the code is entered, the player is essentially invincible and can cause immortal amounts of chaos. God Mode has always been one of the most popular cheats in all types of games.

Previously, the GTA franchise allowed players to enter cheat codes on the PC in the game or in the Pause menu, simply by pressing it. However, cheat codes must be entered on the console when playing GTA V. To bring the console during the game, press the “~” Key on your keyboard while playing the game. This will bring up the console that can be used to enter cheat codes.

sources (1,)

> Check next: How to use emotes in GTA Online

So what do you think about this? Let us know your thoughts in the comments section below, follow us on Twitter and Facebook for more news and updates.

neoAdviser

Google People Card

Now you can add your own details on Google Search: Here’s how to!

People Cards will help you build up your online presence, but for now, it is offered only in India

When searching for a celebrity in Google Search, in addition to various links, a module with information and data about him will also be displayed. To enable this Google takes data from trusted sources and compiles the character card.

[td_block_ad_box spot_id=”custom_ad_2″]

And if you search for your name, if you like the rest of us are not famous, all that appears are the links of your social networks, someone with a name similar to yours and some embarrassing video that you posted on YouTube when you were 10 years old and now you have forgotten the code.

The above module, like that for the celebs, Google will soon make it available to general people as well. Starting today, the company has launched “People Card“, a type of digital business card, where every time you or someone else searches, a module with data and direct links to social networks or websites related to you will also appear. This module may include name, job, residence, address, telephone number, email, etc.

Source of information? You yourself.

You just need to have a Google address and then you can compile the form with all the data you want to share. You will be asked for a phone number to verify it, and if you change your mind you can delete it at any time.

Steps to create People Card on Google

  • Step #1: First sign-in to your Google Account
  • Step #2: Next search for “Add Me To Search
  • Step #3: Next click “Add yourself to Google Search
  • Step #4: Put your phone number to complete the verification process
  • Step #5: Enter 6-digit Unique Code
  • Step #6: Then build your profile on People Card by adding your Location, choosing the image, adding a description of yourself, adding links of your websites or social media profiles, and email addresses, if any.
  • Step #7: Click on Save
  • Step #8: Finally search for your profile name on Google Search to see all the shared information displayed on Google

Do you think this is finally the Google’s solution to take a piece from the huge social media market? We need to wait for a global launch, for now it remains to see how it will go in India.

> Check next: How to Play Call Of Duty Mobile on your PC

So what do you think about this People Cards feature? Let us know your thoughts in the comment section below, follow us on Twitter and Facebook for more news and updates.

neoAdviser

[td_block_11 category_id=”3″ limit=”1″ td_filter_default_txt=””][td_block_ad_box spot_id=”custom_ad_3″]
play Call Of Duty Mobile on your PC

How to Play Call Of Duty Mobile on your PC

You can also play Call Of Duty Mobile on your PC

Not everyone has a smartphone in which you can play Call Of Duty Mobile as it is one of the mobile games which requires a device with high specs. But do not worry because if you have a PC which has the right specifications to handle Call of Duty Mobile, you can play it on your PC without any problems.

[td_block_ad_box spot_id=”custom_ad_2″]

> Check out: How to play PUBG Mobile on your PC

The PC requirements to play Call Of Duty Mobile:

  • OS: Windows 7/8.1/10
  • CPU: AMD/Intel CPU 4 core @3Ghz
  • RAM: 8GB
  • Storage: 5GB (may be larger depending on the software/games you use)
  • GPU: AMD/Intel/Nvidia 1.5 GB dedicated

You must also enable Virtualization. To enable Virtualization follow this tutorial.

To be able to play Call Of Duty Mobile on your PC you will need an Android Emulator. The Android Emulator that can give you the best performance, in this case, is Gameloop which is the official emulator of Call Of Duty Mobile and which you can download here.

  • Once you have downloaded and installed Gameloop, open it and wait for it to launch.
  • Then download Call Of Duty Mobile directly from Gameloop.
  • While Call Of Duty Mobile is downloading, go to settings, and set them according to the image below.
Gameloop COD Mobile Settings
  • Once Call Of Duty Mobile is downloaded and installed login to the game, go to settings and set the settings according to the image below.
COD Mobile Settings
COD Mobile Settings

Once you have done all this you can play Call Of Duty Mobile on your PC and smoothly. It should also be noted that by playing Call Of Duty Mobile on PC, you will be accessing the servers of this game for Android Emulator, and most of the time you will be playing against other people who are also using an emulator.

> Check next: Top 3 Best Offline Games Like GTA

So here’s how to play Call Of Duty Mobile on your PC. Hope you found this article useful! Please let us know in the comment section below, follow us on Twitter and Facebook for more news and updates.

neoAdviser

[td_block_11 category_id=”3″ limit=”1″ td_filter_default_txt=”” tdc_css=””][td_block_ad_box spot_id=”custom_ad_3″ tdc_css=””]